Notice
Recent Posts
Recent Comments
Link
| 일 | 월 | 화 | 수 | 목 | 금 | 토 |
|---|---|---|---|---|---|---|
| 1 | 2 | 3 | 4 | 5 | 6 | 7 |
| 8 | 9 | 10 | 11 | 12 | 13 | 14 |
| 15 | 16 | 17 | 18 | 19 | 20 | 21 |
| 22 | 23 | 24 | 25 | 26 | 27 | 28 |
Tags
- uitableview
- MVVM
- tableView
- swift documentation
- swiftUI
- combine
- Xcode
- Human interface guide
- 클린 코드
- 애니메이션
- collectionview
- map
- Observable
- rxswift
- RxCocoa
- 스위프트
- SWIFT
- ribs
- Refactoring
- Clean Code
- UITextView
- scrollview
- 리펙토링
- 리팩토링
- UICollectionView
- uiscrollview
- Protocol
- ios
- HIG
- clean architecture
Archives
- Today
- Total
김종권의 iOS 앱 개발 알아가기
[iOS - Swift] 2. Kingfisher 프레임워크 (이미지 캐싱, 이미지 로드) - .processor, progressiveJPEG 옵션, UIScreen.main.scale 사용 본문
iOS framework
[iOS - Swift] 2. Kingfisher 프레임워크 (이미지 캐싱, 이미지 로드) - .processor, progressiveJPEG 옵션, UIScreen.main.scale 사용
jake-kim 2022. 9. 7. 01:151. Kingfisher 프레임워크 (이미지 캐싱, 이미지 로드) - 사용 방법
2. Kingfisher 프레임워크 (이미지 캐싱, 이미지 로드) - .processor, progressiveJPEG 옵션
.processor 옵션
- URL로부터 이미지를 불러올때 보통 down sampling이라는 것을 통하여 이미지 그대로 불러오는게 아닌, 필요한 사이즈만큼 샘플링해서 가져오는데, 이때 이 기능을 사용하는 옵션
- down sampling할때 얼마만의 크기가 필요한지 알아야하는데, 아이폰은 기기의 해상도별 픽셀의 수가 다르므로 UIScreen.main.scale을 이용
- ex) UIScreen.main.scale값 - iPhone7은 2.0, iPhone 13 Pro는 3.0
ex) 예제 코드
- imageURLString을 입력하면 kingfisher를 통해 이미지를 로딩하도록 구현
- 아래 downsamplingImageProcessor 인스턴스를 구현할 것
// ViewController.swift

private var imageURLString: String? {
  didSet {
    guard self.imageURLString != oldValue else { return }
    self.thumbnailImageView.kf.cancelDownloadTask()
    self.thumbnailImageView.kf.setImage(
      with: self.imageURLString?.percentEncodedUrl,
      placeholder: nil,
      options: [
        .processor(self.downsamplingImageProcessor)
      ]
    )
  }
}- DownsamplingImageProcessor은 Kingfisher에 있는 인스턴스
- size를 넣어서 쉽게 생성
// Kingfisher.swift
public struct DownsamplingImageProcessor: ImageProcessor {
  public init(size: CGSize) {...}
...
}- size에 들어갈 값은, UIImageView의 size에 UIScreen.main.scale값을 곱한 것
  // MARK: Constants
  private enum Const {
    static let thumbnailSize = CGSize(width: 300, height: 500)
  }

  // MARK: Properties
  private let downsamplingImageProcessor = DownsamplingImageProcessor(
    size: Const.thumbnailSize * UIScreen.main.scale
  )
.progressiveJPEG 옵션
- 이미지를 로드하는 방식
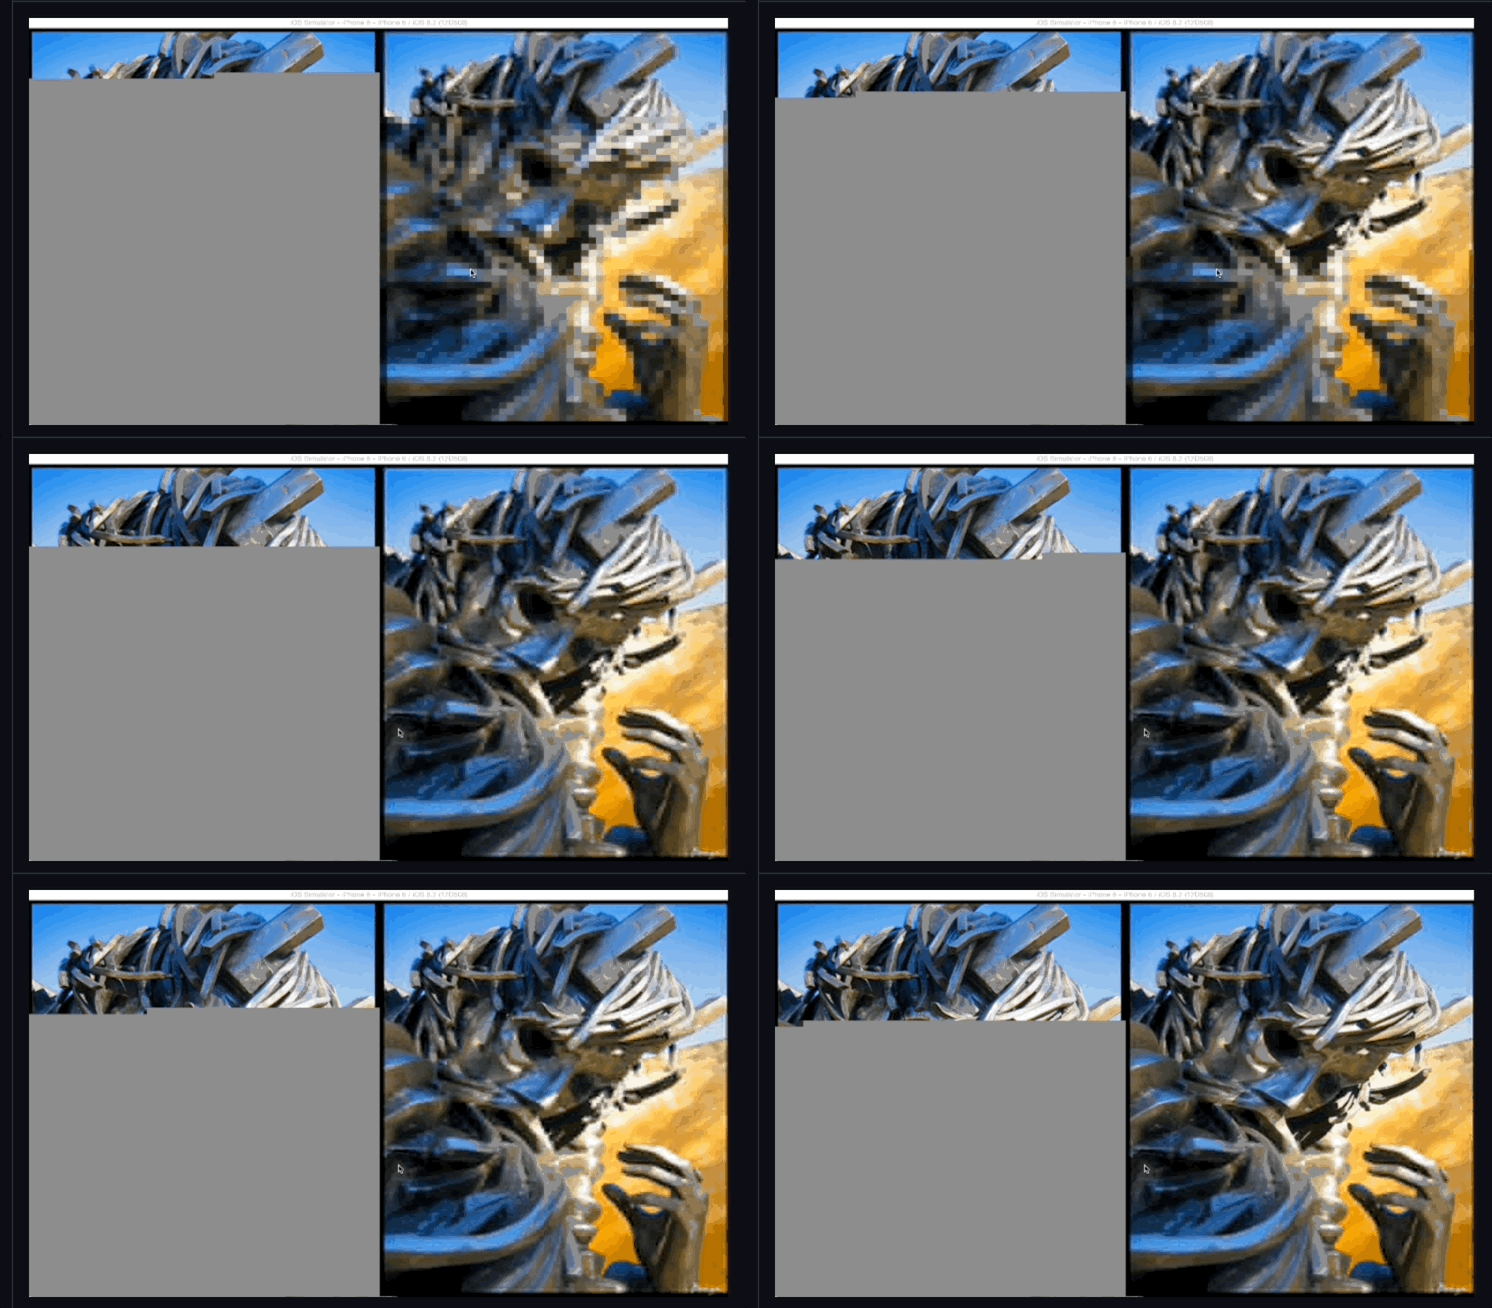
- 왼쪽: 일반적인 로딩 (이미지가 부자연스럽게 뜨는 형태)
- 오른쪽: progressiveJPEG 옵션을 적용한 상태 (이미지가 흐렸다가 서서히 밝아지는 모습)

- 이것도 역시 kingfisher의 setImage에 options 파라미터에 넣으면 쉽게 생성이 가능
- isBlur: 블러처리 효과이며, 블러처리 없이하려면 false 입력
- isFatestScan: scan을 빠르게할것인지 입력
- scanInterval: scan의 속도 입력
  private var imageURLString: String? {
    didSet {
      guard self.imageURLString != oldValue else { return }
      self.thumbnailImageView.kf.cancelDownloadTask()
      self.thumbnailImageView.kf.setImage(
        with: self.imageURLString?.percentEncodedUrl,
        placeholder: nil,
        options: [
          .processor(self.downsamplingImageProcessor),
          .progressiveJPEG(.init(isBlur: false, isFastestScan: true, scanInterval: 0.1)) // <-
        ]
      )
    }
  }
* 전체 코드: https://github.com/JK0369/ExScale
* 참고
'iOS framework' 카테고리의 다른 글
Comments


