Notice
Recent Posts
Recent Comments
Link
| 일 | 월 | 화 | 수 | 목 | 금 | 토 |
|---|---|---|---|---|---|---|
| 1 | 2 | 3 | 4 | 5 | 6 | 7 |
| 8 | 9 | 10 | 11 | 12 | 13 | 14 |
| 15 | 16 | 17 | 18 | 19 | 20 | 21 |
| 22 | 23 | 24 | 25 | 26 | 27 | 28 |
Tags
- uiscrollview
- ios
- Protocol
- 애니메이션
- clean architecture
- MVVM
- 스위프트
- Xcode
- map
- Refactoring
- 클린 코드
- rxswift
- uitableview
- Clean Code
- HIG
- swiftUI
- Human interface guide
- RxCocoa
- UITextView
- 리팩토링
- ribs
- collectionview
- 리펙토링
- tableView
- scrollview
- combine
- Observable
- SWIFT
- UICollectionView
- swift documentation
Archives
- Today
- Total
김종권의 iOS 앱 개발 알아가기
[iOS - SwiftUI] 1. 위젯 Widget 사용 방법 개념 (WidgetKit, WidgetFamily) 본문
iOS 응용 (SwiftUI)
[iOS - SwiftUI] 1. 위젯 Widget 사용 방법 개념 (WidgetKit, WidgetFamily)
jake-kim 2022. 10. 1. 23:471. 위젯 Widget 사용 방법 - WidgetKit, WidgetFamily
2. 위젯 Widget 사용 방법 - API 데이터 로드와 위젯UI 업데이트
3. 위젯 Widget 사용 방법 - 위젯 딥링크 구현 방법 (widgetURL)
4. 위젯 Widget 사용 방법 - 위젯 이미지 로드 방법
5. 위젯 Widget 사용 방법 - Provisioning Profile 등록 (WidgetExtension)
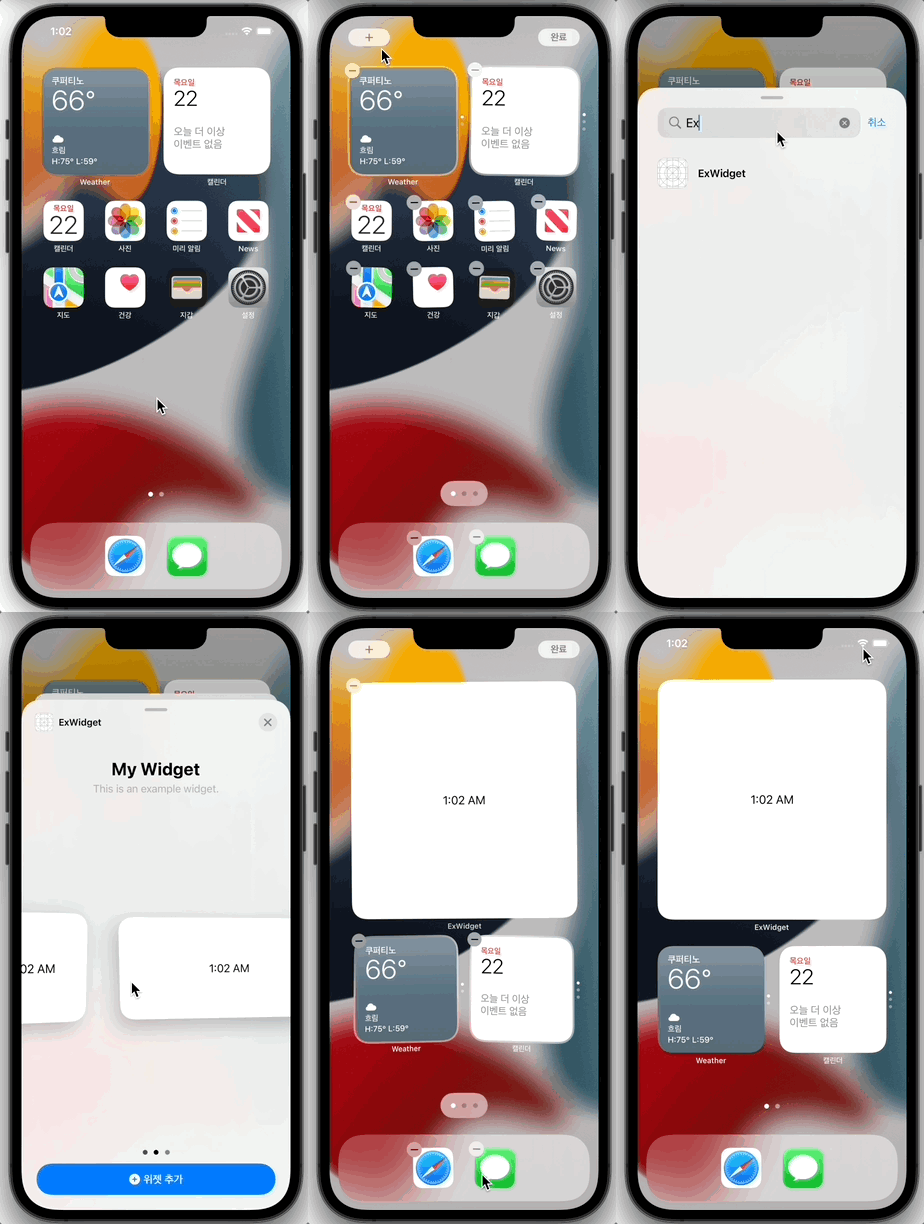
Widget 사용 방법
- Minimum Deployment Target: iOS 14+
- Apple에서는 매우 편리하게 Widget을 사용할 수 있도록 구현
- Xcode -> File -> Target
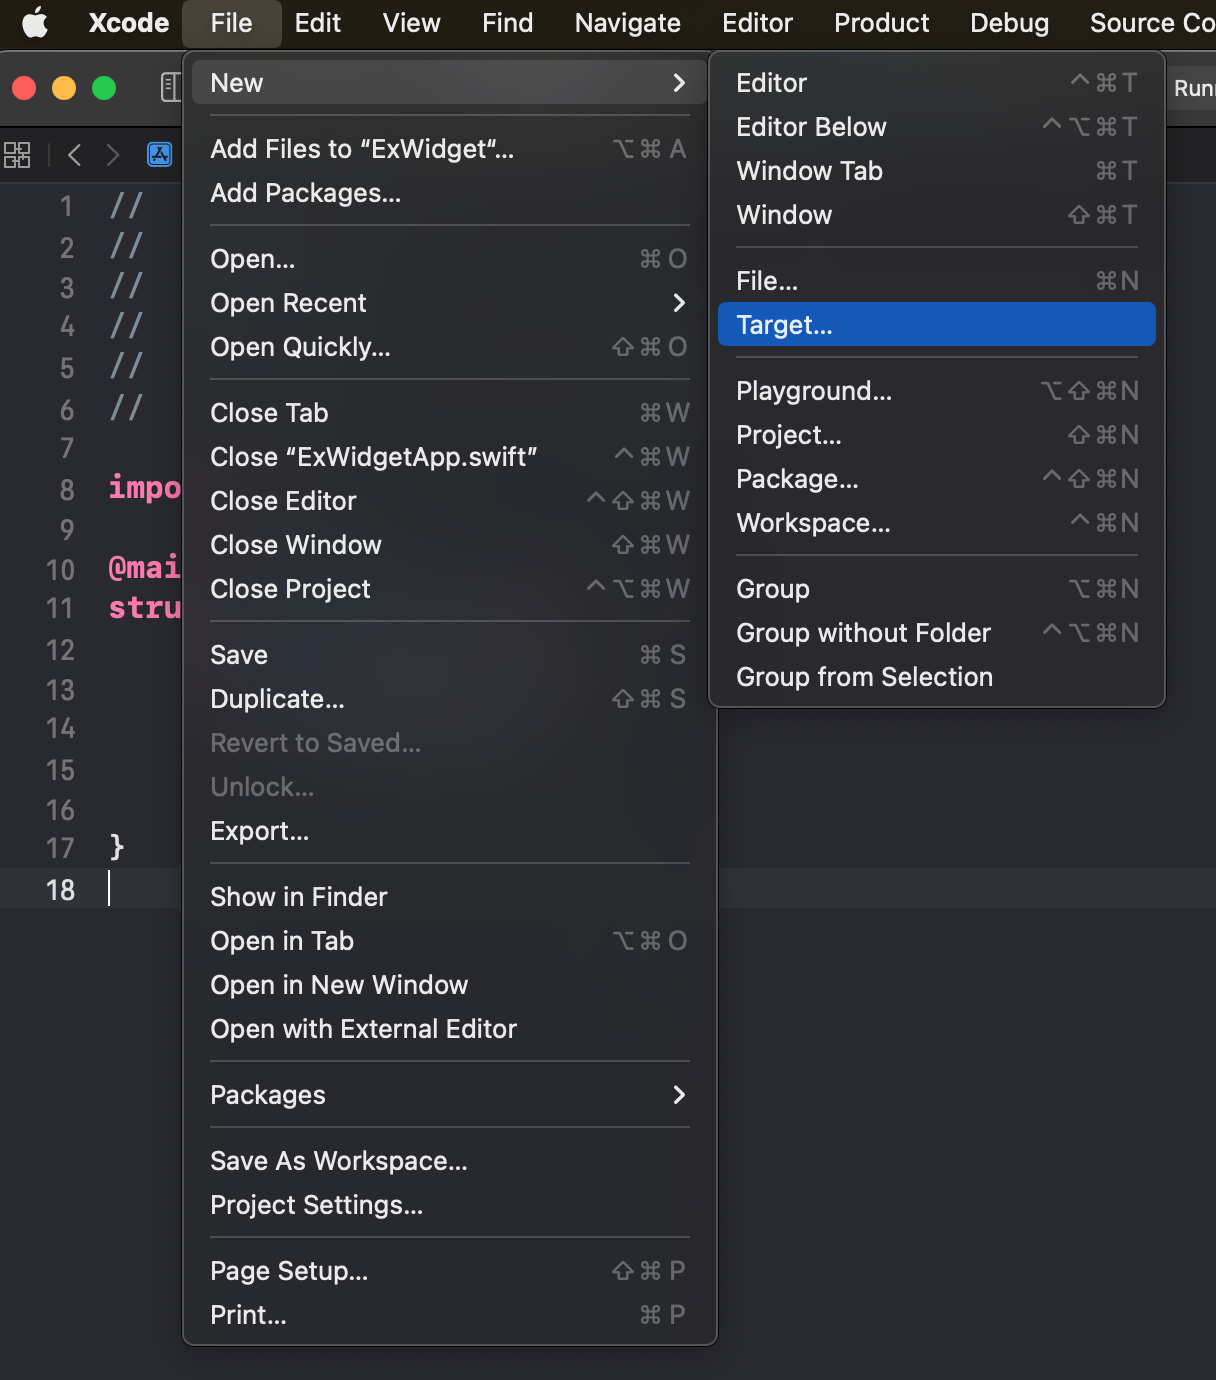
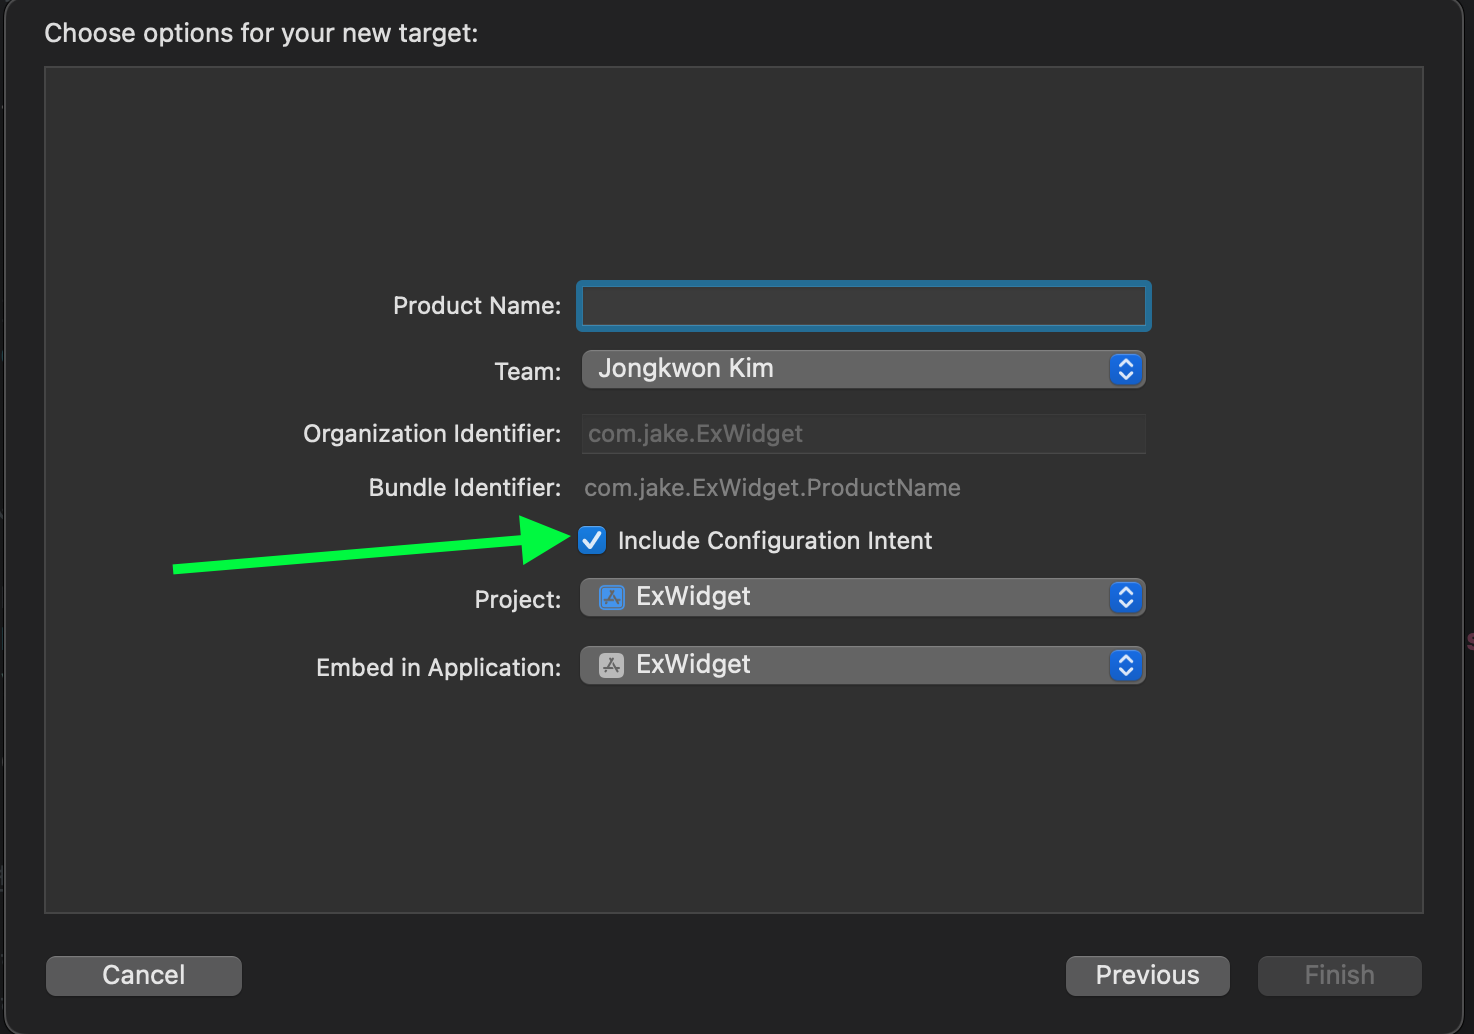
- Widget Extension > Next > 이름 입력 후 Finish

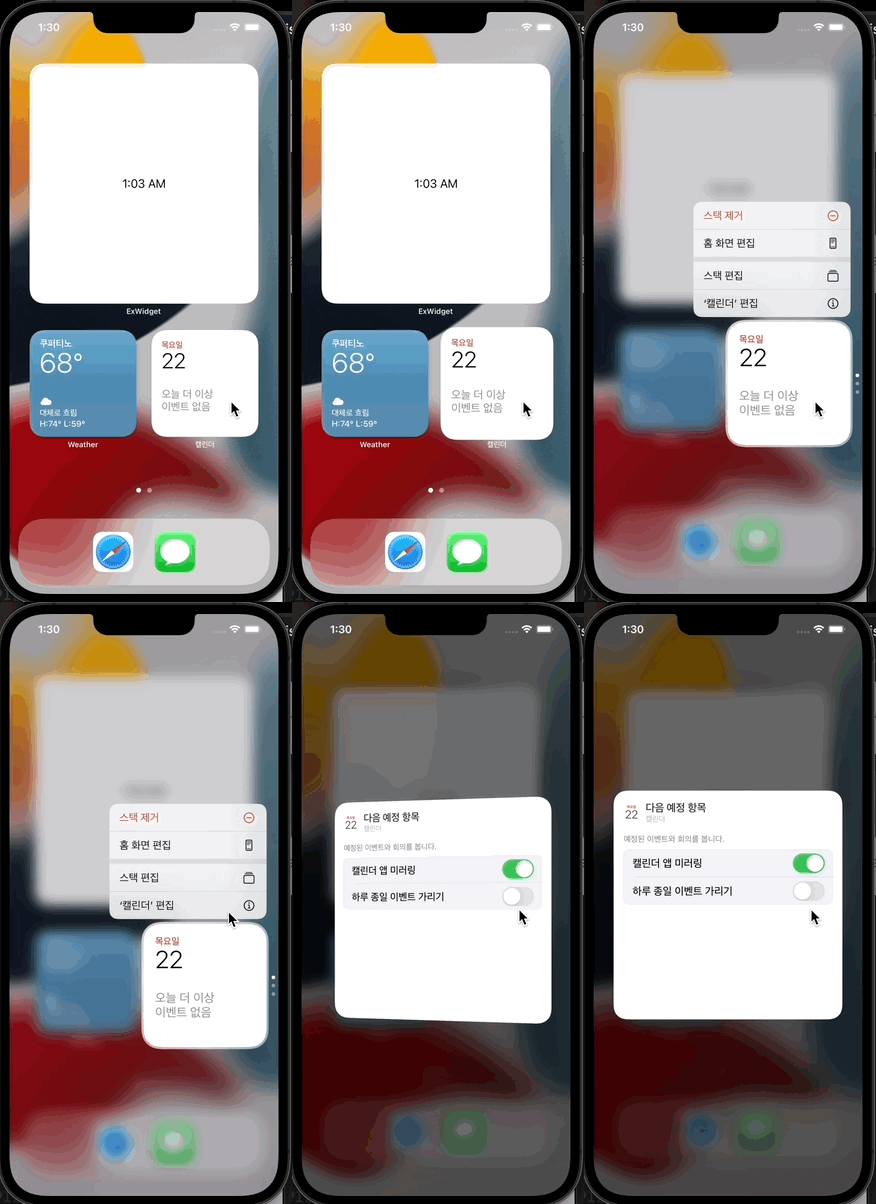
cf) Include Configuration Intent 의미: 활성화하면 사용자가 위젯 편집이 가능
* 캘린더 앱 위젯 편집 화면
- Active "..." scheme? > Activate 선택
- (스킴에 추가할 것인지 묻는 것)

- 좌측 Navigator에는 MyWidget 프로젝트 생성

- MyWidget.swift 파일을 열어서 preview도 바로 확인 가능

Widget 파일
- 위에서 입력한 MyWidget 이름으로 파일들이 생성
- MyWidget.swift 오픈
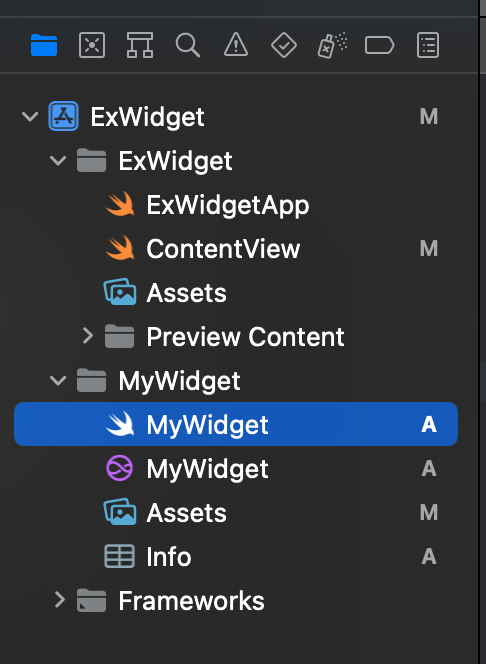
- 이 내부 코드를 보면 struct가 여러가지 존재
- Provider
- SimpleEntry
- MyWidgetEntryView
- @main MyWidget
- @main인 MyWidget 부터 확인
- kind는 위젯에서 타임라인을 리로드할때 사용
@main
struct MyWidget: Widget {
  let kind: String = "MyWidget"

  // body 안에 사용하는 Configuration
    // IntentConfiguration: 사용자가 위젯에서 Edit을 통해 위젯에 보여지는 내용 변경이 가능
    // StaticConfiguration: 사용자가 변경 불가능한 정적 데이터 표출
  var body: some WidgetConfiguration {
    IntentConfiguration(
      kind: kind, // 위젯의 ID
      intent: ConfigurationIntent.self, // 사용자가 설정하는 컨피그
      provider: Provider() // 위젯 생성자 (타이밍 설정도 가능)
    ) { entry in
      // 위젯에 표출될 뷰
      MyWidgetEntryView(entry: entry)
    }
    .configurationDisplayName("My Widget")
    .description("This is an example widget.")
  }
}- configurationDisplayName과 discription은 아래 화면처럼 표출

- struct SimpleEntry의 정체
- *TimelineEntry를 준수하는 구조체
- *TimelineEntry: 위젯을 표시할 Date를 정하고, 그 Data에 표시할 데이터를 나타냄
struct SimpleEntry: TimelineEntry {
  let date: Date
  let configuration: ConfigurationIntent
}- struct Provider의 정체
- 위젯을 업데이트 할 시기를 WidgetKit에 알리는 역할
- 위에서 알아본 SimpleEntry를 포함하여, 본격적으로 위젯에 표시될 placeholder, 데이터를 가져와서 표출해주는 getSnapshot, 타임라인 설정 관련된 getTimeLine이 존재
struct Provider: IntentTimelineProvider {
  // 데이터를 불러오기 전(getSnapshot)에 보여줄 placeholder
  func placeholder(in context: Context) -> SimpleEntry {
    SimpleEntry(date: Date(), configuration: ConfigurationIntent())
  }

  // 위젯 갤러리에서 위젯을 고를 때 보이는 샘플 데이터를 보여줄때 해당 메소드 호출
  // API를 통해서 데이터를 fetch하여 보여줄때 딜레이가 있는 경우 여기서 샘플 데이터를 하드코딩해서 보여주는 작업도 가능
  // context.isPreview가 true인 경우 위젯 갤러리에 위젯이 표출되는 상태
  func getSnapshot(for configuration: ConfigurationIntent, in context: Context, completion: @escaping (SimpleEntry) -> ()) {
    let entry = SimpleEntry(date: Date(), configuration: configuration)
    completion(entry)
  }

  // 홈화면에 있는 위젯을 언제 업데이트 시킬것인지 구현하는 부분
  func getTimeline(for configuration: ConfigurationIntent, in context: Context, completion: @escaping (Timeline<Entry>) -> ()) {
    var entries: [SimpleEntry] = []

    let currentDate = Date()
    for hourOffset in 0 ..< 5 {
      // 1시간뒤, 2시간뒤, ... 4시간뒤 entry 값으로 업데이트 하라는 코드
      let entryDate = Calendar.current.date(byAdding: .hour, value: hourOffset, to: currentDate)!
      let entry = SimpleEntry(date: entryDate, configuration: configuration)
      entries.append(entry)
    }

    // (4시간뒤에 다시 타임라인을 새로 다시 불러옴)
    let timeline = Timeline(entries: entries, policy: .atEnd)
	    // .atEnd: 마지막 date가 끝난 후 타임라인 reloading
	    // .after: 다음 data가 지난 후 타임라인 reloading
	    // .never: 즉시 타임라인 reloading
    completion(timeline)
  }
}- struct MyWidgetEntryView의 정체
- 위 @main struct MyWidget에서 사용되었듯이 위젯 뷰를 표출
struct MyWidgetEntryView : View {
  var entry: Provider.Entry

  var body: some View {
    Text(entry.date, style: .time)
  }
}
WidgetFamily
- Widget의 크기를 의미
- 위젯의 뷰에서 @Environment(\.widgetFamily) var family: WidgetFamily 를 추가하여 구현
as-is
struct MyWidgetEntryView : View {
  var entry: Provider.Entry

  var body: some View {
    Text(entry.date, style: .time)
  }
}- WidgetFamily 추가
struct MyWidgetEntryView : View {
  @Environment(\.widgetFamily) var family: WidgetFamily
  var entry: Provider.Entry

  @ViewBuilder
  var body: some View {
    switch self.family {
    case .systemSmall:
      Text(".systemSmall")
    case .systemMedium:
      Text(".systemMedium")
    case .systemLarge:
      Text(".systemLarge")
    case .systemExtraLarge: // ExtraLarge는 iPad의 위젯에만 표출
      Text(".systemExtraLarge")
    @unknown default:
      Text("default")
    }
  }
}- 결과

Widget Cocoapods 관리
- Widget 타겟네임 확인 - MyWidgetExtension
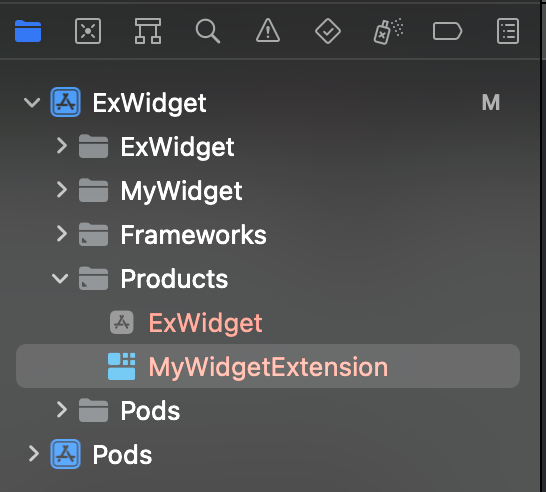
- cocoapods에 target 'MyWidgetExtension' 추가하여 별도 pod 관리
방법)
target 'ExWidget' do
  use_frameworks!

  pod 'Alamofire'
  pod 'Moya/Combine'
  pod 'Kingfisher'
  target 'MyWidgetExtension' do
  end
end
잘못된 방법) - Kingfisher가 중복으로 두 개가 생겨나서 중복으로 인해 컴파일 에러 발생 가능
target 'ExWidget' do
  use_frameworks!

  pod 'Alamofire'
  pod 'Moya/Combine'
  pod 'Kingfisher'
end

target 'MyWidgetExtension' do
  use_frameworks!

  pod 'Kingfisher'
end
cf) MyWidget.swift에서 메인 Target인 ExWidget 코드 접근하려면 ExWidget 파일 중 .swift에서 Target Membership에 MyWidget의 타겟인 MyWidgetExtension을 체크해야 컴파일 에러 방지
* 전체 코드: https://github.com/JK0369/ExWidget-WidgetKit
* 참고
https://developer.apple.com/documentation/widgetkit/timelineprovider/placeholder(in:)-6ypjs
'iOS 응용 (SwiftUI)' 카테고리의 다른 글
| [iOS - SwiftUI] 4. 위젯 Widget 사용 방법 - 위젯 이미지 로드 방법 (0) | 2022.10.04 |
|---|---|
| [iOS - SwiftUI] 2. 위젯 Widget 사용 방법 - API 데이터 로드와 위젯UI 업데이트 (0) | 2022.10.02 |
| [iOS - SwiftUI] Swipe Down To Dismiss (아래로 스와이프하여 뷰 dismiss하는 방법) (0) | 2022.09.30 |
| [iOS - SwiftUI] DragGesture 사용 방법 (뷰 드래그, 뷰 이동 방법, .gesture()) (0) | 2022.09.29 |
| [iOS - SwiftUI] 1. Pagination 방법 (SwiftUI에서 페이지네이션 구현 방법, Combine) (0) | 2022.09.28 |
Comments


