Notice
Recent Posts
Recent Comments
Link
| 일 | 월 | 화 | 수 | 목 | 금 | 토 |
|---|---|---|---|---|---|---|
| 1 | 2 | 3 | 4 | 5 | 6 | 7 |
| 8 | 9 | 10 | 11 | 12 | 13 | 14 |
| 15 | 16 | 17 | 18 | 19 | 20 | 21 |
| 22 | 23 | 24 | 25 | 26 | 27 | 28 |
Tags
- ios
- RxCocoa
- 리펙토링
- UITextView
- swift documentation
- 애니메이션
- map
- UICollectionView
- Clean Code
- SWIFT
- swiftUI
- Human interface guide
- rxswift
- Protocol
- Xcode
- 리팩토링
- scrollview
- collectionview
- uiscrollview
- uitableview
- Observable
- 클린 코드
- 스위프트
- HIG
- Refactoring
- combine
- clean architecture
- MVVM
- ribs
- tableView
Archives
- Today
- Total
김종권의 iOS 앱 개발 알아가기
[iOS - swift] UITableView의 trailingSwipeActionsConfigurationForRowAt 사용 방법 (편집모드 삭제 버튼, 커스텀) 본문
iOS 응용 (swift)
[iOS - swift] UITableView의 trailingSwipeActionsConfigurationForRowAt 사용 방법 (편집모드 삭제 버튼, 커스텀)
jake-kim 2023. 5. 24. 01:13trailingSwipeActionsConfigurationForRowAt 사용 방법
- UITableView의 편집모드에서 - 버튼을 눌렀을 때 trailing edge (한국 기준 오른쪽) 부분에 버튼을 넣을 수 있는 델리게이트

- 예제로 사용할 테이블 뷰 준비
tableView.dataSource = self
tableView.delegate = self

extension ViewController: UITableViewDataSource {
    func tableView(_ tableView: UITableView, numberOfRowsInSection section: Int) -> Int {
        items.count
    }
    func tableView(_ tableView: UITableView, cellForRowAt indexPath: IndexPath) -> UITableViewCell {
        let cell = tableView.dequeueReusableCell(withIdentifier: "cell")
        cell?.textLabel?.text = items[indexPath.row]
        return cell ?? UITableViewCell()
    }
}

extension ViewController: UITableViewDelegate {
  // TODO-
}
- UITableViewDelegate부분에 trailingSwipeActionsConfigurationForRowAt 선언한 후 여기에 구현
extension ViewController: UITableViewDelegate {
    func tableView(_ tableView: UITableView, trailingSwipeActionsConfigurationForRowAt indexPath: IndexPath) -> UISwipeActionsConfiguration? {
        <#code#>
    }
}- UIContextualAction의 생성자를 보면 style, title, handler가 존재
- style: 회색 버튼인 .normal(편집과 같은 일반적인 액션)과 빨간색 버튼인 .destructive(삭제와 같은 주의가 필요한 부정적인 액션)
- title: 제목
- handler: 해당 버튼을 눌렀을 때 수행
UIContextualAction(
            style: /* TODO */,
            title: /* TODO */,
            handler: { [weak self] contextualAction, view, isSuccessBlock in
	            /* TODO */
            }
        )
- handler에는 3가지 파라미터가 존재
- UIContextualAction: 어떤 액션인지 파악할 때 사용
- UIView: 해당 액션이 발생한 뷰
- @escaping (Bool) -> Void: 헨들러에다 액션에 성공했는지, 실패했는지 알려주는 클로저이며 해당 클로저를 실행하면 오른쪽 삭제 버튼이 사라짐 (실행하지 않으면 오른쪽 삭제 버튼이 그대로 남아있으니 꼭 실행해줄것)

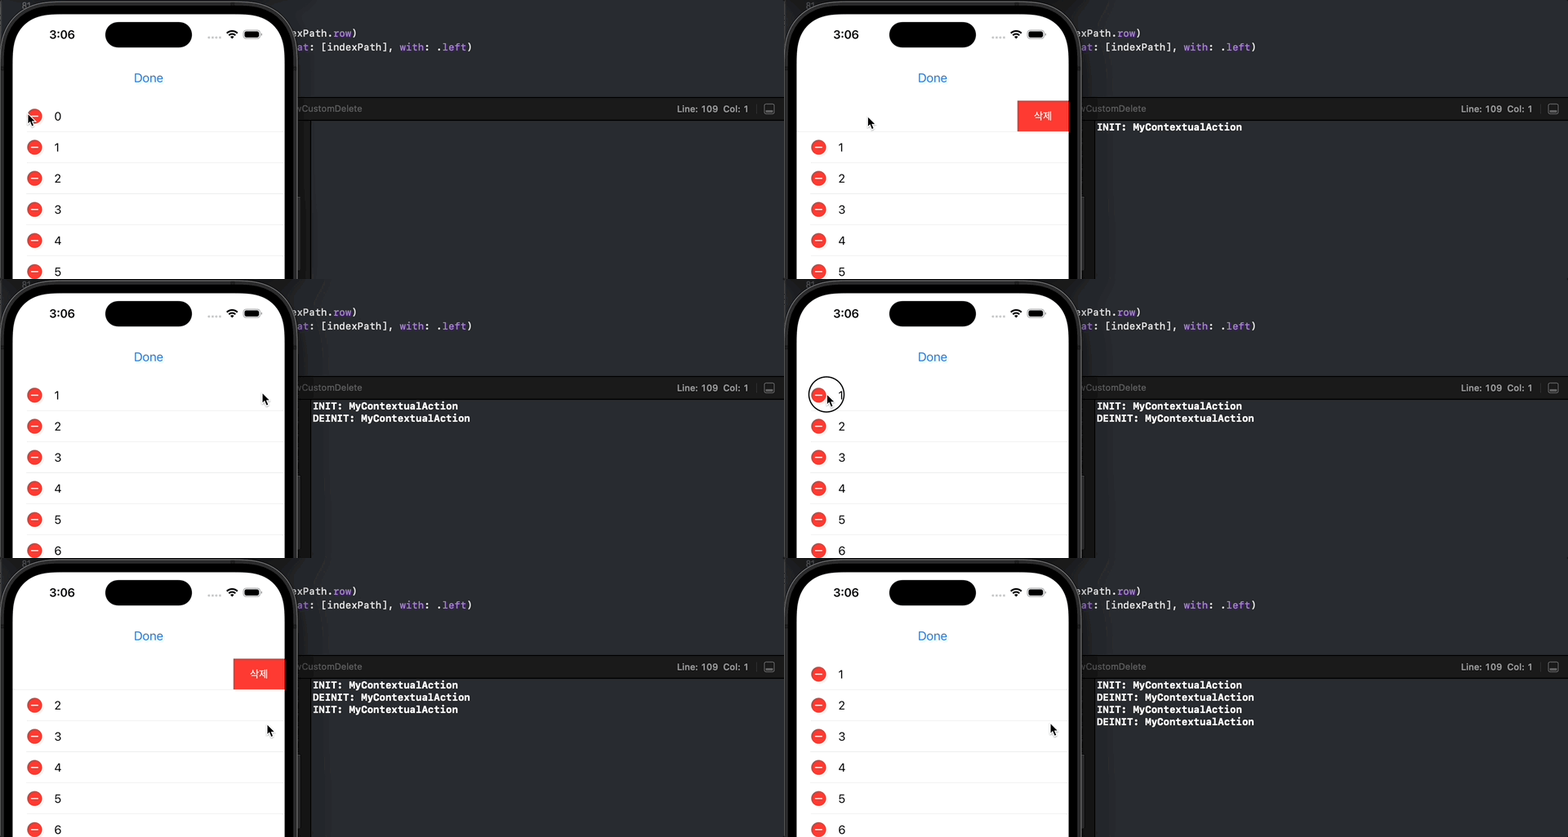
ContextualAction 생명주기
- ContextualAction은 오른쪽 버튼이 등장할 때 생성되며, 사라지면 deinit되는 구조
- 타이밍 얻는 방법
- ContextualAction은 클래스이며 상속하여 사용이 가능
- 생명주기를 알아보기 위해서 init과 deinit 프린트
final class MyDeleteContextualAction: UIContextualAction {
    var verbose = false

    convenience init(style: UIContextualAction.Style, title: String, handler: @escaping UIContextualAction.Handler, verbose: Bool) {
        self.init(style: style, title: title, handler: handler)

        self.verbose = verbose
        guard verbose else { return }
        print("INIT: MyContextualAction")
    }

    deinit {
        guard verbose else { return }
        print("DEINIT: MyContextualAction")
    }
}
* 참고
https://developer.apple.com/documentation/uikit/uicontextualaction/handler
https://developer.apple.com/documentation/uikit/uitableviewdelegate/2902367-tableview
'iOS 응용 (swift)' 카테고리의 다른 글
Comments


