Notice
Recent Posts
Recent Comments
Link
| 일 | 월 | 화 | 수 | 목 | 금 | 토 |
|---|---|---|---|---|---|---|
| 1 | 2 | 3 | ||||
| 4 | 5 | 6 | 7 | 8 | 9 | 10 |
| 11 | 12 | 13 | 14 | 15 | 16 | 17 |
| 18 | 19 | 20 | 21 | 22 | 23 | 24 |
| 25 | 26 | 27 | 28 | 29 | 30 | 31 |
Tags
- Protocol
- 리펙토링
- MVVM
- scrollview
- combine
- Xcode
- UICollectionView
- map
- collectionview
- UITextView
- RxCocoa
- Human interface guide
- swift documentation
- SWIFT
- uiscrollview
- tableView
- 애니메이션
- ios
- 클린 코드
- Observable
- Clean Code
- uitableview
- rxswift
- ribs
- 리팩토링
- HIG
- 스위프트
- swiftUI
- Refactoring
- clean architecture
Archives
- Today
- Total
김종권의 iOS 앱 개발 알아가기
[iOS - swift] Unit test 개념, @testable 본문
Unit test
- 단위 테스트: 프로그램의 기본 단위인 모듈을 테스트
- 모듈이 제대로 구현되어 정해진 기능을 정확히 수행하는지를 테스트
- 프로그램의 각 부분을 고립시켜서 각각의 부분이 정확하게 동작하는지 확인
- Unit test구조가 잡혀있으면 추후에 리팩토링 후 확인이 쉬워, 변경이 쉬움 -> unit test구조를 먼저 잡기위해 TDD방법 존재
Xcode에서 Unit test 환경 세팅
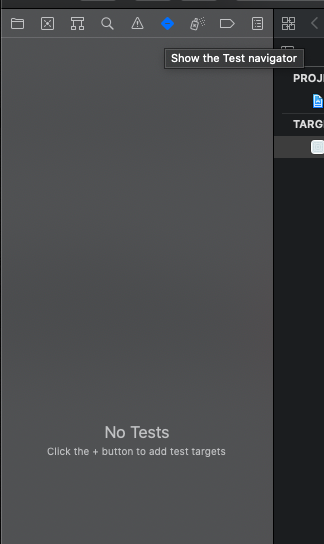
- "Test navigation" 클릭

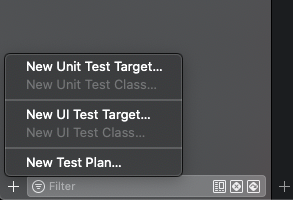
- Unit Test target생성: 하단에 '+' 버튼 클릭 -> New Unit Test Target 클릭
- 단, navigator에서 테스트 탭을 눌러야 보이므로 주의


- ~Tests.swift 파일
- 1. setUpWithError(): 테스트 코드 시작 전 실행 (값을 세팅하는 부분)
- 2. tearDownWithError(): setUp과 반대로 모든 테스트코드가 실행된 후에 호출 (setUp에서 설정한 값들을 해제할 때 사용)
- 3. testExample(): 테스트 코드를 작성하는 메인 코드 (이 부분은 삭제하고 새롭게 생성하여 사용)
- 4. testPerformanceExample(): 성능을 측정햅보기 위해 사용하는 것
import XCTest

class ExampleTests: XCTestCase {

    // 1
    override func setUpWithError() throws {
        // Put setup code here. This method is called before the invocation of each test method in the class.
    }

    // 2
    override func tearDownWithError() throws {
        // Put teardown code here. This method is called after the invocation of each test method in the class.
    }

    // 3
    func testExample() throws {
        // This is an example of a functional test case.
        // Use XCTAssert and related functions to verify your tests produce the correct results.
    }

    // 4
    func testPerformanceExample() throws {
        // This is an example of a performance test case.
        measure {
            // Put the code you want to measure the time of here.
        }
    }

}
- @testable import: test파일안에서 @testable을 사용하는데, test파일에서 internal과 같은 접근제한이 걸려있는 곳에 접근할 수 있도록 설정됨
- (단 UITest에서는 적용 x이므로 UITest대신 Unit Test를 이용을 권장) - test코드에서 접근 허용하는 세팅부분

- 테스트코드 작성
- @testable import 필요한target
- 3-1: 필요한 화면의 ViewController로드
- 3-2: @IBOutlet은 런타임에 생성되므로, @IBOutlet에 접근할 때(3-3에서) 런타임에러 발생방지를 위한 loadView()호출
- 3-3: XCTAssertEqual(테스트대상 값, 테스트값, 에러발생시 문구)로 테스트
//
//  ExampleTests.swift
//  ExampleTests
//
//  Created by 김종권 on 2021/02/11.
//

import XCTest
@testable import Example

class ExampleTests: XCTestCase {

    // 1
    override func setUpWithError() throws {
    }

    // 2
    override func tearDownWithError() throws {
    }

    // 3
    func testPlaceholder() {

        // 3-1
        let storyboard = UIStoryboard(name: "Main", bundle: nil)
        let vc = storyboard.instantiateViewController(withIdentifier: "ViewController") as! ViewController

        // 3-2
        vc.loadView()

        // 3-3
        XCTAssertEqual(vc.textFieldExample.placeholder, "예시", "에러) placeholder가 \"예시\"가 아닙니다")
    }
}
* 참고: 쉽게 배우는 소프트웨어 공학, 2015. 11. 30., 한빛아카데미 (주))
'Unit Test와 UI Test' 카테고리의 다른 글
| [UnitTest] RxSwift, MVVM 구조의 테스트 코드 작성 하기 (RxTest, RxNimble) (0) | 2021.02.12 |
|---|---|
| [iOS - swift] Nimble, Quick 프레임워크 (Unit test) (0) | 2021.02.12 |
| [iOS - swift] BDD (Behavior Driven Development) (given, when ,then) (0) | 2021.02.12 |
| [iOS - swift] TDD (Test Driven Development) (2) | 2021.02.12 |
Comments


