Notice
Recent Posts
Recent Comments
Link
| 일 | 월 | 화 | 수 | 목 | 금 | 토 |
|---|---|---|---|---|---|---|
| 1 | 2 | 3 | 4 | 5 | 6 | 7 |
| 8 | 9 | 10 | 11 | 12 | 13 | 14 |
| 15 | 16 | 17 | 18 | 19 | 20 | 21 |
| 22 | 23 | 24 | 25 | 26 | 27 | 28 |
Tags
- 리펙토링
- ios
- uitableview
- 리팩토링
- Refactoring
- UITextView
- Xcode
- tableView
- Protocol
- HIG
- scrollview
- 애니메이션
- Clean Code
- uiscrollview
- swift documentation
- 클린 코드
- RxCocoa
- rxswift
- map
- ribs
- collectionview
- UICollectionView
- 스위프트
- Observable
- combine
- clean architecture
- MVVM
- Human interface guide
- SWIFT
- swiftUI
Archives
- Today
- Total
김종권의 iOS 앱 개발 알아가기
[iOS - swift] UIProgressView (로딩, 프로그래스 바) 본문

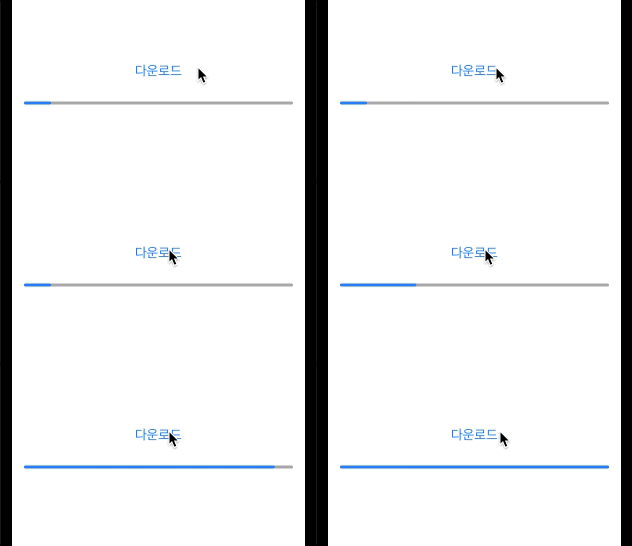
UIProgressView
- Loading이 얼마나 지속되는지 알 수 있는 경우 UIProgressView를 사용
- Loading이 얼마나 지속될지 알 수 없는 경우는 Spinner (UIActivityIndicatorView) 사용

UIProgressView 구현 방법
- 핵심
- progressView.progress = 0.1: progress의 위치 (0 ~ 1)
- progressView.setProgress(_:animated:): progress의 위치 + 애니메이션 적용 (0 ~ 1)
- UIProgressView 초기화
lazy var progressView: UIProgressView = {
    let view = UIProgressView()
    /// progress 배경 색상
    view.trackTintColor = .lightGray
    /// progress 진행 색상
    view.progressTintColor = .systemBlue
    view.progress = 0.1
    return view
}()- setProgress(_:animated:)를 실행하기 위해 필요한 property 선언
- time 프로퍼티는 setProgress(_:animated:)메소드의 파라미터 값으로 부여하고 계속 축적되는 값
- timer 프로퍼티는 Timer인스턴스를 이용하여 시간에따라 setProgress(_:animated:)메소드가 호출되도록 하기 위한 테스트용 인스턴스
/// .setProgress(time, animated: true)에서 time은 Float형을 사용
var time: Float = 0.0
var timer: Timer?- 버튼이 눌린 경우 setProgress() 호출
- 기존에 timer 인스턴스가 동작하고 있을 때 이 인스턴스를 해제해야 계속 동작하지 않으므로 timer?.invalidate() 필요
@objc func didTapDownloadButton() {
    timer?.invalidate()
    timer = Timer.scheduledTimer(timeInterval: 0.05, target: self, selector: #selector(setProgress), userInfo: nil, repeats: true)
}

@objc func setProgress() {
    time += 0.05
    progressView.setProgress(time, animated: true)
    if time >= 1.0 { timer?.invalidate() }
}- 전체 소스 코드
class ViewController: UIViewController {

    /// .setProgress(time, animated: true)에서 time은 Float형을 사용
    var time: Float = 0.0
    var timer: Timer?

    lazy var downloadButton: UIButton = {
        let button = UIButton()
        button.setTitle("다운로드", for: .normal)
        button.setTitleColor(.systemBlue, for: .normal)
        button.setTitleColor(.blue, for: .highlighted)
        button.addTarget(self, action: #selector(didTapDownloadButton), for: .touchUpInside)
        return button
    }()

    lazy var progressView: UIProgressView = {
        let view = UIProgressView()
        /// progress 배경 색상
        view.trackTintColor = .lightGray
        /// progress 진행 색상
        view.progressTintColor = .systemBlue
        view.progress = 0.1
        return view
    }()

    override func viewDidLoad() {
        super.viewDidLoad()

        view.addSubview(progressView)
        progressView.translatesAutoresizingMaskIntoConstraints = false
        NSLayoutConstraint.activate([
            progressView.leadingAnchor.constraint(equalTo: view.leadingAnchor, constant: 16),
            progressView.centerYAnchor.constraint(equalTo: view.centerYAnchor),
            progressView.trailingAnchor.constraint(equalTo: view.trailingAnchor, constant: -16)
        ])

        view.addSubview(downloadButton)
        downloadButton.translatesAutoresizingMaskIntoConstraints = false
        NSLayoutConstraint.activate([
            downloadButton.bottomAnchor.constraint(equalTo: progressView.topAnchor, constant: -24),
            downloadButton.centerXAnchor.constraint(equalTo: view.centerXAnchor)
        ])
    }

    @objc func didTapDownloadButton() {
        timer?.invalidate()
        timer = Timer.scheduledTimer(timeInterval: 0.05, target: self, selector: #selector(setProgress), userInfo: nil, repeats: true)
    }

    @objc func setProgress() {
        time += 0.05
        progressView.setProgress(time, animated: true)
        if time >= 1.0 { timer?.invalidate() }
    }
}
* cf) URLSession에서 download작업에 UIProgress 사용 방법 참고: https://ios-development.tistory.com/740
* 참고
https://developer.apple.com/documentation/uikit/uiprogressview
'iOS 응용 (swift)' 카테고리의 다른 글
Comments


