Notice
Recent Posts
Recent Comments
Link
| 일 | 월 | 화 | 수 | 목 | 금 | 토 |
|---|---|---|---|---|---|---|
| 1 | 2 | 3 | 4 | 5 | 6 | 7 |
| 8 | 9 | 10 | 11 | 12 | 13 | 14 |
| 15 | 16 | 17 | 18 | 19 | 20 | 21 |
| 22 | 23 | 24 | 25 | 26 | 27 | 28 |
Tags
- UITextView
- clean architecture
- Human interface guide
- Clean Code
- map
- SWIFT
- ios
- MVVM
- scrollview
- Observable
- collectionview
- tableView
- combine
- Protocol
- rxswift
- swiftUI
- 리펙토링
- 스위프트
- RxCocoa
- UICollectionView
- HIG
- 클린 코드
- Refactoring
- 애니메이션
- ribs
- Xcode
- uiscrollview
- uitableview
- swift documentation
- 리팩토링
Archives
- Today
- Total
김종권의 iOS 앱 개발 알아가기
[iOS - swift] Firebase Auth 이메일로 로그인하기 (이메일 링크 인증, dynamic link, 동적 링크, Deep Link, 딥링크) 본문
iOS 응용 (swift)
[iOS - swift] Firebase Auth 이메일로 로그인하기 (이메일 링크 인증, dynamic link, 동적 링크, Deep Link, 딥링크)
jake-kim 2021. 11. 19. 23:06이메일 링크 인증
- 로그인 링크를 사용자가 입력한 이메일로 전송
- 편리한 가입 및 로그인 UX 제공
- 사용자가 모바일 기기에서 번거롭게 비밀번호를 입력하거나 기억할 필요 없이 안전하게 로그인 가능
- 주의: 딥링크 수신 시 SceneDelegate의 scene(_:continue:) 메소드가 필요하므로, SceneDelgate를 삭제 x
Firebase 에서 앱 등록
- 앱 등록

- GoogleService-Info.plist 다운로드

- Firebase 초기화 및 로그인 상태에 따라 플로우를 담당하는 AppController 정의
- AppController 코드
// AppController.swift

import UIKit
import Firebase

final class AppController {
    static let shared = AppController()
    private init() {
        FirebaseApp.configure()
        registerAuthStateDidChangeEvent()
    }

    private var window: UIWindow!
    private var rootViewController: UIViewController? {
        didSet {
            window.rootViewController = rootViewController
        }
    }

    func show(in window: UIWindow) {
        self.window = window
        window.backgroundColor = .systemBackground
        window.makeKeyAndVisible()

        // 로그인이 완료된 경우에는 AuthStateDidChange 이벤트를 받아서 NotificationCenter에 의하여 자동 로그인
        if Auth.auth().currentUser == nil {
            routeToLogin()
        }
    }

    private func registerAuthStateDidChangeEvent() {
        NotificationCenter.default.addObserver(self,
                                               selector: #selector(checkLogin),
                                               name: .AuthStateDidChange, // <- Firebase Auth 이벤트
                                               object: nil)
    }

    @objc private func checkLogin() {
        if let user = Auth.auth().currentUser { // <- Firebase Auth
            print("user = \(user)")
            setHome()
        } else {
            routeToLogin()
        }
    }

    private func setHome() {
        let homeVC = HomeVC()
        rootViewController = UINavigationController(rootViewController: homeVC)
    }

    private func routeToLogin() {
        rootViewController = UINavigationController(rootViewController: LoginVC())
    }

}- SceneDelegate에서 AppController 사용
import UIKit
import Firebase

class SceneDelegate: UIResponder, UIWindowSceneDelegate {

    var window: UIWindow?

    func scene(_ scene: UIScene, willConnectTo session: UISceneSession, options connectionOptions: UIScene.ConnectionOptions) {

        guard let windowScene = (scene as? UIWindowScene) else { return }
        let window = UIWindow(windowScene: windowScene)
        self.window = window
        AppController.shared.show(in: window) // <- AppController 호출
    }

    ...
Firebase Auth
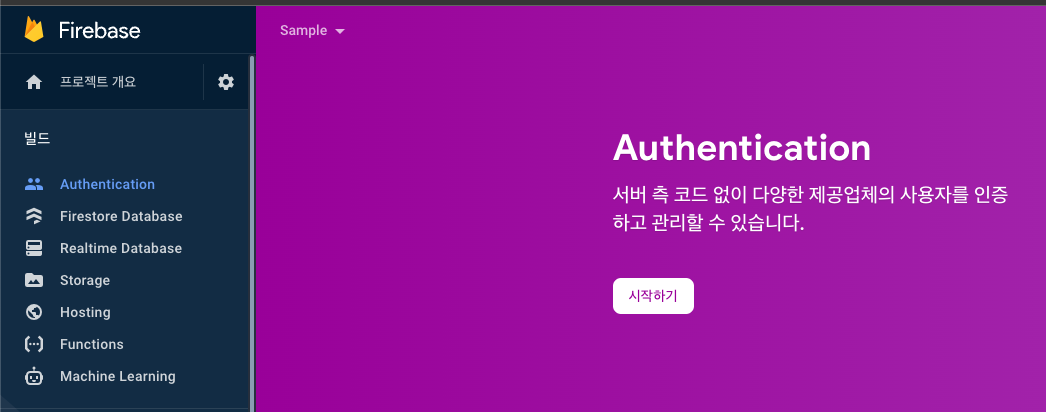
- Firebase Console > Authentication 탭 클릭 > 시작하기 버튼 클릭
- 이메일/비밀번호 클릭
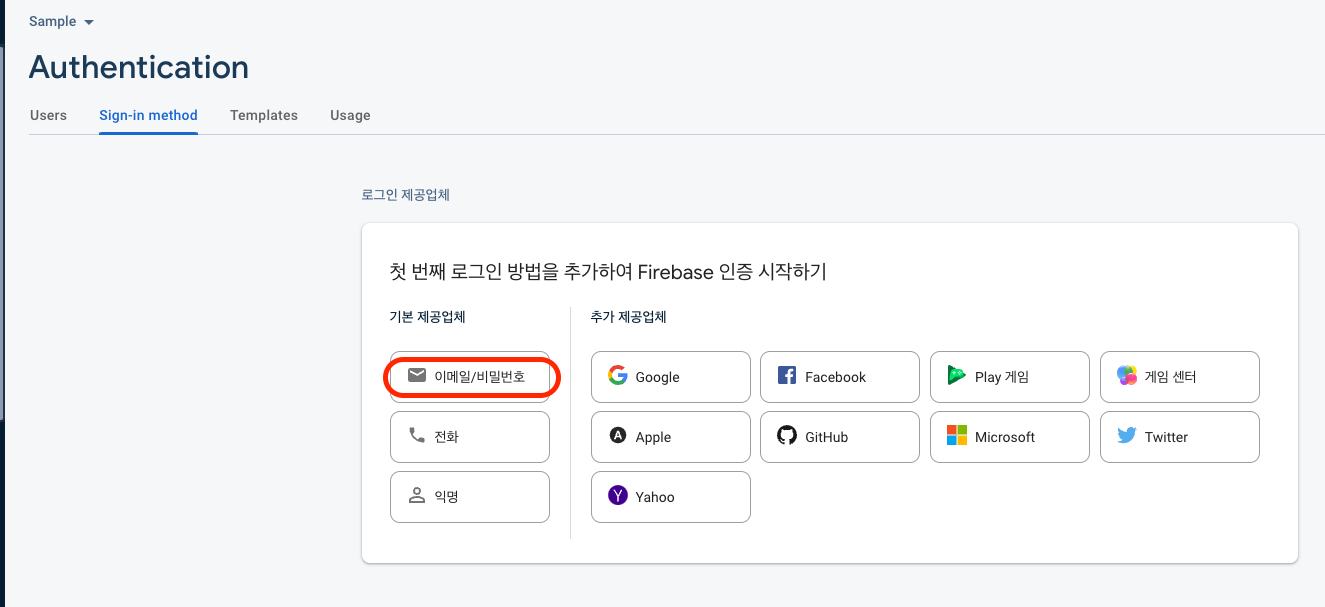
- 이메일 링크(비밀번호가 없는 로그인) 사용 설정 활성화 > 저장 클릭

사용 방법
- 사용자에게 이메일 주소를 입력하게끔 하는 UI 제공 후, ActionCodeSettings 인스턴스로 이메일 전달
- ActionCodeSettings 이것을 통해 이메일 링크 생성
- 이메일에서 해당 링크를 누르면 앱으로 다시 돌아와야 하므로 dynamic link 필요
- dynamic link먼저 설정 필요
Firebase Dynamic Link를 위해 준비해야할 사항
- dynamic link 생성 시 Apple ID가 필요하기 때문에 App Store Connect에서 애플리케이션 먼저 생성 필요
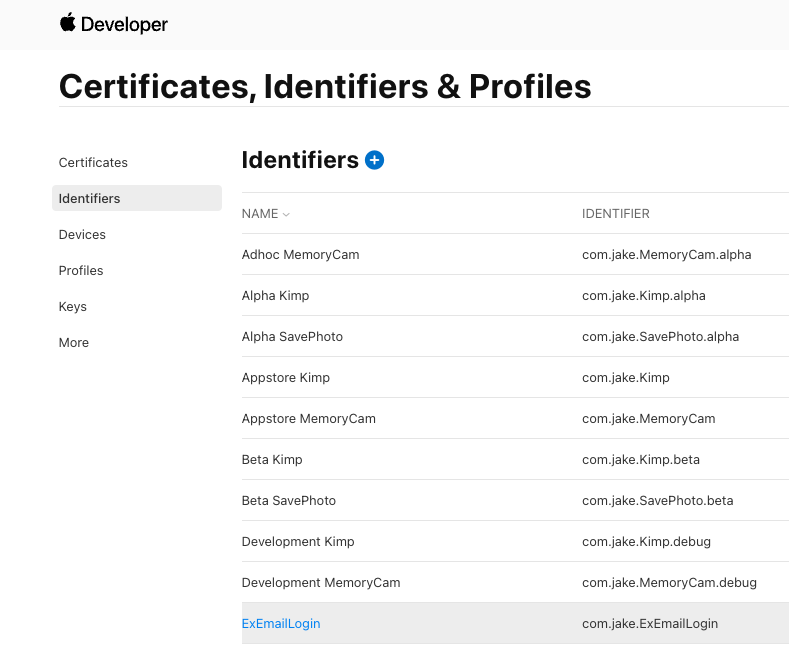
- App Store Connect에 앱 등록 전에, Apple Developer에서 AppIdentifier 등록
- App Store Connect에서 애플리케이션 생성
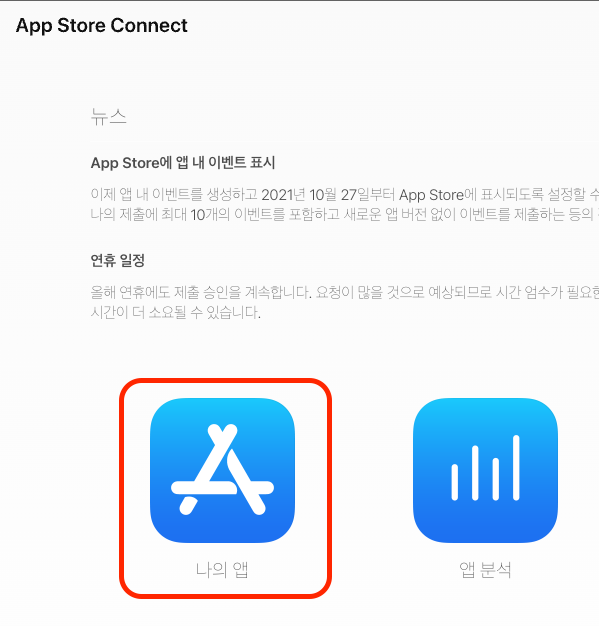
- 신규 앱 클릭

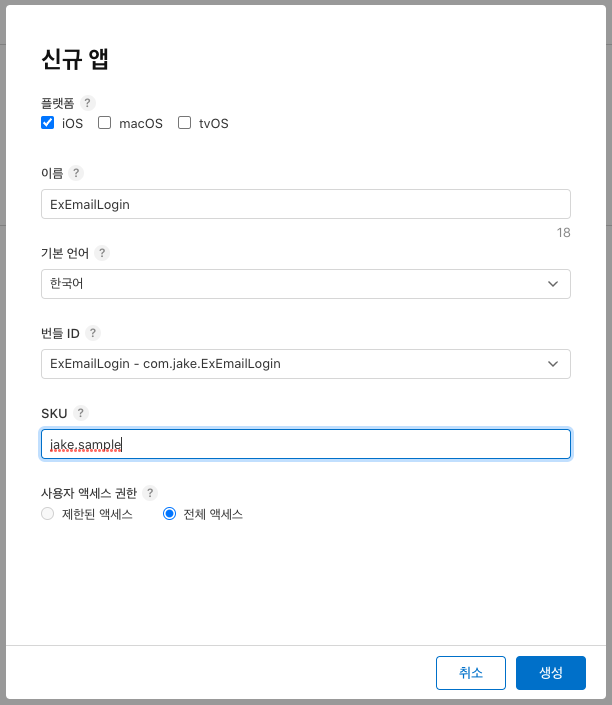
- 생성 완료

- 클릭 > 앱 정보 탭 > Apple ID 확인
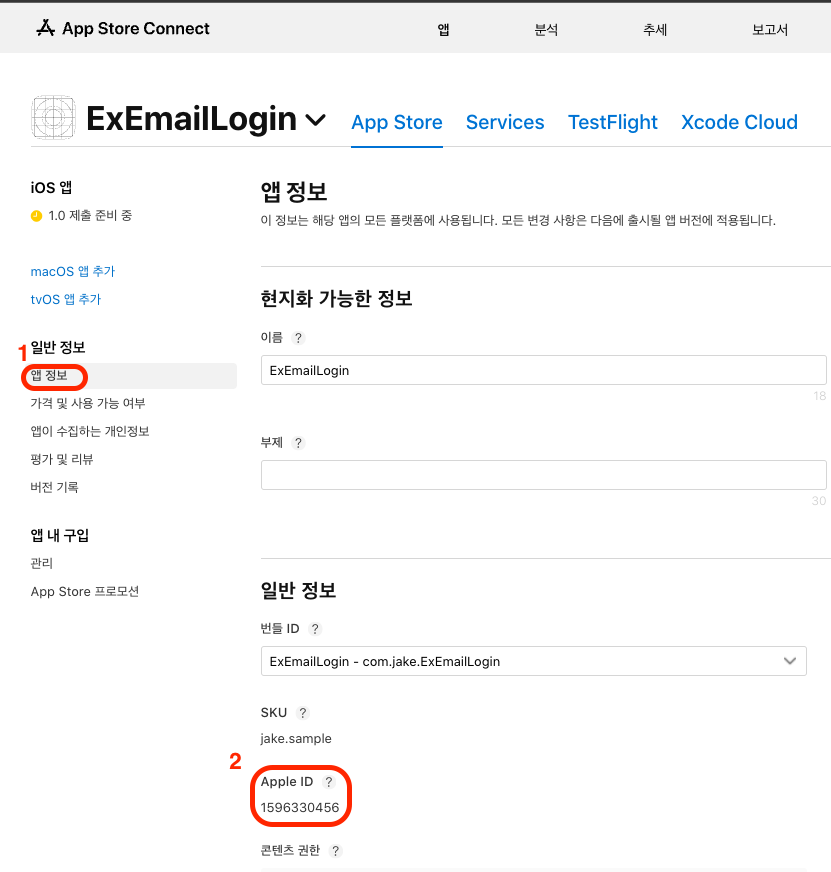
Firebase Dynamic Links
- Firebase > Dynamic Links 클릭 > 시작하기 클릭

- [단축 URL 링크 설정] Dynamic Link 생성
- 반드시 firebase에서 추천해주는 domain 이름으로 설정
- 새 동적 링크 버튼 클릭
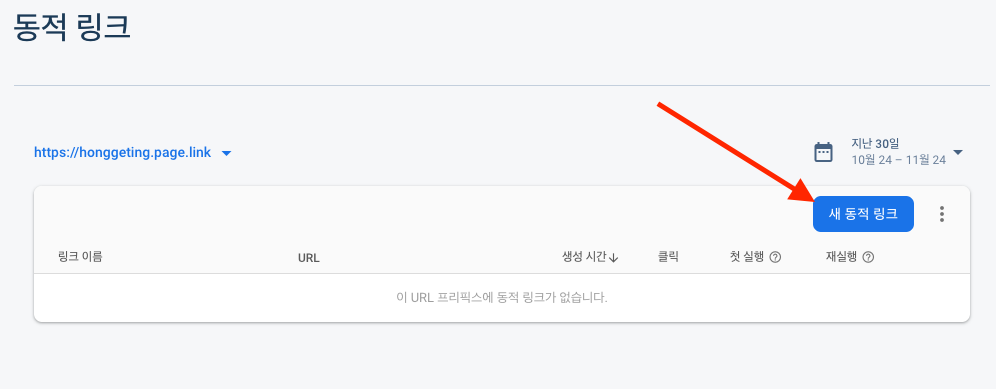
- 단축 URL 링크 생성

- Authentication > Sign-in method > 승인된 도메인에서 링크 복사

- [동적 링크 설정] 딥 링크 URL은 prefix를 "https://"로하여, 위 링크를 붙여넣기
- 딥 링크 URL: https://sample-9ca7b.firebaseapp.com
- 동적 링크 이름은 임의로 설정: Open App

- [Apple용 링크 동작 정의]
- Apple 앱에서 딥 링크 열기 체크
- App Store ID, Team ID 아래에서 확인

> App Store ID: App Store Connect
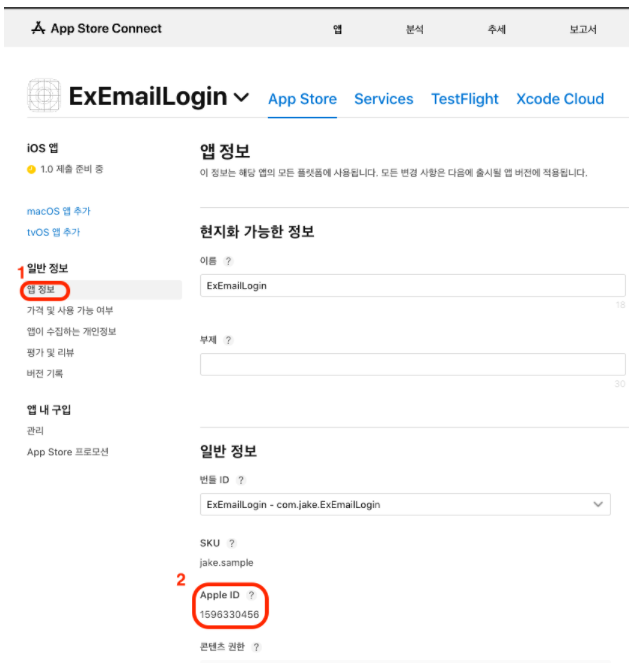
> Team ID: Apple Developer

- 다시 입력할 시 [Apple용 링크 동작 정의] 완료

- 나머지 4, 5번 스텝은 불필요하므로 다음 버튼 계속 클릭 후 만들기 완료
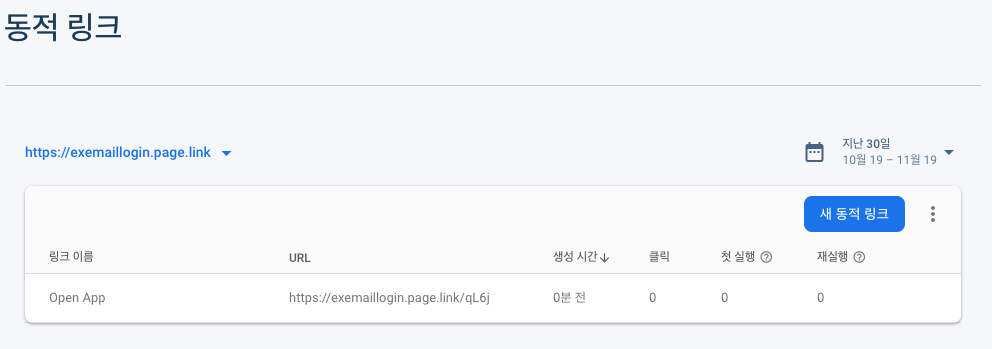
iOS 앱에 적용
- 위 페이지에서 도메인 복사

- Xcode > Target > Signing & Capabilities > + Capability > Associated Domains 생성

- 위에서 복사한 domain에 "applinks:" prefix를 붙여서 작성
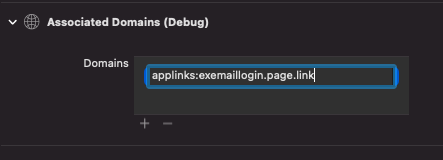
- info 탭에서 URL Types에 추가
- Identifier는 임의의 이름으로 작성 "Open_app"
- URL Schemes는 반드시 Bundle Id로 작성

- UI 준비
- 링크 전송: 이메일로 로그인 링크 송신 버튼
- 로그인: 이메일에서 로그인 링크를 누르고 다시 앱으로 돌아와서 로그인 버튼을 누르면 로그인되는 버튼

- 이메일로 인증 링크 전송 버튼을 탭한 경우 - ActionCodeSetting 인스턴스 사용
- actionCodeSetting.url값은 Firebase 콘솔에서 [Authentication - Signin method - 승인된 도메인]에서 선택한 도메인 사용
- actionCodeSettings.handleCodeInApp = true: 로그인 작업은 항상 앱에서 완료하도록 하는 플래그값 (인증 과정 마지막에 사용자가 로그인하고 사용자의 인증 상태가 앱에서 관리되게끔 하기 위함)
- actionCodeSettings.setIOSBundleID(Bundle.main.bundleIdentifier!): dynamic link의 scheme 설정
@objc private func didTapAuthButton() {
    guard let email = emailTextField.text else { return }

    let actionCodeSettings = ActionCodeSettings()
    actionCodeSettings.url = URL(string: "https://sample-9ca7b.firebaseapp.com/?email=\(email)")
    actionCodeSettings.handleCodeInApp = true
    actionCodeSettings.setIOSBundleID(Bundle.main.bundleIdentifier!)

    Auth.auth().sendSignInLink(toEmail: email,
                               actionCodeSettings: actionCodeSettings) { error in
        if let error = error {
            print("email not sent \"\(error.localizedDescription)\"")
        } else {
            print("email sent")
        }
    }
}- 로그인 버튼을 탭한 경우
- 위에서 클릭했던 링크와 입력한 링크를 인수로하는 Auth.auth().signIn(withEmail:link:) 사용
@objc private func didTapLoginButton() {
    guard let email = emailTextField.text,
          let link = UserDefaults.standard.string(forKey: "Link") else { return }
    Auth.auth().signIn(withEmail: email, link: link) { [weak self] result, error in
        if let error = error {
            print("email auth error \"\(error.localizedDescription)\"")
            return
        }

        // 화면 이동은 AppController에서 Firebase Auth 이벤트를 구독하고 있으므로 AppController에서 화면전환 수행
    }
}
딥링크 처리
- 이메일에서 인증 링크 클릭 시 앱 화면으로 오면, 딥링크를 처리
- SceneDelegate.swift의 scene(_:continue:) 사용
func scene(_ scene: UIScene, continue userActivity: NSUserActivity) {
    guard let webpageURL = userActivity.webpageURL else { return }
    print(userActivity.webpageURL)
    /*
     https://exemaillogin.page.link/?link=https://sample-9ca7b.firebaseapp.com/__/auth/action?apiKey%3DAIzaSyDkfsdsd6cdah83MZtMEllERKqWJcV3os14%26mode%3DsignIn%26oobCode%3DcZ-xm1p4pXDuKmSvQ7DqxkcQQYzMLqBR0l331QBZA08AAAF9NeZFOA%26continueUrl%3Dhttps://sample-9ca7b.firebaseapp.com/?email%253Dpalatable7@naver.com%26lang%3Den&ibi=com.jake.ExEmailLogin&ifl=https://sample-9ca7b.firebaseapp.com/__/auth/action?apiKey%3DAIzaSyDkZ2b76cdah83MZtMEllERKqWJcV3os14%26mode%3DsignIn%26oobCode%3DcZ-xm1p4pXDuKmSvQ7DqxkcQQYzMLqBR0l331QBZA08AAAF9NeZFOA%26continueUrl%3Dhttps://sample-9ca7b.firebaseapp.com/?email%253Dpafdsable7@naver.com%26lang%3Den
     */
}- 링크로 넘어온 값 전체를 디스크에 저장해놓고, 이 값을 로그인 버튼을 눌렀을 때의 link값으로 넘겨주면 로그인이 성공되므로 디스크에 저장하는 코드 추가
func scene(_ scene: UIScene, continue userActivity: NSUserActivity) {
    guard let webpageURL = userActivity.webpageURL else { return }
    let link = webpageURL.absoluteString
    if Auth.auth().isSignIn(withEmailLink: link) {
        UserDefaults.standard.set(link, forKey: "Link")
    }
}
- 로그인 버튼을 눌렀을 때 딥링크로 받은 이메일 주소로 로그인
// LoginVC.swift

@objc private func didTapLoginButton() {
    guard let email = emailTextField.text,
          let link = UserDefaults.standard.string(forKey: "Link") else { return }
    Auth.auth().signIn(withEmail: email, link: link) { [weak self] result, error in
        if let error = error {
            print("email auth error \"\(error.localizedDescription)\"")
            return
        }
    }
}
cf) 이메일 인증 요청 내용도 수정 가능
- Authentication > Templates > 이메일 주소 인증

* 전체 소스 코드: https://github.com/JK0369/ExEmailLogin
* 참고
- https://firebase.google.com/docs/auth/ios/email-link-auth?hl=ko
- https://medium.com/@huzaifa.ameen229/firebase-email-link-authentication-ac2504068562
'iOS 응용 (swift)' 카테고리의 다른 글
Comments


