
Notice
Recent Posts
Recent Comments
Link
| 일 | 월 | 화 | 수 | 목 | 금 | 토 |
|---|---|---|---|---|---|---|
| 1 | 2 | 3 | 4 | 5 | ||
| 6 | 7 | 8 | 9 | 10 | 11 | 12 |
| 13 | 14 | 15 | 16 | 17 | 18 | 19 |
| 20 | 21 | 22 | 23 | 24 | 25 | 26 |
| 27 | 28 | 29 | 30 |
Tags
- uiscrollview
- swift documentation
- 클린 코드
- Protocol
- 스위프트
- Clean Code
- swiftUI
- 애니메이션
- scrollview
- Xcode
- Human interface guide
- 리펙토링
- UITextView
- map
- Observable
- combine
- RxCocoa
- ios
- clean architecture
- uitableview
- collectionview
- ribs
- Refactoring
- tableView
- rxswift
- 리팩토링
- HIG
- MVVM
- UICollectionView
- SWIFT
Archives
- Today
- Total
김종권의 iOS 앱 개발 알아가기
[iOS - SwiftUI] 튜토리얼 - 16. iOS앱 프로젝트에 WatchOS 애플워치 알림 UI 구현 방법 (커스텀 Notification UI) 본문
iOS 튜토리얼 (SwiftUI)
[iOS - SwiftUI] 튜토리얼 - 16. iOS앱 프로젝트에 WatchOS 애플워치 알림 UI 구현 방법 (커스텀 Notification UI)
jake-kim 2022. 7. 18. 23:49* 애플워치에 UI 구현 방법 및 이전 코드는 이전 포스팅 글이나 애플 튜토리얼 페이지 참고
알림 UI 구현
- 이전 포스팅 글에서 알아본 애플 워치 타겟을 추가하면 자동으로 WatchKit Extension 폴더 하위에 NotificationController와 NotificationView가 생성

- 여기서 NotificationView에 UI를 구현하면 노티에 그대로 표출
NotificationView 구현
- 보통 APNs에서 오는 페이로드는 아래와 같은 json 내용으로 구성
- aps 키값이 전체를 감싸고 있고, 그 안에 alert와 title, body가 존재 (표준 형식)
{
   "aps":{
      "alert":{
         "title":"iOS 앱 개발 알아가기 타이틀",
         "body":"바디"
      },
      "sound":3
   }
}- 예제에서 사용할 PushNotificationPayload.apns 파일을 보면 아래와 같이 존재
{
  "aps": {
    "alert": {
      "title": "Silver Salmon Creek",
      "body": "You are within 5 miles of Silver Salmon Creek."
    },
    "category": "LandmarkNear",
    "thread-id": "5280"
  },

  "landmarkIndex": 1,

  "WatchKit Simulator Actions": [
    {
      "title": "First Button",
      "identifier": "firstButtonAction"
    }
  ],

  "customKey": "Use this file to define a testing payload for your notifications. ...."
}- NotificationView도 위 파일에 맞도록 title, message, 데이터를 추가
(자동으로 만들어진 초기 NotificationView 상태)
import SwiftUI

struct NotificationView: View {
  var body: some View {
    Text("Hello, World!")
  }
}

struct NotificationView_Previews: PreviewProvider {
  static var previews: some View {
    NotificationView()
  }
}- title, message, landmark 프로퍼티를 추가
import SwiftUI

struct NotificationView: View {
  var title: String? // <-
  var message: String? // <-
  var landmark: Landmark? // <-

  var body: some View {
    Text("Hello, World!")
  }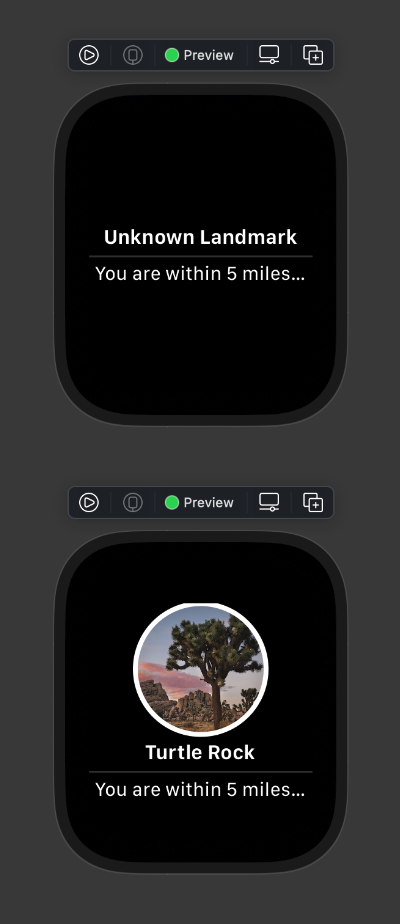
}- body 부분의 UI도 수정
- 만약 landmark 데이터가 없는 경우 (nil인 경우) 다른 디폴트 이미지를 사용
- landmark 데이터가 있는 경우, title과 message를 표출
import SwiftUI

struct NotificationView: View {
  var title: String?
  var message: String?
  var landmark: Landmark?

  var body: some View {
    VStack {
      if landmark != nil {
        CircleImage(image: landmark!.image.resizable())
          .scaledToFit()
      }

      Text(title ?? "Unknown Landmark")
        .font(.headline)

      Divider()

      Text(message ?? "You are within 5 miles of one of your favorite landmarks.")
        .font(.caption)
    }
    .lineLimit(0)
  }
}- preview에도 데이터를 주지 않은 경우와 데이터를 입력한 경우 각각 확인하기 위해 Group으로 생성
struct NotificationView_Previews: PreviewProvider {
  static var previews: some View {
    Group { // <-
      NotificationView()
      NotificationView(
        title: "Turtle Rock",
        message: "You are within 5 miles of Turtle Rock.",
        landmark: ModelData().landmarks[0]
      )
    }
  }
}
- NotificationView는 NotificationController에서 사용하고, title, message, landmark 데이터를 주입하여 사용
//  NotificationController.swift

import WatchKit
import SwiftUI
import UserNotifications

class NotificationController: WKUserNotificationHostingController<NotificationView> {
  // 프로퍼티 추가
  var title: String?
  var message: String?
  var landmark: Landmark?

  override var body: NotificationView {
    return NotificationView(title: title, message: message, landmark: landmark) // <-
  }

  override func willActivate() {
    // This method is called when watch view controller is about to be visible to user
    super.willActivate()
  }

  override func didDeactivate() {
    // This method is called when watch view controller is no longer visible
    super.didDeactivate()
  }

  override func didReceive(_ notification: UNNotification) {
    // This method is called when a notification needs to be presented.
    // Implement it if you use a dynamic notification interface.
    // Populate your dynamic notification interface as quickly as possible.
  }
}- 알림을 받았을 때 데이터를 핸들링하는 것은 역시 NotificationController에서 수행하고, didReceive(_:)메소드에서 처리가 가능
- 파싱하여 title, body, landmark 데이터를 입력
  //  NotificationController.swift

  override func didReceive(_ notification: UNNotification) {
    let modelData = ModelData()

    let notificationData = notification.request.content.userInfo as? [String: Any]
    let aps = notificationData?["aps"] as? [String: Any]
    let alert = aps?["alert"] as? [String: Any]

    title = alert?["title"] as? String
    message = alert?["body"] as? String

    guard let index = notificationData?["landmarkIndex"] as? Int else { return }
    landmark = modelData.landmarks[index]
  }
푸시 수신 및 처리
- 푸시 수신은 @main이 존재하는 LandmarksApp에서 처리

// LandmarksApp.swift

import SwiftUI

@main
struct LandmarksApp: App {
  @StateObject private var modelData = ModelData()

  var body: some Scene {
    WindowGroup {
      ContentView()
        .environmentObject(modelData)
    }
  }
}- 여기서 단순하게 os(watchOS) 플래그를 두고, WKNotificationScene(controller:category:)를 사용하여 구현
@main
struct LandmarksApp: App {
  @StateObject private var modelData = ModelData()

  var body: some Scene {
    WindowGroup {
      ContentView()
        .environmentObject(modelData)
    }

    #if os(watchOS) // <-
    WKNotificationScene(controller: NotificationController.self, category: "LandmarkNear")
    #endif
  }
}- 여기서의 category 이름은 aps json 파일에 존재하는 값을 사용
{
  "aps": {
    "alert": {
      "title": "Silver Salmon Creek",
      "body": "You are within 5 miles of Silver Salmon Creek."
    },
    "category": "LandmarkNear", // <-
    "thread-id": "5280"
  },

  ...
노티 테스트 방법
- Scheme에서 WatchLandmarks (Notification)을 선택 후 실행
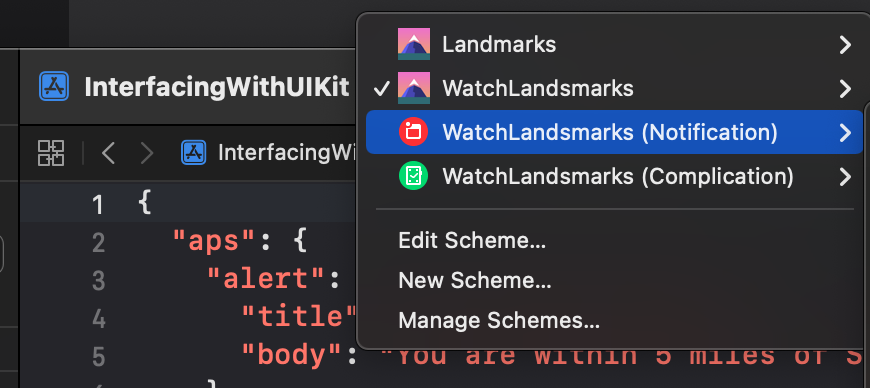
- 실행하면 노티를 Allow 할것인지 선택화면이 나오고, Allow를 하면 바로 노티가 와서 확인이 가능
* 참고
https://developer.apple.com/tutorials/swiftui/creating-a-watchos-app
'iOS 튜토리얼 (SwiftUI)' 카테고리의 다른 글
'iOS 튜토리얼 (SwiftUI)' Related Articles
more


