Notice
Recent Posts
Recent Comments
Link
| 일 | 월 | 화 | 수 | 목 | 금 | 토 |
|---|---|---|---|---|---|---|
| 1 | 2 | 3 | 4 | 5 | 6 | 7 |
| 8 | 9 | 10 | 11 | 12 | 13 | 14 |
| 15 | 16 | 17 | 18 | 19 | 20 | 21 |
| 22 | 23 | 24 | 25 | 26 | 27 | 28 |
Tags
- clean architecture
- 리팩토링
- ribs
- HIG
- Human interface guide
- Protocol
- map
- ios
- swiftUI
- Observable
- uitableview
- UITextView
- scrollview
- 리펙토링
- swift documentation
- MVVM
- Refactoring
- uiscrollview
- 클린 코드
- Clean Code
- SWIFT
- Xcode
- UICollectionView
- RxCocoa
- rxswift
- collectionview
- 스위프트
- tableView
- combine
- 애니메이션
Archives
- Today
- Total
김종권의 iOS 앱 개발 알아가기
[iOS - swift] 3. Concurrent Programming - DispatchQueue의 serial, concurrent, async, sync 이해하고 사용하기 본문
iOS 응용 (swift)
[iOS - swift] 3. Concurrent Programming - DispatchQueue의 serial, concurrent, async, sync 이해하고 사용하기
jake-kim 2022. 8. 13. 22:581. Concurrent Programming - NSLock, DispatchSemaphore 사용 방법
2. Concurrent Programming - DispatchSemaphore로 코틀린의 CompletableDeferred 구현방법
3. Concurrent Programming - DispatchQueue의 serial, concurrent, async, sync 이해하고 사용하기
4. Concurrent Programming - Thread Safe Array 구현방법 (DispatchQueue의 barrier 사용)
5. Concurrent Programming - OperationQueue로 동적으로 작업 추가, 취소하는 모듈 구현방법
기본지식) DispatchQueue에서의 serial, concurrent, async, sync
- swift에서 DispatchQueue 없이 코드를 작성하면 main serial queue에서 동작
- DispatchQueue안에서의 스레드 작업은 thread safe
- DispatchQueue().sync로 수행하면, 한 번에 하나의 프로세스만 실행할 수 있음
- DispatchQueue의 디폴트 값은 Serial 큐
- 단, attributes: .conccurent를 추가하면 동시성 큐
let serialQueue = DispatchQueue(label: "MyQueue")
let concurrentQueue = DispatchQueue(label: "MyArrayQueue", attributes: .concurrent)
iOS에서 스레드가 동작하는 방식
- 별도의 DispatchQueue 코드 없이 바로 코드 선언할 경우 (Serial Queue)
import UIKit

class ViewController: UIViewController {
  override func viewDidLoad() {
    super.viewDidLoad()

    var a = 1
    a = a + 2
    print(a)
  }
}


- DispatchQueue를 선언해서 사용하는 경우, concurrent를 선언해주지 않으면 serial queue이므로 위와 동일하게 동작
let serialQueue = DispatchQueue(label: "serial")
serialQueue.sync {
  var a = 1
  a = a + 2
  print(a)
}
async와 sync
- async는 작업이 종료할때까지 기다리지 않고 바로 진행하라는 의미
- sync는 작업이 종료될때까지 기다리다가, 이전 작업이 종료되었을때 수행
- DispatchQueue에서의 async, sync의미 파악이 더욱 중요
- DispatchQueue.sync: 해당 코드를 부르는 쪽에서 sync로 처리하라는 의미
- DispatchQueue.async: 해당 코드를 부르는 쪽에서 async로 처리하라는 의미
ex) main thread에서 DispatchQueue().sync를 사용한 경우
- 호출한 쪽이 main thread이므로 main thread에서 sync하게 동작
class ViewController: UIViewController {
  override func viewDidLoad() {
    super.viewDidLoad()

    let serialQueue = DispatchQueue(label: "serial")
    serialQueue.sync {
      var a = 1
      a = a + 2
      print(a)
    }
  }
}- sync를 부른 쪽에 적용되기 때문에, DispatchQueue를 여러개 두고 테스트를 해봤을때 모두 sync하게 동작하는것을 확인 가능
import UIKit

class ViewController: UIViewController {
  override func viewDidLoad() {
    super.viewDidLoad()

    let serialQueue1 = DispatchQueue(label: "serial1")
    serialQueue1.sync {
      sleep(3)
      print("task1 finish")
    }

    let serialQueue2 = DispatchQueue(label: "serial2")
    serialQueue2.sync {
      print("call after task1 is done?")
    }
  }
}

/*
task1 finish
call after task1 is done?
*/- 만약 async로 부르는 경우, main thread에서 async로 인지하여, sleep(3)을 무시하고 두번째 큐가 먼저 실행
class ViewController: UIViewController {
  override func viewDidLoad() {
    super.viewDidLoad()

    let serialQueue1 = DispatchQueue(label: "serial1")
    serialQueue1.async {
      sleep(3)
      print("task1 finish")
    }

    let serialQueue2 = DispatchQueue(label: "serial2")
    serialQueue2.async {
      print("call after task1 is done?")
    }
  }
}
/*
call after task1 is done?
task1 finish

*/
Serial Queue와 Concurrent Queue
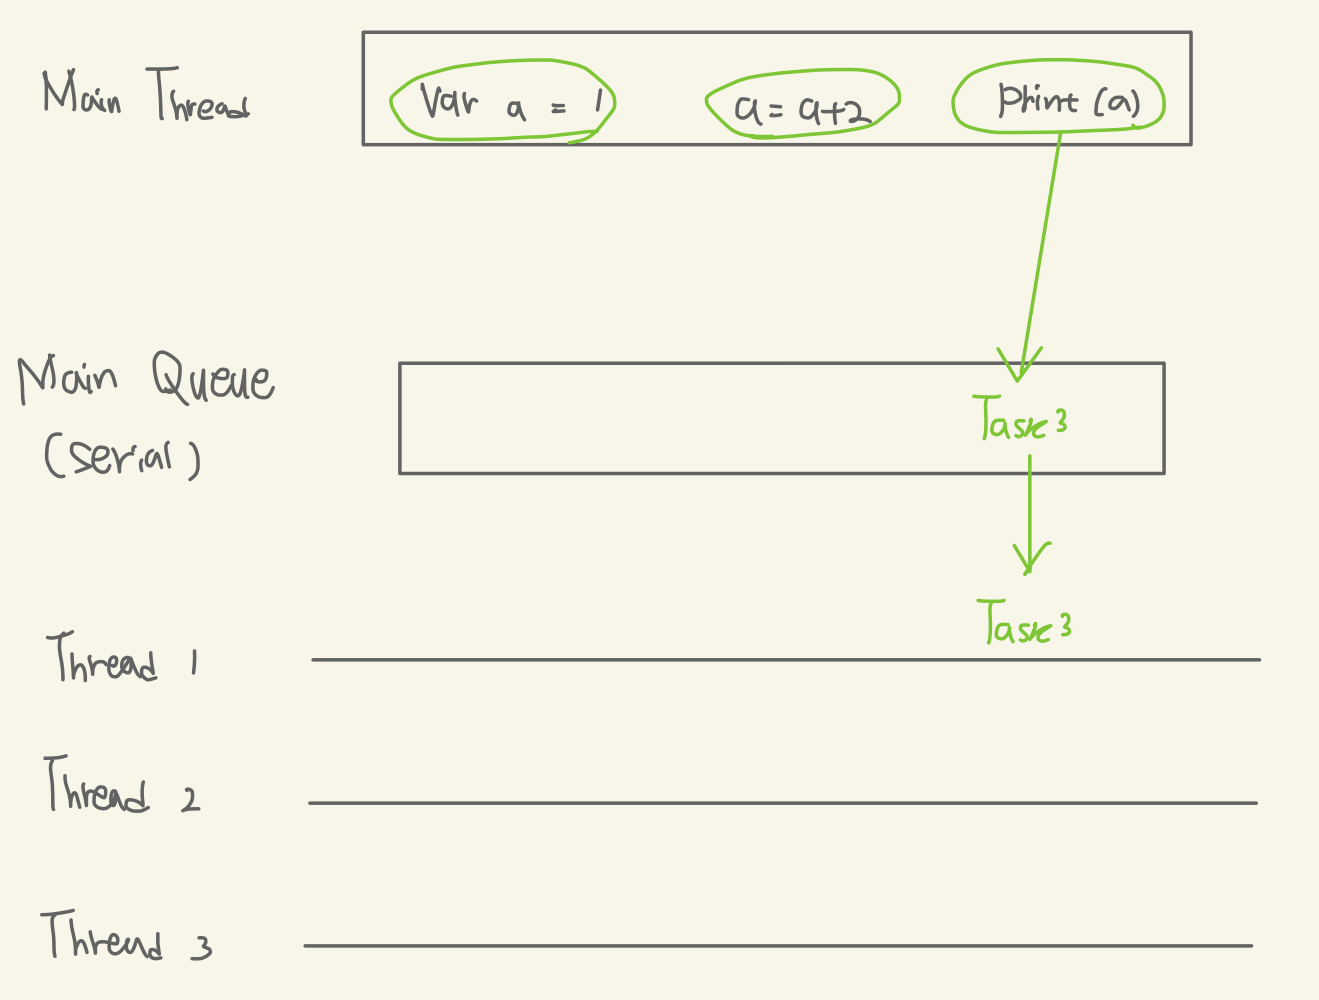
- Serial Queue는 위에서 살펴본대로, Queue에 하나씩 담기고 스레드 하나씩만 관여하는 작업
(아래 Main Queue에 Task가 두개 쌓여있지만 하나씩 처리되고 있는것)
// main thread > serial queue

class ViewController: UIViewController {
  override func viewDidLoad() {
    super.viewDidLoad()

    var a = 1
    a = a + 2
    print(a)
  }
}
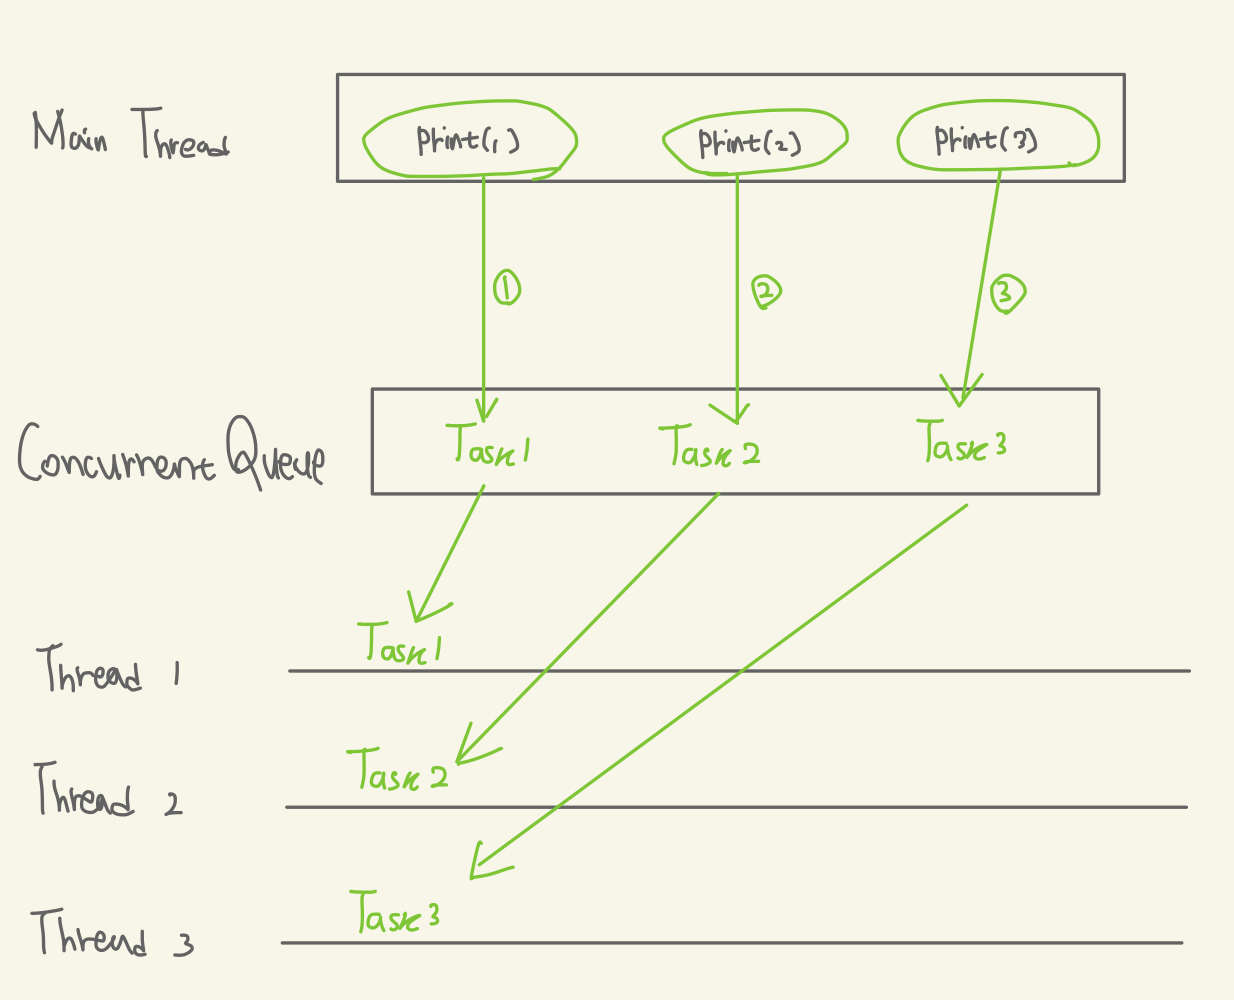
- Concurrent Queue는 Queue에서 스레드로 작업들을 여러개 동시에 전달
class ViewController: UIViewController {
  override func viewDidLoad() {
    super.viewDidLoad()

    let concurrentQueue = DispatchQueue(label: "concurrent", attributes: .concurrent)
    concurrentQueue.async {
      print(1)
    }

    concurrentQueue.async {
      print(2)
    }

    concurrentQueue.async {
      print(3)
    }
  }
}

/*
 1
 3
 2
 */
헷갈리기 쉬운 개념
DispatchQueue.sync, DispatchQueue.async의 의미는,
자기 자신 DispatchQueue를 사용하는쪽(메인 스레드)에서 sync 또는 async 하게 처리하라는 의미로 이해할것
- sync, async는 사용하는 쪽의 스레드에 영향
- 별도의 큐 두개를 준비하고 모두 async로 주면 메인 스레드에서 async로 받아들임 (UI 업데이트 블락 x)
- 별도의 큐 두개를 준비하고 모두 sync로 주면 메인 스레드에서 sync로 받아들임 (UI 업데이트도 블락 o)
// 별도의 큐 두개를 준비하고 모두 async로 주면 메인 스레드에서 async로 받아들임 (UI 업데이트 블락 x)

let serialQueue1 = DispatchQueue(label: "serial1")
let serialQueue2 = DispatchQueue(label: "serial2")
serialQueue1.async {
  print("job 1")
  sleep(1)
}
serialQueue1.async {
  print("job 2")
}
serialQueue2.async {
  print("job 3")
}
serialQueue2.async {
  print("job 4")
}

/*
job 1
job 3
job 4

(after seconds...)job 2
*/
// 별도의 큐 두개를 준비하고 모두 sync로 주면 메인 스레드에서 sync로 받아들임 (UI 업데이트도 블락 o)
let serialQueue1 = DispatchQueue(label: "serial1")
let serialQueue2 = DispatchQueue(label: "serial2")
serialQueue1.sync {
print("job 1")
sleep(1)
}
serialQueue1.sync {
print("job 2")
}
serialQueue2.sync {
print("job 3")
}
serialQueue2.sync {
print("job 4")
}
/*
job 1
(wait...)
job 2
job 3
job 4
*/serial queue 하나에 async하게 작업을 보내도 순서대로 수행
- async를 사용한다는건 메인 스레드에 async가 적용된다는 의미이므로 해당 queue가 async라는 의미는 x
let serialQueue1 = DispatchQueue(label: "serial1")
serialQueue1.async {
  print("job 1")
}
serialQueue1.async {
  print("job 2")
  sleep(1)
}
serialQueue1.async {
  print("job 3")
}
serialQueue1.async {
  print("job 4")
}

/*
job 1
job 2
(wait...)
job 3
job 4
*/
// 위 코드와 동일
let serialQueue1 = DispatchQueue(label: "serial1")
serialQueue1.async {
print("job 1")
print("job 2")
sleep(1)
print("job 3")
print("job 4")
}DispatchQueue, sync와 async의 우선순위
- 메인 스레드에서 async, sync하게 처리하는 작업이 여러개 존재할 때 우선순위는 async보다 sync가 높음
- async는 결과가 끝나는 것을 기다리지 않고 다음 작업을 수행하여, 다른 작업에도 기능을 수행하여 현재 작업에 100%를 집중하지 않아 sync보다 결과를 늦게 반환하는 경우가 존재
// 짝수는 모두 sync로 한 결과, 홀수보다 짝수 print가 더 빨리 실행되는 결과

let serialQueue1 = DispatchQueue(label: "serial1")
let serialQueue2 = DispatchQueue(label: "serial2")
serialQueue1.async {
  print("job 1")
}
serialQueue2.sync {
  print("job 2")
}
serialQueue1.async {
  print("job 3")
}
serialQueue2.sync {
  print("job 4")
}
serialQueue1.async {
  print("job 5")
}
serialQueue2.sync {
  print("job 6")
}
serialQueue1.async {
  print("job 7")
}
serialQueue2.sync {
  print("job 8")
}

/*
job 2
job 1
job 4
job 6
job 8
job 3
job 5
job 7
*/
'iOS 응용 (swift)' 카테고리의 다른 글
Comments


