Notice
Recent Posts
Recent Comments
Link
| 일 | 월 | 화 | 수 | 목 | 금 | 토 |
|---|---|---|---|---|---|---|
| 1 | 2 | 3 | 4 | 5 | 6 | 7 |
| 8 | 9 | 10 | 11 | 12 | 13 | 14 |
| 15 | 16 | 17 | 18 | 19 | 20 | 21 |
| 22 | 23 | 24 | 25 | 26 | 27 | 28 |
Tags
- uitableview
- Human interface guide
- UICollectionView
- scrollview
- 리팩토링
- map
- tableView
- 애니메이션
- 스위프트
- RxCocoa
- swiftUI
- uiscrollview
- SWIFT
- collectionview
- 리펙토링
- rxswift
- ios
- UITextView
- MVVM
- Protocol
- Observable
- HIG
- Xcode
- 클린 코드
- swift documentation
- Refactoring
- ribs
- Clean Code
- combine
- clean architecture
Archives
- Today
- Total
김종권의 iOS 앱 개발 알아가기
[iOS -swift] 툴팁 뷰 구현 방법 (ToolTip View) 본문

툴팁 구현 아이디어
- UILabel과 삼각형 뷰인 tipView를 감싸는 containerView를 만들고 두 개를 집어넣기
- tipView의 구현은 draw(_ rect: CGRect) 메소드에서 UIBezierPath()로 선을 긋고 fill()로 삼각형 뷰를 구현

TipView 구현

- 삼각형 모양의 뷰이며 UIBezierPath()를 사용하여 구현
- backgroundColor를 .clear로 초기화한 후 setFill()이라는 static 메소드 호출 (setFill은 현재의 context에 컬러 색상을 채우는 기능)
- path로 왼쪽 상단부터, 오른쪽, 아래로 그린 후 close()하고 fill()하면 삼각형 완성
private class TipView: UIView {
    var bgColor = UIColor.gray

    override func draw(_ rect: CGRect) {
        backgroundColor = .clear
        bgColor.setFill()

        let path = UIBezierPath()
        path.move(to: CGPoint(x: 0, y: 0))
        path.addLine(to: CGPoint(x: rect.maxX, y: 0))
        path.addLine(to: CGPoint(x: rect.midX, y: rect.maxY))
        path.close()
        path.fill()
    }
}- 상단 tip도 대응하려면 아래처럼 구현
private class TipView: UIView {
    var isTopTip = false
    var bgColor = UIColor.gray

    override func draw(_ rect: CGRect) {
        backgroundColor = .clear
        bgColor.setFill()

        isTopTip ? drawTopTip(rect) : drawBottomTip(rect)
    }

    private func drawTopTip(_ rect: CGRect) {
        let path = UIBezierPath()
        path.move(to: CGPoint(x: rect.midX, y: 0))
        path.addLine(to: CGPoint(x: rect.maxX, y: rect.maxY))
        path.addLine(to: CGPoint(x: rect.minX, y: rect.maxY))
        path.close()
        path.fill()
    }

    private func drawBottomTip(_ rect: CGRect) {
        let path = UIBezierPath()
        path.move(to: CGPoint(x: 0, y: 0))
        path.addLine(to: CGPoint(x: rect.maxX, y: 0))
        path.addLine(to: CGPoint(x: rect.midX, y: rect.maxY))
        path.close()
        path.fill()
    }
}
ToolTipView 구현
- 사각형에다가 위에서 구현한 tipView를 밑에 붙이면 완료
- 뷰 레이아웃 구현에는 코드 베이스로 쉽게 구현할 수 있도록 SnapKit 사용
- 구현 아이디어
- containerView를 하나 만들고 여기에 UILabel과 ToolTip을 넣고 구현
- 필요한 뷰 선언
final class ToolTipView: UIView {
    private let containerView = UIView()
    private let label: UILabel = {
        let label = UILabel()
        label.numberOfLines = 0
        label.textAlignment = .center
        return label
    }()
    private let tipView = TipView()
}- 필요한 property, init 선언
private let textColor: UIColor
private let bgColor: UIColor

init(title: String?, textColor: UIColor = .white, backgroundColor: UIColor = .gray, isTopTip: Bool = false) {
    label.text = title
    tipView.isTopTip = isTopTip
    self.textColor = textColor
    self.bgColor = backgroundColor

    super.init(frame: .zero)

    setupUI()
    setupLayout()
}
required init?(coder: NSCoder) {
    fatalError()
}

private func setupUI() {
  // TODO...
}

private func setupLayout() {
  // TODO...
}- setupUI와 setupLayout() 구현
private func setupUI() {
    backgroundColor = .clear
    label.textColor = textColor
    containerView.backgroundColor = bgColor
    tipView.bgColor = bgColor
}

private func setupLayout() {
    addSubview(containerView)
    containerView.addSubview(label)
    containerView.addSubview(tipView)

    tipView.isTopTip ? layoutTopTip() : layoutBottomTip()
}

private func layoutTopTip() {
  // TODO...
}

private func layoutBottomTip() {
  // TODO...
}- layoutTopTip(), layoutBottomTip() 구현
private func layoutTopTip() {
    containerView.snp.makeConstraints {
        $0.leading.trailing.equalToSuperview()
        $0.top.equalToSuperview().inset(8)
        $0.bottom.equalToSuperview()
    }

    label.snp.makeConstraints {
        $0.edges.equalToSuperview().inset(UIEdgeInsets(top: 10, left: 5, bottom: 10, right: 5))
    }

    tipView.snp.makeConstraints{
        $0.size.equalTo(CGSize(width: 10, height: 5))
        $0.bottom.equalTo(containerView.snp.top)
        $0.centerX.equalToSuperview()
    }
}

private func layoutBottomTip() {
    containerView.snp.makeConstraints {
        $0.leading.trailing.equalToSuperview()
        $0.top.equalToSuperview()
        $0.bottom.equalToSuperview().inset(8)
    }

    label.snp.makeConstraints {
        $0.edges.equalToSuperview().inset(UIEdgeInsets(top: 10, left: 5, bottom: 10, right: 5))
    }

    tipView.snp.makeConstraints{
        $0.size.equalTo(CGSize(width: 10, height: 5))
        $0.top.equalTo(containerView.snp.bottom)
        $0.centerX.equalToSuperview()
    }
}
(완료)

보완) tip의 분기문에 bool을 사용하는 것보다 enum을 사용
- isTopTip이라는 bool을 사용하면, 이를 사용하는 쪽에서 top이라는것이 아닌 경우 어떤 코드인지 예측하기가 힘들기 때문에 enum으로 명확하게 관리하는것이 유지보수에 용이
- TipPosition 생성
enum TipPosition {
    case top
    case bottom
}- ToolTipView에 isTopTip대신 tipPosition 매개변수로 변경
final class ToolTipView: UIView {
    ...

    init(title: String?, textColor: UIColor = .white, backgroundColor: UIColor = .gray, tipPoistion: TipPosition = .bottom) {
        ...
    }
}- TipView에도 마찬가지로 적용
private class TipView: UIView {
    var tipPoistion = TipPosition.bottom

    ...
}- 사용하는 쪽
class ViewController: UIViewController {
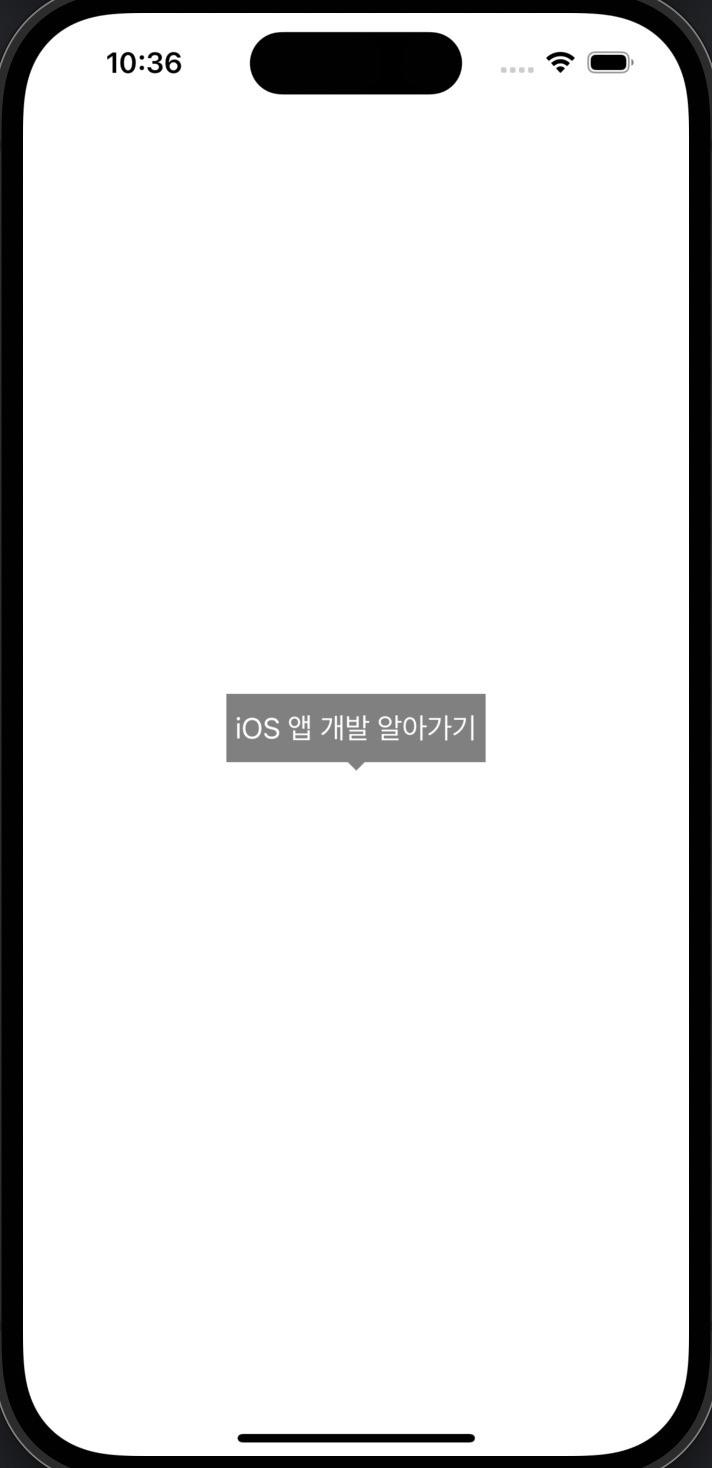
    private let toolTipView = ToolTipView(title: "iOS 앱 개발 알아가기", tipPoistion: .bottom)

    override func viewDidLoad() {
        super.viewDidLoad()
        view.addSubview(toolTipView)

        toolTipView.snp.makeConstraints {
            $0.center.equalToSuperview()
        }
    }
}
* 전체 코드
https://github.com/JK0369/ExToolTipView
* 참고
https://stackoverflow.com/questions/48725671/draw-rect-cgrect-not-getting-called-in-custom-view
'UI 컴포넌트 (swift)' 카테고리의 다른 글
Comments


