Notice
Recent Posts
Recent Comments
Link
| 일 | 월 | 화 | 수 | 목 | 금 | 토 |
|---|---|---|---|---|---|---|
| 1 | 2 | 3 | 4 | 5 | 6 | 7 |
| 8 | 9 | 10 | 11 | 12 | 13 | 14 |
| 15 | 16 | 17 | 18 | 19 | 20 | 21 |
| 22 | 23 | 24 | 25 | 26 | 27 | 28 |
Tags
- 리팩토링
- Clean Code
- map
- 스위프트
- RxCocoa
- combine
- ribs
- scrollview
- ios
- swiftUI
- rxswift
- uitableview
- SWIFT
- Human interface guide
- clean architecture
- MVVM
- uiscrollview
- tableView
- UITextView
- 애니메이션
- Observable
- 클린 코드
- UICollectionView
- Xcode
- swift documentation
- 리펙토링
- Refactoring
- collectionview
- Protocol
- HIG
Archives
- Today
- Total
김종권의 iOS 앱 개발 알아가기
[iOS - swift] UILayoutGuide 개념 본문
UILayoutGuide 개념
- Auto Layout을 사용하는 뷰에서 "뷰 없이" autolayout을 설정할 수 있는 방법
- rectangular 영역을 표현할 수 있는 것

- UIView로만 autolayout을 설정할 수 있는데 굳이 UILayoutGuide가 있는 이유?
- 빈공간을 표현하고 싶을 때, UIView없이 공간만 autolayout으로 잡아도 되는데 이 때 UILayoutGuide를 활용
- "빈공간"을 표현하려고 할 때 UIView는 목적과는 다르게 많은 기능을 가지고 있는 상태이고 UILayoutGuide 인스턴스는 그에 맞는 기능만 있으므로 목적에 맞게끔 코딩이 가능

UILayoutGuide 코드
- 위에서 알아본대로 UILayoutGuide는 autolayout을 위한 형태
- 아래에서 확인할 수 있듯이 leadingAnchor 부터... centerYAnchor까지 autolayout에 관련된 프로퍼티들이 다수 존재
@available(iOS 9.0, *)
@MainActor open class UILayoutGuide : NSObject, NSCoding {
    open var layoutFrame: CGRect { get }
    weak open var owningView: UIView?
    open var identifier: String

    open var leadingAnchor: NSLayoutXAxisAnchor { get }
    open var trailingAnchor: NSLayoutXAxisAnchor { get }
    open var leftAnchor: NSLayoutXAxisAnchor { get }
    open var rightAnchor: NSLayoutXAxisAnchor { get }
    open var topAnchor: NSLayoutYAxisAnchor { get }
    open var bottomAnchor: NSLayoutYAxisAnchor { get }
    open var widthAnchor: NSLayoutDimension { get }
    open var heightAnchor: NSLayoutDimension { get }
    open var centerXAnchor: NSLayoutXAxisAnchor { get }
    open var centerYAnchor: NSLayoutYAxisAnchor { get }
}
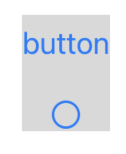
ex) 상단에 버튼이 있고 하단에 imageView가 있는 UI 구현
- UIButton 하나와 UIIMageView하나를 사용하여 구현이 가능하고, 이것을 UILayoutGuide를 사용하여 구현하면?

- UILayoutGuide없이 구현
- button의 하단에 imageView가 위치하도록 구현
final class MyView1: UIView {
    private let button: UIButton = { ... }()
    private let imageView: UIImageView = { ... }()

    init() {
        super.init(frame: .zero)

        addSubview(button)
        addSubview(imageView)

        NSLayoutConstraint.activate([
            button.leadingAnchor.constraint(equalTo: leadingAnchor),
            button.trailingAnchor.constraint(equalTo: trailingAnchor),
            button.topAnchor.constraint(equalTo: topAnchor)
        ])
        NSLayoutConstraint.activate([
            imageView.centerXAnchor.constraint(equalTo: centerXAnchor),
            imageView.topAnchor.constraint(equalTo: button.bottomAnchor, constant: 16),
            imageView.bottomAnchor.constraint(equalTo: bottomAnchor)
        ])
    }
}- UILayoutGuide사용하여 구현
- layoutGuide를 따로 두고 이 layoutGuide를 버튼과 이미지 뷰 사이에 끼워넣는 형태로 autolayout 정의
final class MyView1: UIView {
    private let button: UIButton = { ... }()
    private let imageView: UIImageView = { ... }()

    private lazy var layoutGuide: UILayoutGuide = {
        let guide = UILayoutGuide()
        addLayoutGuide(guide)
        return guide
    }()

    init() {
        super.init(frame: .zero)

        ...

        NSLayoutConstraint.activate([
            button.leadingAnchor.constraint(equalTo: leadingAnchor),
            button.trailingAnchor.constraint(equalTo: trailingAnchor),
            button.topAnchor.constraint(equalTo: topAnchor)
        ])

        NSLayoutConstraint.activate([
            layoutGuide.leadingAnchor.constraint(equalTo: leadingAnchor),
            layoutGuide.trailingAnchor.constraint(equalTo: trailingAnchor),
            layoutGuide.topAnchor.constraint(equalTo: button.bottomAnchor),
            layoutGuide.heightAnchor.constraint(equalToConstant: 16)
        ])

        NSLayoutConstraint.activate([
            imageView.centerXAnchor.constraint(equalTo: centerXAnchor),
            imageView.topAnchor.constraint(equalTo: layoutGuide.bottomAnchor),
            imageView.bottomAnchor.constraint(equalTo: bottomAnchor)
        ])
    }
}
결과)
- 상단 - UILayoutGuide없이 구현
- 하단 - UILayoutGuide있이 구현

* 전체 코드: https://github.com/JK0369/ExUILayoutGuide
* 참고
- https://developer.apple.com/documentation/uikit/uilayoutguide
'iOS 응용 (swift)' 카테고리의 다른 글
Comments


