Notice
Recent Posts
Recent Comments
Link
| 일 | 월 | 화 | 수 | 목 | 금 | 토 |
|---|---|---|---|---|---|---|
| 1 | 2 | 3 | 4 | 5 | 6 | 7 |
| 8 | 9 | 10 | 11 | 12 | 13 | 14 |
| 15 | 16 | 17 | 18 | 19 | 20 | 21 |
| 22 | 23 | 24 | 25 | 26 | 27 | 28 |
Tags
- uitableview
- 리펙토링
- 리팩토링
- 애니메이션
- clean architecture
- Observable
- scrollview
- 클린 코드
- UICollectionView
- Protocol
- Refactoring
- tableView
- map
- ribs
- HIG
- ios
- collectionview
- uiscrollview
- swiftUI
- Clean Code
- swift documentation
- SWIFT
- UITextView
- rxswift
- combine
- Xcode
- RxCocoa
- 스위프트
- MVVM
- Human interface guide
Archives
- Today
- Total
김종권의 iOS 앱 개발 알아가기
[iOS - SwiftUI] stroke 사용 시 주의사항 (#원 안에 테두리 넣기) 본문
원 안에 테두리가 있는 UI
- 원 안에 테두리가 있는 아래 UI를 구현하는 방법?

- 보통은 Circle()을 선언하고 여기에 oberlay를 사용하여 stroke로 위에 뷰를 덫붙여서 구현
struct ContentView: View {
    let lineWidth = 1.0
    let length = 40.0

    var body: some View {
        VStack {
            Circle() // 첫 번째 circle
                .stroke(Color(UIColor.clear), lineWidth: lineWidth)
                .background(Color(UIColor.lightGray))
                .frame(width: length, height: length)
                .cornerRadius(length / 2)
                .overlay(
                    Circle() // 두 번째 circle
                        .trim(from: 0, to: 1)
                        .stroke(Color.black, lineWidth: lineWidth)
                )
        }
    }
}- 하지만 stroke옵션의 원리는 해당 뷰의 안쪽이 아닌 바깥쪽으로 그려지기 때문에 주의 할 것
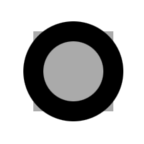
- 위처럼 작성하면 첫 번째 circle보다 외부에 circle이 그려질 것
ex) circle에 cornerRadius를 제거하여 두 번째 circle이 어떻게 그려지는지 비교
- 차이를 알기 위해 lineWidth를 크게 10으로 설정하여 비교
struct ContentView: View {
    let lineWidth = 10.0
    let length = 40.0

    var body: some View {
        VStack {
            Circle() // 첫 번째 circle
                .stroke(Color(UIColor.clear), lineWidth: lineWidth)
                .background(Color(UIColor.lightGray))
                .frame(width: length, height: length)
//                .cornerRadius(length / 2)
                .overlay(
                    Circle() // 두 번째 circle
                        .trim(from: 0, to: 1)
                        .stroke(Color.black, lineWidth: lineWidth)
                )
        }
    }
}- 결과를 보면 두 번째 circle이 frame을 침범하는 상황이 발생
- 이처럼 stroke속성은 기존 뷰에서 바깥으로 길어지기 때문에 주의할 것
| 위 코드 | 기대하는 결과 |
 |
 |
- 기대하는 결과처럼 되도록 해결 방법?
- overlay에서 추가된 뷰에 padding을 추가해주면 해결 완료
struct ContentView: View {
    let lineWidth = 10.0
    let length = 40.0

    var body: some View {
        VStack {
            Circle() // 첫 번째 circle
                .stroke(Color(UIColor.clear), lineWidth: lineWidth)
                .background(Color(UIColor.lightGray))
                .frame(width: length, height: length)
//                .cornerRadius(length / 2)
                .overlay(
                    Circle() // 두 번째 circle
                        .trim(from: 0, to: 1)
                        .stroke(Color.black, lineWidth: lineWidth)
                        .padding(lineWidth / 2) /// 패딩을 추가하여 stroke를 안쪽으로 이동
                )
        }
    }
}

'iOS 응용 (SwiftUI)' 카테고리의 다른 글
Comments


