Notice
Recent Posts
Recent Comments
Link
| 일 | 월 | 화 | 수 | 목 | 금 | 토 |
|---|---|---|---|---|---|---|
| 1 | 2 | 3 | 4 | 5 | 6 | 7 |
| 8 | 9 | 10 | 11 | 12 | 13 | 14 |
| 15 | 16 | 17 | 18 | 19 | 20 | 21 |
| 22 | 23 | 24 | 25 | 26 | 27 | 28 |
Tags
- ios
- Protocol
- ribs
- Clean Code
- RxCocoa
- tableView
- uitableview
- Human interface guide
- clean architecture
- MVVM
- uiscrollview
- Refactoring
- swiftUI
- UITextView
- rxswift
- Xcode
- SWIFT
- swift documentation
- Observable
- 리팩토링
- 스위프트
- map
- HIG
- collectionview
- 리펙토링
- scrollview
- combine
- 클린 코드
- 애니메이션
- UICollectionView
Archives
- Today
- Total
김종권의 iOS 앱 개발 알아가기
[iOS - swift] 서버 푸시 (remote notification), APNs (Apple Push Notification service) 본문
iOS 응용 (swift)
[iOS - swift] 서버 푸시 (remote notification), APNs (Apple Push Notification service)
jake-kim 2020. 12. 17. 21:29푸시의 종류
- 로컬 푸시(local notificatino): 앱으로부터 push를 앱에 띄우는 것 - ios-development.tistory.com/386
- 서버 푸시(remote notificatino): 서버로부터 push를 앱에 띄우는 것
서버에서 푸시를 받는 원리
- Apple Developer 홈페이지에서 push서비스와 함께 Identifiers등록
- push서비스와 함께 certificates 발급
- APNs에 디바이스 토큰 등록
Identifiers에 push등록
Certificates생성, Provisioning profile생성 방법은 여기 참고: ios-development.tistory.com/256?category=936128
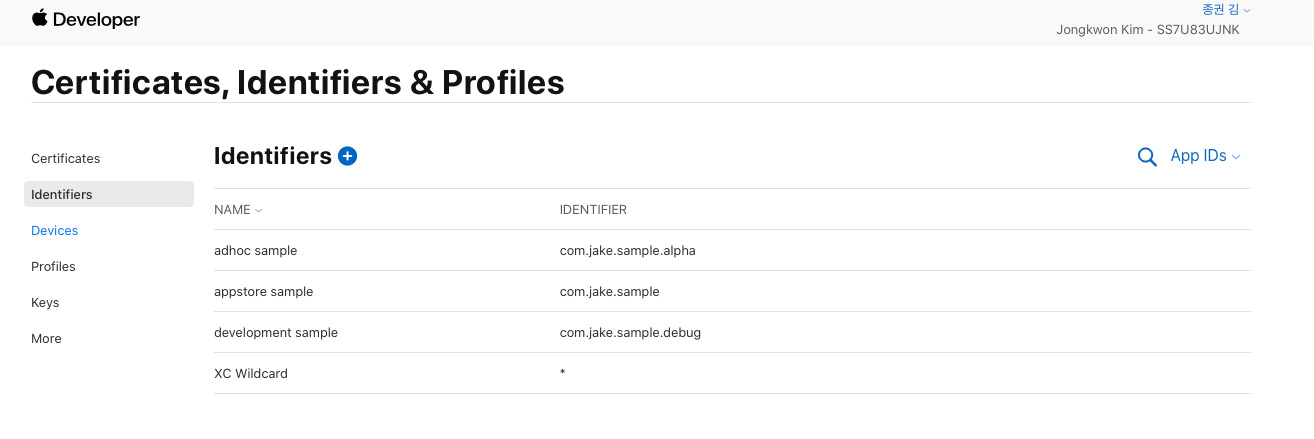

디바이스 토큰을 APNs에 등록하는 원리
- 디바이스 토큰: iOS푸시알림은 APNs에서 발송하는데, 애플서버에서 디바이스 토큰을 통해 푸시알림을 보냄
이 디바이스 토큰을 만들어 애플서버에 알려주어야 함 - 사용자에게 푸시알림을 승인한 경우, APNs에 디바이스 토큰이 등록되게끔 설정
디바이스 토큰을 APNs에 등록 방법
- 사용자에게 notification권한 획득을 위해 UNUserNotificationCenter객체 이용 및 APNs 디바이스 토큰 등록
1. 푸시 center로 유저에게 권한 요청
2. APNs에 디바이스 토큰 등록 - Delegate등록
3. 앱이 foreground상태 일 때 알림이 온 경우 어떻게 표현할 것인지 처리
4. push가 온 경우 처리
    private func registerForRemoteNotifications() {

        // 1. 푸시 center (유저에게 권한 요청 용도)
        let center = UNUserNotificationCenter.current()
        center.delegate = self // push처리에 대한 delegate - UNUserNotificationCenterDelegate
        let options: UNAuthorizationOptions = [.alert, .sound, .badge]
        center.requestAuthorization(options: options) { (granted, error) in

            guard granted else {
                return
            }

            DispatchQueue.main.async {
                // 2. APNs에 디바이스 토큰 등록
                UIApplication.shared.registerForRemoteNotifications()
            }
        }
    }

    extension AppDelegate: UNUserNotificationCenterDelegate {

    // 3. 앱이 foreground상태 일 때, 알림이 온 경우 어떻게 표현할 것인지 처리
    func userNotificationCenter(_ center: UNUserNotificationCenter,
                                willPresent notification: UNNotification,
                                withCompletionHandler completionHandler: @escaping (UNNotificationPresentationOptions) -> Void) {

        // 푸시가 오면 alert, badge, sound표시를 하라는 의미
        completionHandler([.alert, .badge, .sound])
    }

    // push를 탭한 경우 처리
    func userNotificationCenter(_ center: UNUserNotificationCenter, didReceive response: UNNotificationResponse, withCompletionHandler completionHandler: @escaping () -> Void) {

        // deep link처리 시 아래 url값 가지고 처리
        let url = response.notification.request.content.userInfo
        print("url = \(url)")

        // if url.containts("receipt")...
    }
}- application(_:didFinishLaunchingWithOptions) -> Bool 함수에서 호출
    func application(_ application: UIApplication, didFinishLaunchingWithOptions launchOptions: [UIApplication.LaunchOptionsKey: Any]?) -> Bool {

        registerForRemoteNotifications()

        return true
}- 실행

- AppDelegate전체 코드
//
//  AppDelegate.swift
//  test
//
//  Created by 김종권 on 2020/12/17.
//

import UIKit

@main
class AppDelegate: UIResponder, UIApplicationDelegate {


    func application(_ application: UIApplication, didFinishLaunchingWithOptions launchOptions: [UIApplication.LaunchOptionsKey: Any]?) -> Bool {

        registerForRemoteNotifications()

        return true
    }

    private func registerForRemoteNotifications() {

        // 1. 푸시 center (유저에게 권한 요청 용도)
        let center = UNUserNotificationCenter.current()
        center.delegate = self // push처리에 대한 delegate - UNUserNotificationCenterDelegate
        let options: UNAuthorizationOptions = [.alert, .sound, .badge]
        center.requestAuthorization(options: options) { (granted, error) in

            guard granted else {
                return
            }

            DispatchQueue.main.async {
                // 2. APNs에 디바이스 토큰 등록
                UIApplication.shared.registerForRemoteNotifications()
            }
        }
    }

    // MARK: UISceneSession Lifecycle

    func application(_ application: UIApplication, configurationForConnecting connectingSceneSession: UISceneSession, options: UIScene.ConnectionOptions) -> UISceneConfiguration {
        return UISceneConfiguration(name: "Default Configuration", sessionRole: connectingSceneSession.role)
    }

    func application(_ application: UIApplication, didDiscardSceneSessions sceneSessions: Set<UISceneSession>) {
    }


}

extension AppDelegate: UNUserNotificationCenterDelegate {

    // 앱이 foreground상태 일 때, 알림이 온 경우 처리
    func userNotificationCenter(_ center: UNUserNotificationCenter,
                                willPresent notification: UNNotification,
                                withCompletionHandler completionHandler: @escaping (UNNotificationPresentationOptions) -> Void) {

        // 푸시가 오면 alert, badge, sound표시를 하라는 의미
        completionHandler([.alert, .badge, .sound])
    }

    // push를 탭한 경우 처리
    func userNotificationCenter(_ center: UNUserNotificationCenter, didReceive response: UNNotificationResponse, withCompletionHandler completionHandler: @escaping () -> Void) {

        // deep link처리 시 아래 url값 가지고 처리
        let url = response.notification.request.content.userInfo
        print("url = \(url)")

        // if url.containts("receipt")...
    }
}- 추가적인 application함수
- 디바이스 토큰 등록 성공 시 실행되는 메서드
    func application(_ application: UIApplication, didRegisterForRemoteNotificationsWithDeviceToken deviceToken: Data) {

    }
- 디바이스 토큰 등록 실패 시 실행되는 메서드
func application(_ application: UIApplication, didFailToRegisterForRemoteNotificationsWithError error: Error) {
}- Push Notification 설정: "+Capability" 선택 -> Push Notification추가
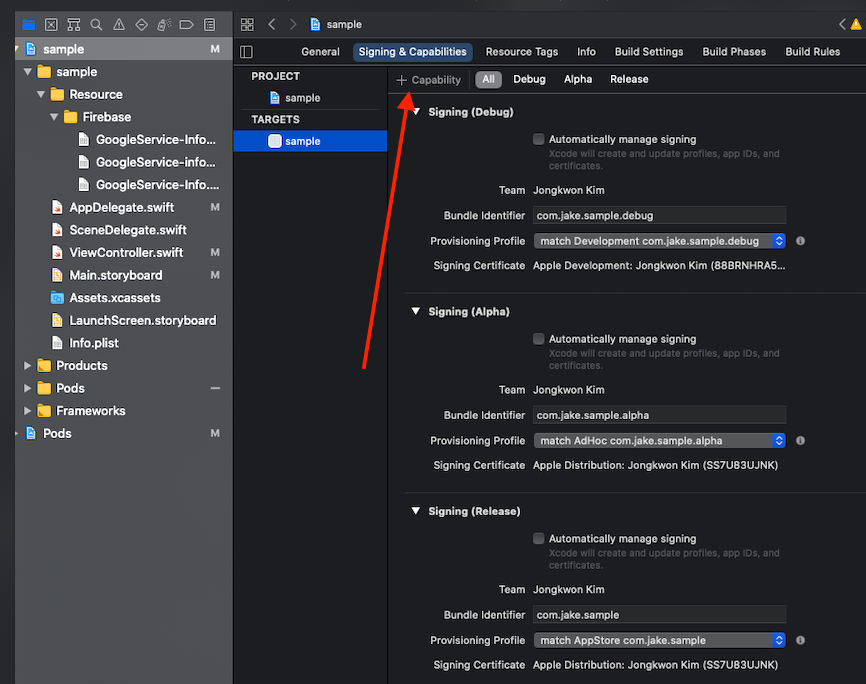

앱스토어에서 앱으로 테스트

- 앱에 입력할 3가지: Device Token, App bundle, Certificate
- apple developer 홈페이지에서 인증서를 다운로드하여 push앱에 등록
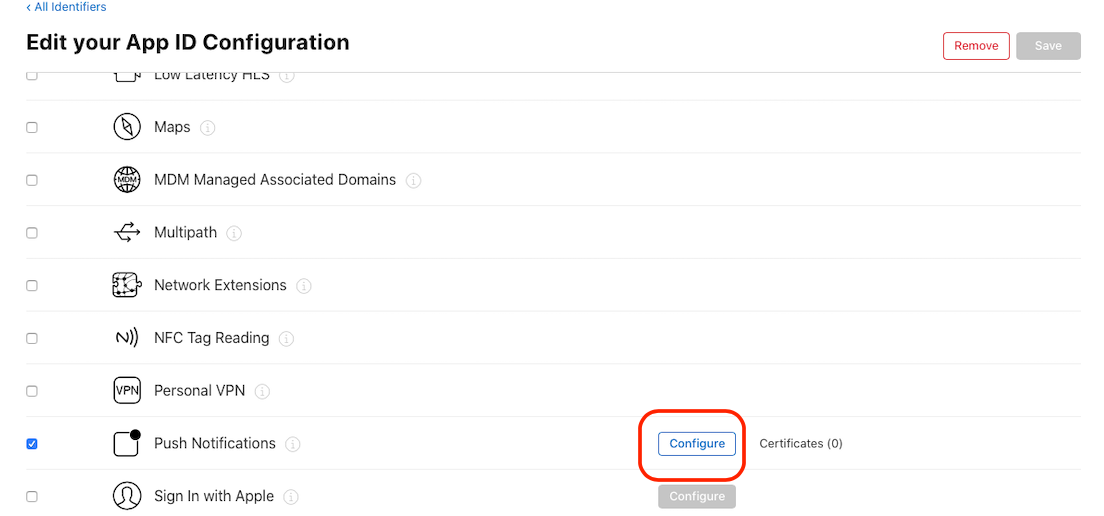
- 개발환경이라도 Production 인증서를 선택해도 테스트 가능


.p8 업로드 해야하는 경우 (추천)
- 만약 .p8파일을 업로드해야 한다면, Apple Developer > Keys > APNs 추가하여 그 파일을 업로드

.p12파일을 업로드 해야하는 경우 (비추천)
- 인증서 다운

- 더블클릭 -> 키체인 접근에서 해당 인증서의 하위 클릭 -> 오른쪽 마우스 -> 내보내기
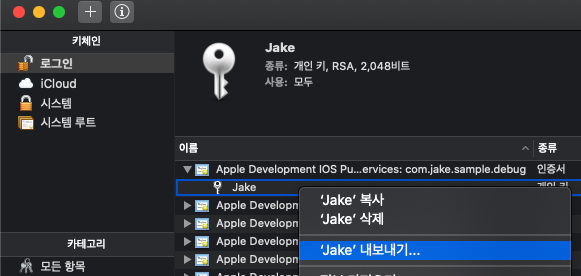
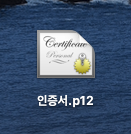
- 얻어진 인증서.p12를 푸시 테스트앱에 등록
- Device Token값은 AppDelegate에서 다음 함수로 확인
    func application(_ application: UIApplication, didRegisterForRemoteNotificationsWithDeviceToken deviceToken: Data) {
        let deviceTokenString = deviceToken.map { String(format: "%02x", $0) }.joined()
        print(deviceTokenString)
    }
- APNs인증서 등록, 디바이스 토큰 등록, 앱 번들 등록 후 Send Push
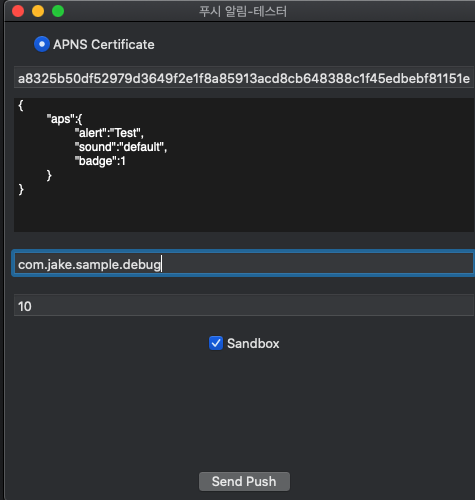
성공

특정 화면에 푸시 데이터 처리하기
- NotificationCenter이용
- 보내는 쪽: AppDelegate의 UNUserNotificationCenterDelegate구현 함수인 userNotificationCenter(:,didRecieve, withCompletionHandler)에서 구현
    func userNotificationCenter(_ center: UNUserNotificationCenter, didReceive response: UNNotificationResponse, withCompletionHandler completionHandler: @escaping () -> Void) {
    	NotificationCenter.default.post(name: .home, object: nil)
    }

// in CommonExtension
extension NSNotification.Name {
    static let home = NSNotification.Name("Home")
}- 받는 쪽
import RxSwift
import RxCocoa

func example() {
  NotificationCenter.default.rx.notification(.home)
    .asDriverOnErrorNever()
    .drive(onNext: { [weak self] _ in
	    self?.processDeeplink()
  }).disposed(by: disposeBag)
}
cf) Background에서 Foreground로 넘어온 경우, 특정 화면에서 알아차리는 방법
import RxSwift
import RxCocoa

func ex() {
  NotificationCenter.default.rx.notification(UIApplication.willEnterForegroundNotification)
    .asDriverOnErrorNever()
      .drive(onNext: { [weak self] _ in
          self?.checkSample()
  }).disposed(by: disposeBag)
}
* braze연동을 통한 server push 이해: https://ios-development.tistory.com/652
* deeplink 개념: https://ios-development.tistory.com/721
'iOS 응용 (swift)' 카테고리의 다른 글
Comments


