Notice
Recent Posts
Recent Comments
Link
| 일 | 월 | 화 | 수 | 목 | 금 | 토 |
|---|---|---|---|---|---|---|
| 1 | 2 | 3 | 4 | 5 | 6 | 7 |
| 8 | 9 | 10 | 11 | 12 | 13 | 14 |
| 15 | 16 | 17 | 18 | 19 | 20 | 21 |
| 22 | 23 | 24 | 25 | 26 | 27 | 28 |
Tags
- SWIFT
- ios
- UITextView
- 클린 코드
- tableView
- Refactoring
- Observable
- MVVM
- combine
- swiftUI
- HIG
- map
- 스위프트
- scrollview
- uiscrollview
- swift documentation
- 리펙토링
- 애니메이션
- 리팩토링
- Xcode
- ribs
- uitableview
- UICollectionView
- Protocol
- Clean Code
- Human interface guide
- RxCocoa
- rxswift
- clean architecture
- collectionview
Archives
- Today
- Total
김종권의 iOS 앱 개발 알아가기
[iOS - swift] TableView Cell 삭제, 편집, 이동 (snapshot, UIGrphics) 본문
HIG(Human Interface Guidelines)/HIG - UI
[iOS - swift] TableView Cell 삭제, 편집, 이동 (snapshot, UIGrphics)
jake-kim 2021. 5. 7. 01:41Cell 이동 애니메이션 적용 아이디어
|
Cell 사용
- Edit모드는 지양할 것 > 버튼을 눌러서 특정 작업을 한다는것은 번거로운 작업
- 셀을 직접 swipe해서 제거하거나, 셀을 long pressed하여 이동시키는 방법이 UX적으로 좋은 방법
Swipe to delete

- DataSource에 remove 함수 정의: dataSource에서 삭제하는 기능과 tableView에서 삭제되는 기능
class MyDataSource {
    var myData: [MyModel]

    ...

    func append(player: Player, to tableView: UITableView) {
        players.append(player)
        tableView.insertRows(at: [IndexPath(row: players.count-1, section: 0)], with: .automatic)
    }

    func remove(at indexPath: IndexPath, to tableView: UITableView) {
        players.remove(at: indexPath.row)
        tableView.deleteRows(at: [indexPath], with: .automatic)
    }
}- tableView delegate에서 실행
    override func tableView(_ tableView: UITableView, commit editingStyle: UITableViewCell.EditingStyle, forRowAt indexPath: IndexPath) {
        if editingStyle == .delete {
            myDataSource.remove(at: indexPath, to: tableView)
        }
    }
Edit to delete

- DataSource에 button이 눌린 경우 edit하는 함수 추가
- 주의: BarButtonItem의 style은 "edit"이 아닌 custom이어야 button의 title을 변경 가능
class MyDataSource {
    var myData: [MyModel]

    ...

    func append(player: Player, to tableView: UITableView) {
        ...
    }

    func remove(at indexPath: IndexPath, to tableView: UITableView) {
        ...
    }

    func edit(with button: UIBarButtonItem, to tableView: UITableView) {
        if tableView.isEditing {
            button.title = "Edit"
            tableView.setEditing(false, animated: true)
        } else {
            button.title = "Done"
            tableView.setEditing(true, animated: true)
        }
    }
}- Bar Button Item 객체를 통해 Edit 버튼 추가

- @IBAction을 통해 edit기능 추가: Type은 default가 Any로 되어있으므로 UIBarButtonItem으로 설정
(Edit버튼을 누를 경우 Done으로 변경되게 하기위함)

- 호출
- UI는 바로 삭제되지만, 데이터 삭제는 위에서 정의한 editingStyle관련 delegate에서 삭제
    @IBAction func didTapEditButton(_ sender: UIBarButtonItem) {
        playersDataSource.edit(with: sender, to: tableView)
    }
Edit mode에서의 Cell 행 이동

- tableView가 edit모드에 들어갔을 때 moveRowAt관련 delegate가 구현되어 있으면 move모드 자동으로 설정
- UI는 바로 변경 가능하지만 dataSource의 데이터는 직접 작업해야 반영 > longPressedGesture를 이용한 내용에서 소개
    override func tableView(_ tableView: UITableView, moveRowAt sourceIndexPath: IndexPath, to destinationIndexPath: IndexPath) {

    }
LongPressedGesture를 통한 Cell 이동 (애니메이션 수작업)
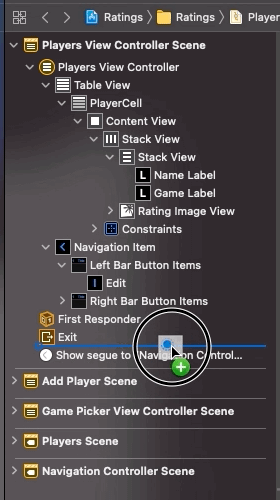
- Long Pressed Gesture Recognizer 추가

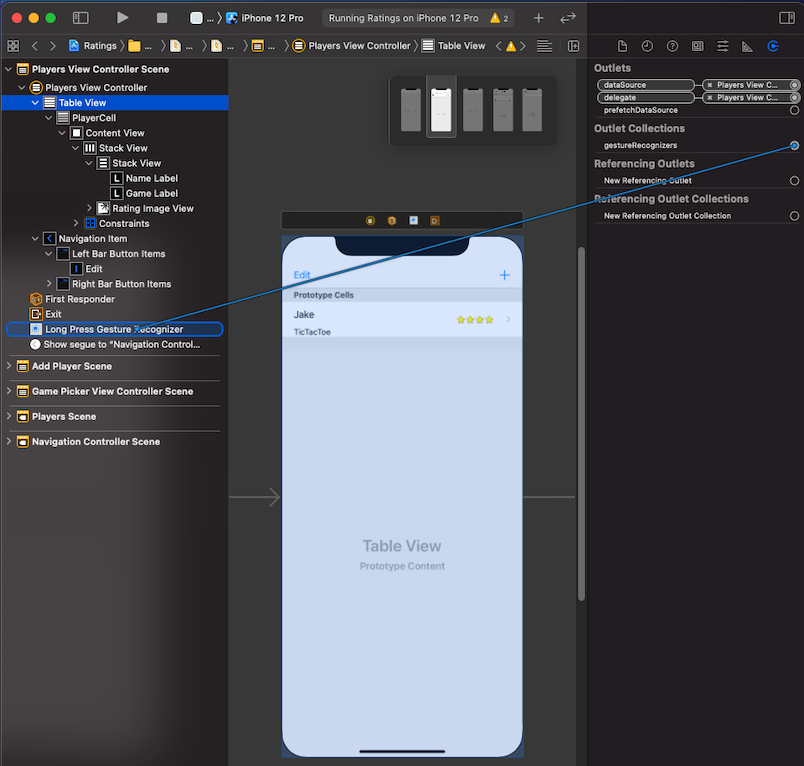
- TableView에 gesture Outlet 연결

- 코드에 @IBAction 연결
    @IBAction func didLongPressCell(_ sender: UILongPressGestureRecognizer) {
        // MyDataSource에 구현하여 호출
}- DataSource에 데이터 변경 로직 구현
class MyDataSource {
    var myData: [MyModel]

    ...

    func append(player: Player, to tableView: UITableView) {
        ...
    }

    func remove(at indexPath: IndexPath, to tableView: UITableView) {
        ...
    }

    func edit(with button: UIBarButtonItem, to tableView: UITableView) {
        ...
    }

    func swapByLongPress(with sender: UILongPressGestureRecognizer, to tableView: UITableView) {
        let longPressedPoint = sender.location(in: tableView)
        guard let indexPath = tableView.indexPathForRow(at: longPressedPoint) else { return }

        struct BeforeIndexPath {
            static var value: IndexPath?
        }

        switch sender.state {
        case .began:
            BeforeIndexPath.value = indexPath
        case .changed:
            if let beforeIndexPath = BeforeIndexPath.value, beforeIndexPath != indexPath {
                let beforeValue = players[beforeIndexPath.row]
                let afterValue = players[indexPath.row]
                players[beforeIndexPath.row] = afterValue
                players[indexPath.row] = beforeValue
                tableView.moveRow(at: beforeIndexPath, to: indexPath)

                BeforeIndexPath.value = indexPath
            }
        default:
            // TODO animation
            break
        }
    }

}

애니메이션
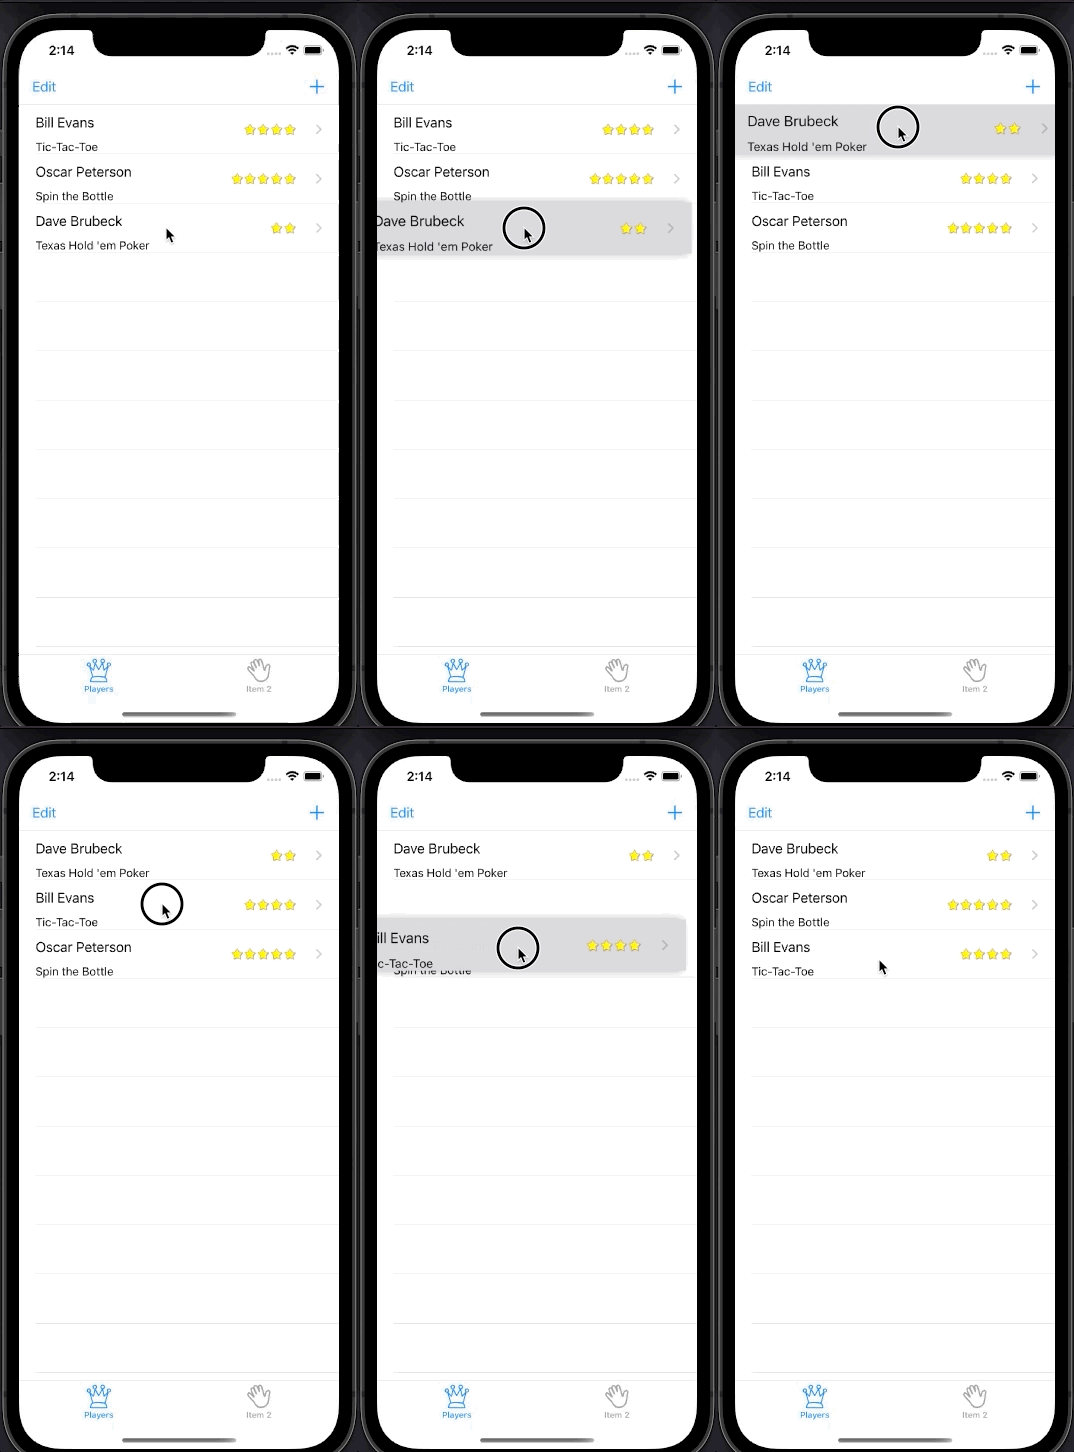
- 애니메이션: Long pressed 시 셀이 들어올려지고, 손가락 끝을 따라다니는 효과
- 스냅샷 사진을 매순간 찍어서, 이어 붙이는 방식
- UIGraphics로 ImageContext 생성 > 스냅샷을 찍을 대상을 렌더링 > 렌더링 완료된 결과를 image 객체에 저장
extension UIView {
    func snapshotCellStyle() -> UIView {
        let image = snapshot()
        let cellSnapshot = UIImageView(image: image)
        cellSnapshot.layer.masksToBounds = false
        cellSnapshot.layer.cornerRadius = 0.0
        cellSnapshot.layer.shadowOffset = CGSize(width: -5.0, height: 0.0)
        cellSnapshot.layer.shadowRadius = 5.0
        cellSnapshot.layer.shadowOpacity = 0.4
        return cellSnapshot
    }

    private func snapshot() -> UIImage {
        UIGraphicsBeginImageContextWithOptions(bounds.size, false, 0.0)
        layer.render(in: UIGraphicsGetCurrentContext()!)
        let image = UIGraphicsGetImageFromCurrentImageContext()! as UIImage
        UIGraphicsEndImageContext()
        return image
    }
}
- began일때 애니메이션 추가
        case .began:
            BeforeIndexPath.value = indexPath

            // snapshot을 tableView에 추가
            guard let cell = tableView.cellForRow(at: indexPath) else { return }
            CellSnapshotView.value = cell.snapshotCellStyle()
            CellSnapshotView.value?.center = cell.center
            CellSnapshotView.value?.alpha = 0.0
            if let cellSnapshotView = CellSnapshotView.value {
                tableView.addSubview(cellSnapshotView)
            }

            // 원래의 cell을 hidden시키고 snapshot이 보이도록 설정
            UIView.animate(withDuration: 0.3) {
                CellSnapshotView.value?.center = longPressedPoint
                CellSnapshotView.value?.transform = CGAffineTransform(scaleX: 1.05, y: 1.05)
                CellSnapshotView.value?.alpha = 0.98
                cell.alpha = 0.0
            } completion: { (isFinish) in
                if isFinish {
                    cell.isHidden = true
                }
}- changed일때 SnapshotView의 위치 조정 추가
        case .changed:
            CellSnapshotView.value?.center = longPressedPoint
...- Cell에서 손가락을 뗀경우 애니메이션
        default:
            // 손가락을 떼면 indexPath에 셀이 나타나는 애니메이션
            guard let beforeIndexPath = BeforeIndexPath.value,
                  let cell = tableView.cellForRow(at: beforeIndexPath) else { return }
            cell.isHidden = false
            cell.alpha = 0.0

            // Snapshot이 사라지고 셀이 나타내는 애니메이션 부여
            UIView.animate(withDuration: 0.3) {
                CellSnapshotView.value?.center = cell.center
                CellSnapshotView.value?.transform = CGAffineTransform.identity
                CellSnapshotView.value?.alpha = 1.0
                cell.alpha = 1.0
            } completion: { (isFinish) in
                if isFinish {
                    BeforeIndexPath.value = nil
                    CellSnapshotView.value?.removeFromSuperview()
                    CellSnapshotView.value = nil
                }
            }
- 전체 코드
    func swapByLongPress(with sender: UILongPressGestureRecognizer, to tableView: UITableView) {
        let longPressedPoint = sender.location(in: tableView)
        guard let indexPath = tableView.indexPathForRow(at: longPressedPoint) else { return }

        struct BeforeIndexPath {
            static var value: IndexPath?
        }

        struct CellSnapshotView {
            static var value: UIView?
        }

        switch sender.state {
        case .began:
            BeforeIndexPath.value = indexPath

            // snapshot을 tableView에 추가
            guard let cell = tableView.cellForRow(at: indexPath) else { return }
            CellSnapshotView.value = cell.snapshotCellStyle()
            CellSnapshotView.value?.center = cell.center
            CellSnapshotView.value?.alpha = 0.0
            if let cellSnapshotView = CellSnapshotView.value {
                tableView.addSubview(cellSnapshotView)
            }

            // 원래의 cell을 hidden시키고 snapshot이 보이도록 설정
            UIView.animate(withDuration: 0.3) {
                CellSnapshotView.value?.center = longPressedPoint
                CellSnapshotView.value?.transform = CGAffineTransform(scaleX: 1.05, y: 1.05)
                CellSnapshotView.value?.alpha = 0.98
                cell.alpha = 0.0
            } completion: { (isFinish) in
                if isFinish {
                    cell.isHidden = true
                }
            }

        case .changed:
            CellSnapshotView.value?.center = longPressedPoint

            if let beforeIndexPath = BeforeIndexPath.value, beforeIndexPath != indexPath {
                let beforeValue = players[beforeIndexPath.row]
                let afterValue = players[indexPath.row]
                players[beforeIndexPath.row] = afterValue
                players[indexPath.row] = beforeValue
                tableView.moveRow(at: beforeIndexPath, to: indexPath)

                BeforeIndexPath.value = indexPath
            }
        default:
            // 손가락을 떼면 indexPath에 셀이 나타나는 애니메이션
            guard let beforeIndexPath = BeforeIndexPath.value,
                  let cell = tableView.cellForRow(at: beforeIndexPath) else { return }
            cell.isHidden = false
            cell.alpha = 0.0

            // Snapshot이 사라지고 셀이 나타내는 애니메이션 부여
            UIView.animate(withDuration: 0.3) {
                CellSnapshotView.value?.center = cell.center
                CellSnapshotView.value?.transform = CGAffineTransform.identity
                CellSnapshotView.value?.alpha = 1.0
                cell.alpha = 1.0
            } completion: { (isFinish) in
                if isFinish {
                    BeforeIndexPath.value = nil
                    CellSnapshotView.value?.removeFromSuperview()
                    CellSnapshotView.value = nil
                }
            }

        }
    }
'HIG(Human Interface Guidelines) > HIG - UI' 카테고리의 다른 글
| [iOS - HIG] 2. 인터페이스에 필수로 들어가야할 요소 (0) | 2021.05.09 |
|---|---|
| [iOS - HIG] 1. 다른앱과 차별하고 있는 iOS의 테마 (0) | 2021.05.09 |
| [iOS - swift] Modal 스타일 (Transition Style, Presentation) (0) | 2021.05.05 |
| [iOS - swift] 2. iOS 스러운, storyboard 활용 방법 (dynamic prototypes cell, unwind segue, storyboard reference) (0) | 2021.05.05 |
| [iOS - swift] 1. iOS 스러운, storyboard 활용 방법 (static prototype cell, segue, gesture) (0) | 2021.05.04 |
Comments


