
- 분류 전체보기 (1717)

- Git, CocoaPods, Xcode, Shel.. (71)
- iOS 튜토리얼 (SwiftUI) (23)
- iOS 기본 (SwiftUI) (55)
- iOS 응용 (SwiftUI) (75)
- iOS 접근성 (SwiftUI) (3)
- iOS Combine (SwiftUI) (19)
- swift 5 문법 (23)
- swift 공식 문서 (27)
- iOS 기본 (swift) (149)
- iOS 실전 (swift) (51)
- iOS 응용 (swift) (740)
- iOS framework (33)
- RxSwift (40)
- OAuth Login (4)
- Architecture (swift) (34)
- CoreML (2)
- REST API (2)
- iOS 앱 배포와 출시 (29)
- Unit Test와 UI Test (5)
- Design Pattern (디자인 패턴) (4)
- Clean Architecture (22)
- Clean Code (클린 코드) (15)
- Refactoring (리펙토링) (61)
- 알고리즘 (8)
- 커스텀 프레임워크 (2)
- Mac OS 편의 설정 (6)
- HIG(Human Interface Guideli.. (70)
- UI 컴포넌트 (swift) (66)
- 빌드 환경 설정 (4)
- Swift-Extension (0)
- WWDC 정리 (32)
- 오픈소스 까보기 (5)
- Swift Macro (6)
- 최적화하기 (6)
- AI (20)
| 일 | 월 | 화 | 수 | 목 | 금 | 토 |
|---|---|---|---|---|---|---|
| 1 | 2 | 3 | 4 | |||
| 5 | 6 | 7 | 8 | 9 | 10 | 11 |
| 12 | 13 | 14 | 15 | 16 | 17 | 18 |
| 19 | 20 | 21 | 22 | 23 | 24 | 25 |
| 26 | 27 | 28 | 29 | 30 | 31 |
- 리펙토링
- tableView
- rxswift
- uiscrollview
- ios
- collectionview
- map
- 스위프트
- SWIFT
- Clean Code
- uitableview
- HIG
- Xcode
- UICollectionView
- combine
- clean architecture
- claude code
- 클로드코드
- Human interface guide
- MVVM
- swift documentation
- Observable
- 애니메이션
- RxCocoa
- 리팩토링
- swiftUI
- Protocol
- UITextView
- 클린 코드
- Refactoring
- Today
- Total
김종권의 iOS 앱 개발 알아가기
[iOS - swift] 4. CollectionView (컬렉션 뷰) -실전 사용 방법 (FlowLayout, CustomLayout, GridLayout, binary search, cache) 본문
[iOS - swift] 4. CollectionView (컬렉션 뷰) -실전 사용 방법 (FlowLayout, CustomLayout, GridLayout, binary search, cache)
jake-kim 2021. 8. 31. 01:401. CollectionView (컬렉션 뷰) - UICollectionViewFlowLayout
2. CollectionView (컬렉션 뷰) - UICollectionViewFlowLayout을 이용한 CarouselView (수평 스크롤 뷰)
3. CollectionView (컬렉션 뷰) - custom layout (grid, pinterest 레이아웃 구현)
4. CollectionView (컬렉션 뷰) -실전 사용 방법 (FlowLayout, CustomLayout, binary search, cache)
FlowLayout vs CustomLayout
- Grid 형태처럼 단순한 것은 FlowLayout 사용
- Pinterest앱과 같이 복잡한 Grid 형태인 경우 CustomLayout 사용
FlowLayout
- 작동 원리
- 레이아웃 업데이트: prepare() 메소드에서 수행
- 삭제, 삽입 처리: performBatchUpdates(:completion)에서 처리되기 때문에, 일괄 처리를 위하여 delete, insert정보를 저장해놓는 변수를 선언해놓고 (deletingIndexPaths, insertingIndexPaths) 사용
- prepare(forColelctionViewUpdates:)에서 삭제, 삽입되는 indexpath 값 획득 > 변수에 저장
- 삽입될 때 애니메이션, 삭제될 때 애니메이션은 각각 finalLayoutAttributesForDisappearingItem(at:), initialLayoutAttributesForAppearingItem(at:)에서 구현
- deletingIndexPaths, insertingIndexPaths 초기화 시점 > finalizeCollectionViewUpdates()

- ColumnFlowLayout 정의: UICollectionViewFlowLayout을 상속받아서 column이 채워지는 layout으로 구현
class ColumnFlowLayout: UICollectionViewFlowLayout {

}- column의 minWidth를 정의하여, column에 배치될 cell 갯수 정의
- width를 3으로 나누었지만, layoutMargin을 고려하기 때문에 cell이 3열이 안될수 있음을 주의
private let minColumnWidth: CGFloat = UIScreen.main.bounds.width / 3
private let cellHeight: CGFloat = 70.0- data의 변경사항들을 performBatchUpdates(_:completion:)에서 갱신할때 하나하나씩 되는게 아닌 일괄 처리되므로, 일괄처리를 위해 delete, insert되는 데이터들이 모아지는 프로퍼티 선언
private var deletingIndexPaths = [IndexPath]()
private var insertingIndexPaths = [IndexPath]()- cell의 레이아웃 업데이트
override func prepare() {
    super.prepare()

    guard let collectionView = collectionView else { return }

    let availableWidth = collectionView.bounds.inset(by: collectionView.layoutMargins).width
    let maxNumColumns = Int(availableWidth / minColumnWidth)
    let cellWidth = (availableWidth / CGFloat(maxNumColumns)).rounded(.down)

    itemSize = CGSize(width: cellWidth, height: cellHeight)
    /// minimumInteritemSpacing 값 = 10.0
    sectionInset = UIEdgeInsets(top: minimumInteritemSpacing, left: 0.0, bottom: 0.0, right: 0.0)
    sectionInsetReference = .fromSafeArea
}- 값 삭제, 삽입 처리
// item이 변경(삭제, 삽입)되기 직전에 호출
override func prepare(forCollectionViewUpdates updateItems: [UICollectionViewUpdateItem]) {
    super.prepare()

    for update in updateItems {
        switch update.updateAction {
        case .delete:
            /// indexPath에 해당하는 item이 삭제되기 전에 deletingIndexPaths에 삽입
            guard let indexPath = update.indexPathBeforeUpdate else { return }
            deletingIndexPaths.append(indexPath)
        case .insert:
            /// indexPath에 해당하는 item이 추가된 다음 insertingIndexPaths에 삽입
            guard let indexPath = update.indexPathAfterUpdate else { return }
            insertingIndexPaths.append(indexPath)
        default:
            break
        }
    }
}- 삭제, 삽입 애니메이션 설정
// 삭제 시 적용 애니메이션
override func finalLayoutAttributesForDisappearingItem(at itemIndexPath: IndexPath) -> UICollectionViewLayoutAttributes? {
    guard let attributes = super.finalLayoutAttributesForDisappearingItem(at: itemIndexPath) else { return nil }

    if deletingIndexPaths.contains(itemIndexPath) {
        attributes.transform = CGAffineTransform(scaleX: 0.5, y: 0.5)
        attributes.alpha = 0.0
        attributes.zIndex = 0
    }

    /// nil반환 시 애니메이션의 start point와 end point 모두 동일한 attributes 사용
    return attributes
}

// 삽입 시 적용 애니메이션
override func initialLayoutAttributesForAppearingItem(at itemIndexPath: IndexPath) -> UICollectionViewLayoutAttributes? {
    guard let attributes = super.initialLayoutAttributesForAppearingItem(at: itemIndexPath) else { return nil }

    if insertingIndexPaths.contains(itemIndexPath) {
        attributes.transform = CGAffineTransform(scaleX: 1.5, y: 1.5)
        attributes.alpha = 0.0
        attributes.zIndex = 0
    }

    /// nil반환 시 애니메이션의 start point와 end point 모두 동일한 attributes 사용
    return attributes
}- performBatchUpdates(:completion:) 호출에서 completion 시작되기 바로 직전에 호출되는 메소드 override
// performBatchUpdates(:completion)호출에서 compeltion이 시작되기 바로 직전에 호출
override func finalizeCollectionViewUpdates() {
    super.finalizeCollectionViewUpdates()

    insertingIndexPaths.removeAll()
    deletingIndexPaths.removeAll()
}- CollectionView의 삭제, 삽입처리를 위한 연산 모델 정의
enum CollectionViewUpdateState<T> {
    case delete(Int)
    case insert(T, Int)
    case move(Int, Int)
    case reload(Int)
}- controller에 collectionView 세팅
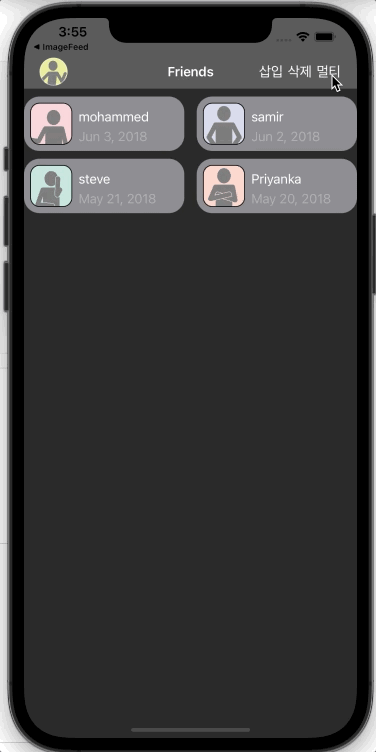
class FriendsViewController: UIViewController {

    let collectionView = UICollectionView(frame: .zero, collectionViewLayout: ColumnFlowLayout())
    private var peopleDataSource = Mock.samplePerson()

    override func viewDidLoad() {
        super.viewDidLoad()

        setupView()
    }

    func setupView() {
        collectionView.backgroundColor = .systemGray.withAlphaComponent(0.3)
        collectionView.register(PersonCell.self, forCellWithReuseIdentifier: PersonCell.className)
        collectionView.delegate = self
        collectionView.dataSource = self
    }
}

extension FriendsViewController: UICollectionViewDataSource, UICollectionViewDelegate {
    func collectionView(_ collectionView: UICollectionView, numberOfItemsInSection section: Int) -> Int {
        peopleDataSource.count
    }

    func collectionView(_ collectionView: UICollectionView, cellForItemAt indexPath: IndexPath) -> UICollectionViewCell {
        guard let cell = collectionView.dequeueReusableCell(withReuseIdentifier: PersonCell.className, for: indexPath) as? PersonCell else {
            fatalError(#function)
        }

        cell.model = peopleDataSource[indexPath.item]
        return cell
    }
}- collectionView의 데이터 갱신: performUpdate(:completion:)과 colelctionView.deleteItems, insertItems 이용
@objc func didTapInsertButton(_ sender: Any) {
    let sampleUpdates = [
        CollectionViewUpdateState<Person>.insert(Person(name: "samir", month: 6, day: 2, year: 2018), (0..<collectionView.numberOfItems(inSection: 0)).randomElement() ?? 0),
    ]
    performUpdate(sampleUpdates: sampleUpdates)
}

@objc func didTapDeleteButton(_ sender: Any) {
    let sampleUpdates = [
        CollectionViewUpdateState<Person>.delete(peopleDataSource.count - 1),
    ]
    performUpdate(sampleUpdates: sampleUpdates)
}

@objc func didTapUpdateButton(_ sender: Any) {
    let sampleUpdates = [
        CollectionViewUpdateState<Person>.move(0, 1),
        CollectionViewUpdateState<Person>.move(1, 2),
        CollectionViewUpdateState<Person>.move(2, 3),
        CollectionViewUpdateState<Person>.reload(3) // 변경된 데이터 뷰에 갱신
    ]
    performUpdate(sampleUpdates: sampleUpdates)
}

private func performUpdate(sampleUpdates: [CollectionViewUpdateState<Person>]) {

    collectionView.performBatchUpdates {
        var deletes = [Int]()
        var inserts = [(person:Person, index:Int)]()

        sampleUpdates.forEach {
            switch $0 {
            case let .delete(index):
                collectionView.deleteItems(at: [IndexPath(item: index, section: 0)])
                deletes.append(index)

            case let .insert(person, index):
                collectionView.insertItems(at: [IndexPath(item: index, section: 0)])
                inserts.append((person, index))

            case let .move(fromIndex, toIndex):
                collectionView.moveItem(at: IndexPath(item: fromIndex, section: 0),
                                        to: IndexPath(item: toIndex, section: 0))
                deletes.append(fromIndex)
                inserts.append((peopleDataSource[fromIndex], toIndex))

            default: break
            }
        }

        // 삭제를 내림차순 배열에서 진행: 삭제가 진행되면 index값이 줄어들기 때문
        deletes.sorted().reversed()
            .forEach { peopleDataSource.remove(at: $0) }

        // 삽입을 오름차순 배열에서 진행
        inserts.sorted(by: {  return $0.index <= $1.index })
            .forEach { peopleDataSource.insert($0.person, at: $0.index) }

    } completion: { _ in
        print("finish update !!!")
    }

}
* 전체 코드: https://github.com/JK0369/CollectionViewFlowEx
Custom layout

- 작동 원리
- UIColelctionViewLayout은 Cell마다 다른 사이를 할당 가능하여 복잡한 Grid 형태 구현
- 핵심은 layout정보를 기록하고 있는 `UICollectionViewLayoutAttributes` 객체 배열: prepare에서 계산하고 이 값을 각 메소드에서 이용
- `UICollectionViewLayoutAttributes`의 이해: IndexPath값을 가지고 초기화되며, 외부에서는 IndexPath로 접근

- layout을 계산하는 원리: CGRect값을 정해놓고, 이 사각형을 slice하여 layout을 구성
- 사각형을 slice하는데 사용될 dividedIntegral(fraction:from:) 메소드 정의
- 구현하는데 사용되는 divided(atDistance:from:) 메소드 개념 참고
extension CGRect {

    /// 사각형을 from을 기준으로 fraction비율로 두개로 slice하는 메소드
    func dividedIntegral(fraction: CGFloat, from fromEdge: CGRectEdge) -> (first: CGRect, second: CGRect) {
        let dimension: CGFloat

        switch fromEdge {
        case .minXEdge, .maxXEdge:
            dimension = self.size.width
        case .minYEdge, .maxYEdge:
            dimension = self.size.height
        }

        // slice된 최종 길이
        let distance = (dimension * fraction).rounded(.up)

        // 원래의 사각형을 나누어 두 개의 사각형으로 나누는 작업: CGRect타입의 (slice, remaider) 리턴
        var slices = self.divided(atDistance: distance, from: fromEdge)

        // cell 사이의 간격을 주기 위한 처리
        switch fromEdge {
        case .minXEdge, .maxXEdge:
            // +1만큼 x좌표를 더한 다음, 늘어난 만큼 width -1
            slices.remainder.origin.x += 1
            slices.remainder.size.width -= 1
        case .minYEdge, .maxYEdge:
            slices.remainder.origin.y += 1
            slices.remainder.size.height -= 1
        }

        return (first: slices.slice, second: slices.remainder)
    }
}- layout을 구분하는 enum 값 정의
enum MosaicSegmentStyle {
    /// horizontal 1조각
    case fullWidth
    /// horizontal 각각 0.5씩 나누어진 2조각
    case fiftyFifty
    /// vertical은 2/3로 나누어진 2조각, horizontal은 0.5로 나누어진 1조각
    case twoThirdsOneThird
    /// vertical은 3/1로 나누어진 2조각, horizontal은 0.5로 나누어진 1조각
    case oneThirdTwoThirds
}- MoasicLayout 구현 준비
class MoasicLayout: UICollectionViewLayout {

}- 필요한 property 정의
/// 계속 누적하여, collectionViewContentSize값을 구해야할 때 사용되는 프로퍼티
var contentBounds: CGRect = .zero
/// prepare에서 cachedAttributes 값들을 계산 후, 스크롤 할때마다 layout 값이 필요한데, 이 값을 사용
var cachedAttributes = [UICollectionViewLayoutAttributes]()- layout을 계산하는 prepare() 메소드 재정의: collectionView에서 항목이 추가, 제거, 방향이 변경될때 호출되는 메소드
override func prepare() {
    super.prepare()
    guard let collectionView = collectionView else { return }

    // 초기화
    cachedAttributes.removeAll()
    contentBounds = CGRect(origin: .zero, size: collectionView.bounds.size)
    let count = collectionView.numberOfItems(inSection: 0)
    var currentIndex = 0
    var segment: MosaicSegmentStyle = .fullWidth
    /// lastFrame: 다음 cell의 Y좌표값을 알기 위해서 직전 cell의 maxY값을 기록하기 위한 프로퍼티
    var lastFrame: CGRect = .zero
    let collectionViewWidth = collectionView.bounds.size.width

    // layout 계산
    while currentIndex < count {
        /// segmentFrame: cell들을 slice하기 전의 전체 크기
        let segmentFrame = CGRect(x: 0, y: lastFrame.maxY + 1.0, width: collectionViewWidth, height: 200.0)

        /// segmentFrame값이 slice되어 cell각각의 Rect값이 기록될 프로퍼티
        var segmentRects: [CGRect] = []

        switch segment {
        case .fullWidth:
            segmentRects = [segmentFrame]
        case .fiftyFifty:
            let horizontalSlices = segmentFrame.dividedIntegral(fraction: 0.5, from: .minXEdge)
            segmentRects = [horizontalSlices.first, horizontalSlices.second]
        case .twoThirdsOneThird:
            let horizontalSlices = segmentFrame.dividedIntegral(fraction: 2.0 / 3.0, from: .minXEdge)
            let verticalSlices = horizontalSlices.second.dividedIntegral(fraction: 0.5, from: .minYEdge)
            segmentRects = [horizontalSlices.first, verticalSlices.first, verticalSlices.second]
        case .oneThirdTwoThirds:
            let horizontalSlices = segmentFrame.dividedIntegral(fraction: 1.0 / 3.0, from: .minXEdge)
            let verticalSlices = horizontalSlices.first.dividedIntegral(fraction: 0.5, from: .minYEdge)
            segmentRects = [verticalSlices.first, verticalSlices.second, horizontalSlices.second]
        }

        // 계산된 Rect 조각들을 가지고 cacheAttributes와 contentBounds에 추가
        for rect in segmentRects {
            let attributes = UICollectionViewLayoutAttributes(forCellWith: IndexPath(item: currentIndex, section: 0))
            attributes.frame = rect

            cachedAttributes.append(attributes)
            contentBounds = contentBounds.union(lastFrame)

            currentIndex += 1
            lastFrame = rect
        }

        // 다음 레이아웃 변경
        switch count - currentIndex {
        case 1:
            segment = .fullWidth
        case 2:
            segment = .fiftyFifty
        default:
            switch segment {
            case .fullWidth:
                segment = .fiftyFifty
            case .fiftyFifty:
                segment = .twoThirdsOneThird
            case .twoThirdsOneThird:
                segment = .oneThirdTwoThirds
            case .oneThirdTwoThirds:
                segment = .fiftyFifty
            }
        }
    }
}- 현재 collectionView의 contentSize를 반환하는 프로퍼티 재정의
override var collectionViewContentSize: CGSize {
    return contentBounds.size
}- layout객체에 업데이트가 필요한지 여부 반환: prepare 메소드를 호출할지 결정 - 매번 true 반환 필요
- 단, newBounds가 기존 collectionView의 bounds사이즈와 동일하다면 호출이 필요 없는 상태
override func shouldInvalidateLayout(forBoundsChange newBounds: CGRect) -> Bool {
    guard let collectionView = collectionView else { return false }
    return !newBounds.size.equalTo(collectionView.bounds.size)
}- 현재 화면에서 보여지는 collectionView영역의 rect값을 인수로 들어오고, 이 값을 토대로 prepare()에서 계산한 UICollectionViewLayoutAttributes 배열 값 반환: 아래와 같이 하면 비효율적인 코드
- IndexPath로 인수가 들어오면 random access로 O(1)로 효율적으로 탐색할수 있지만, rect로 들어온 경우는 일일이 for문을 돌면서 비교할 경우 비효율적
- 해당 메소드는 scrolling 될때마다 호출 > O(n)으로 접근시 큰 부하 > attributes는 이미 정렬되어 있다는 것을 활용 (bianry search)
override func layoutAttributesForElements(in rect: CGRect) -> [UICollectionViewLayoutAttributes]? {
    return cachedAttributes.filter { rect.intersects($0.frame) }
}- binary search를 이용하여 효율적으로 현재 보여지는 rect
override func layoutAttributesForElements(in rect: CGRect) -> [UICollectionViewLayoutAttributes]? {

    var attributesArray = [UICollectionViewLayoutAttributes]()

    // rect에 해당하는 cell의 index 탐색
    guard let lastIndex = cachedAttributes.indices.last,
          let firstMatchIndex = binSearch(rect, start: 0, end: lastIndex) else { return attributesArray }

    // reversed()를 하는 이유: firstMatchIndex와 가까운 cell이 현재 보여지고 있는 화면에 가깝기 때문
    for attributes in cachedAttributes[..<firstMatchIndex].reversed() {
        guard attributes.frame.maxY >= rect.minY else { break }
        attributesArray.append(attributes)
    }

    for attributes in cachedAttributes[firstMatchIndex...] {
        guard attributes.frame.minY <= rect.maxY else { break }
        attributesArray.append(attributes)
    }

    return attributesArray
}

/// 인수로 들어온 rect에 해당하는 `UICollectionViewLayoutAttributes`의 index값 탐색
func binSearch(_ rect: CGRect, start: Int, end: Int) -> Int? {
    if end < start { return nil }

    let mid = (start + end) / 2
    let attr = cachedAttributes[mid]

    /// intersects: 교집합
    if attr.frame.intersects(rect) {
        return mid
    } else {
        if attr.frame.maxY < rect.minY {
            return binSearch(rect, start: (mid + 1), end: end)
        } else {
            return binSearch(rect, start: start, end: (mid - 1))
        }
    }
}- indexPath에 해당하는 layout 반환
override func layoutAttributesForItem(at indexPath: IndexPath) -> UICollectionViewLayoutAttributes? {
    return cachedAttributes[indexPath.item]
}- ViewController에서 MosiacLayout을 적용한 collectionView 사용
class ComplexViewConroller: UIViewController {
    let avatarView = AvartarView()
    let collectionView = UICollectionView(frame: .zero, collectionViewLayout: MosaicLayout())
    var dataSource: [Complex] = []

    override func viewDidLoad() {
        super.viewDidLoad()

        setupView()
        setupDataSource()
    }

    override func viewWillAppear(_ animated: Bool) {
        super.viewWillAppear(animated)

        if collectionView.numberOfItems(inSection: 0) > 0 {
            collectionView.scrollToItem(at: IndexPath(item: 0, section: 0), at: .top, animated: false)
        }
    }

    private func setupDataSource() {
        (0...150).forEach {
            let color = UIColor(red: CGFloat(drand48()),
                                green: CGFloat(drand48()),
                                blue: CGFloat(drand48()),
                                alpha: CGFloat(Float(arc4random()) / Float(UINT32_MAX)))
            dataSource.append(Complex(color: color, title: String($0)))
        }
    }
}

extension ComplexViewConroller: UICollectionViewDataSource, UICollectionViewDelegate {
    func collectionView(_ collectionView: UICollectionView, numberOfItemsInSection section: Int) -> Int {
        return dataSource.count
    }

    func collectionView(_ collectionView: UICollectionView, cellForItemAt indexPath: IndexPath) -> UICollectionViewCell {
        let cell = collectionView.dequeueReusableCell(withReuseIdentifier: ComplexCell.className, for: indexPath) as! ComplexCell
        cell.model = dataSource[indexPath.item]
        return cell
    }
}- device의 방향이 변경되어도 prepare() 메소드가 재호출되어 레이아웃 적용

* 전체 코드: https://github.com/JK0369/CollectionViewFlowEx
* 참고
- CollectionView WWDC 2019 25:00 ~: https://developer.apple.com/videos/play/wwdc2018/225/
- performbatchUpdates 메소드: https://developer.apple.com/documentation/uikit/uicollectionview/1618045-performbatchupdates
- CollectionView: https://developer.apple.com/documentation/uikit/views_and_controls/collection_views/layouts/customizing_collection_view_layouts


