Notice
Recent Posts
Recent Comments
Link
| 일 | 월 | 화 | 수 | 목 | 금 | 토 |
|---|---|---|---|---|---|---|
| 1 | 2 | 3 | 4 | 5 | 6 | 7 |
| 8 | 9 | 10 | 11 | 12 | 13 | 14 |
| 15 | 16 | 17 | 18 | 19 | 20 | 21 |
| 22 | 23 | 24 | 25 | 26 | 27 | 28 |
Tags
- SWIFT
- MVVM
- 애니메이션
- RxCocoa
- 리펙토링
- Protocol
- Clean Code
- Xcode
- rxswift
- 스위프트
- tableView
- Observable
- Human interface guide
- uiscrollview
- 리팩토링
- scrollview
- 클린 코드
- UICollectionView
- clean architecture
- swiftUI
- HIG
- combine
- collectionview
- ios
- UITextView
- swift documentation
- uitableview
- ribs
- Refactoring
- map
Archives
- Today
- Total
김종권의 iOS 앱 개발 알아가기
[iOS - swift] 2. WKWebView 사용 방법 (웹뷰, 쿠키, WKScriptMessageHandler, WKNavigationDelegate, WKUIDelegate) 본문
iOS 응용 (swift)
[iOS - swift] 2. WKWebView 사용 방법 (웹뷰, 쿠키, WKScriptMessageHandler, WKNavigationDelegate, WKUIDelegate)
jake-kim 2021. 9. 15. 23:551. WKWebView 개념1 (UIWebView, AJAX, XHR, 캐시, 쿠키)
2. WKWebView 사용 방법 (웹뷰, 쿠키, WKScriptMessageHandler, WKNavigationDelegate, WKUIDelegate)
WKWebView를 사용하기 전 알아야할 기본 개념
WKWebView 기본 사용 방법
- webView초기화: 가끔 viewDidLoad()에서 view를 초기화하여 사용하지만, webView같은 경우 viewDidLoad에서 초기화하지 않고 viewController 블록 내에서 바로 초기화하여 사용하는게 효율적
import WebKit

let webView = WKWebView()- loadView()를 override하여 webView를 할당
- loadView(): ViewController가 기본적으로 가지고 있는 view를 다른 view로 지정하고 싶은 경우 override하여 사용

override func loadView() {
    self.view = webView
}- remote content 로드 방법
if let url = URL(string: "https://www.apple.com" {
    let request = URLRequest(url: url)
    webView.load(request)
}- local content 로드 방법
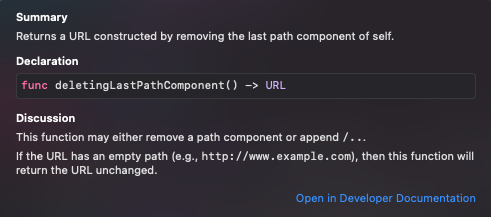
- url.deletingLastPathComponent(): url의 last path 컴포넌트가 제거된 url로 반환
if let url = Bundle.main.url(forResource: "help", withExtension: "html") {
   /// allowingReadAccessTo: url.deletingLastPathComponent(): "help.html"이라는 파일 로드하는 코드
   webView.loadFileURL(url, allowingReadAccessTo: url.deletingLastPathComponent())
}
- 웹뷰에 HTML 직접 코드로 정의: loadHTMLString(:baseURL:) 사용
- 단, image나 CSS와 같은 번들의 assets을 참조해야하는 경우는 baseURL을 Bundle.main.resourceURL로 사용
let html = """
<html>
<body>
<h1>Hello, Swift!</h1>
</body>
</html>
"""

webView.loadHTMLString(html, baseURL: nil)

/// image나 CSS와 같은 bundle의 assets에 접근하는 경우
webView.loadHTMLString(html, baseURL: Bundle.main.resourceURL)
WebView의 WKNavigationDelegate
ex) WKNavigationDelegate를 이용하여 특정 사이트에 대해서 방문할 수 없도록 제한하는 방법
- WKNavigationDelegate 프로토콜 conform
class ViewController: UIViewController, WKNavigationDelegate {

...

webView.navigationDelegate = self- webView(:decidePolicyFor:decisionHandler:) 메소드에서 decisionHandler에 허용하는 페이지면 .allow, 허용하지 않으면 .cancel로 전달
func webView(_ webView: WKWebView, decidePolicyFor navigationAction: WKNavigationAction, decisionHandler: @escaping (WKNavigationActionPolicy) -> Void) {
    if let host = navigationAction.request.url?.host {
        if host == "www.apple.com" {
            decisionHandler(.allow)
            return
        }
    }

    decisionHandler(.cancel)
}- webVoew(:decidePolicyFor:decisionHandler:) 전화화면, 이메일 화면으로 이동되게끔 하는 코드
func webView(_ webView: WKWebView, decidePolicyFor navigationAction: WKNavigationAction, decisionHandler: @escaping (WKNavigationActionPolicy) -> Void) {
    if let url = navigationAction.request.url {
        if url.scheme == "mailto" || url.scheme == "tel" {
            if UIApplication.shared.canOpenURL(url) {
                UIApplication.shared.open(url, options: [:], completionHandler: nil)
            }
            decisionHandler(.cancel)
            return
        }
    }

    decisionHandler(.allow)
    return
}
Page load 이벤트 구독
- 유저에게 웹이 HTML fetching중, CSS, image등을 다운받고 있어서 로딩중인걸 알리는 방법: estimatedProgress를 옵저빙
// 구독
webView.addObserver(self, forKeyPath: #keyPath(WKWebView.estimatedProgress), options: .new, context: nil)

// 이벤트 수신은 observeValue 메소드를 오버라이딩
override func observeValue(forKeyPath keyPath: String?, of object: Any?, change: [NSKeyValueChangeKey : Any]?, context: UnsafeMutableRawPointer?) {
    if keyPath == "estimatedProgress" {
        print(Float(webView.estimatedProgress))
    }
}- 웹 페이지의 title이 변경되었을 때 알 수 있는 방법: title를 옵저빙
// 구독
webView.addObserver(self, forKeyPath: #keyPath(WKWebView.title), options: .new, context: nil)

// 이벤트 수신은 observerValue 메소드를 오버라이딩
override func observeValue(forKeyPath keyPath: String?, of object: Any?, change: [NSKeyValueChangeKey : Any]?, context: UnsafeMutableRawPointer?) {
    if keyPath == "estimatedProgress" {
        print(Float(webView.estimatedProgress))
    }
}
유저가 방문한 페이지 조회
- backList
for page in webView.backForwardList.backList {
    print("User visited \(page.url.absoluteString)")
}- forwardList
for page in webView.backForwardList.forwardList {
    print("User visited \(page.url.absoluteString)")
}
Page에 Javascript를 주입하는 방법
- evaluateJavaScript() 사용
webView.evaluateJavaScript("document.getElementById('username').innerText") { (result, error) in
    if let result = result {
        print(result)
    }
}
쿠키, Cookie 읽기 & 삭제
- webView.configuration.websiteDataStore.httpCookieStore.getAllCookies로 쿠키 접근
// 인증 쿠키는 모두 삭제하고, 다른 쿠키는 출력하는 코드

webView.configuration.websiteDataStore.httpCookieStore.getAllCookies { cookies in
    for cookie in cookies {
        if cookie.name == "authentication" {
            self.webView.configuration.websiteDataStore.httpCookieStore.delete(cookie)
        } else {
            print("\(cookie.name) is set to \(cookie.value)")
        }
    }
}
웹 서버에 웹 브라우저에 접속하는 user 식별 값 전달 방법
- customUserAgent 프로퍼티 사용
webView.customUserAgent = "My Awesome App"WebView에서 자바 스크립트의 alert() 반응에 대한 처리 방법
- WKUIDelegate를 conform
class ViewController: UIViewController, WKUIDelegate {

...

webView.uiDelegate = self- webView(:runJavaScriptAlertPanelWithMessage:initiatedByFrame:completionHandler:) 메소드 구현
// 자바스크립트에서 alert() 기능을 사용하고 싶은 경우

func webView(_ webView: WKWebView, runJavaScriptAlertPanelWithMessage message: String, initiatedByFrame frame: WKFrameInfo, completionHandler: @escaping () -> Void) {
    let ac = UIAlertController(title: "Hey, listen!", message: message, preferredStyle: .alert)
    ac.addAction(UIAlertAction(title: "OK", style: .default, handler: nil))
    present(ac, animated: true)
    completionHandler()
}
WebView 화면 캡쳐
- webView.takeSnapshot(with:) 사용
// 웹뷰의 왼쪽 상단 150*50 이미지 생성

let config = WKSnapshotConfiguration()
config.rect = CGRect(x: 0, y: 0, width: 150, height: 50)

webView.takeSnapshot(with: config) { image, error in
    if let image = image {
        print(image.size)
    }
}
전화번호, 일정, 번호 등을 탭 가능한 링크로 표출 방법
- WKWebView 생성 시 configuration정보 삽입
let config = WKWebViewConfiguration()
config.dataDetectorTypes = [.all]
let webView = WKWebView(frame: .zero, configuration: config)
* 참고
- The Ultimate Guide to WKWebView: https://www.hackingwithswift.com/articles/112/the-ultimate-guide-to-wkwebview
- WKWebView: https://developer.apple.com/documentation/webkit/wkwebview
- loadView(): https://developer.apple.com/documentation/uikit/uiviewcontroller/1621454-loadview
'iOS 응용 (swift)' 카테고리의 다른 글
Comments


