Notice
Recent Posts
Recent Comments
Link
| 일 | 월 | 화 | 수 | 목 | 금 | 토 |
|---|---|---|---|---|---|---|
| 1 | 2 | 3 | 4 | 5 | 6 | 7 |
| 8 | 9 | 10 | 11 | 12 | 13 | 14 |
| 15 | 16 | 17 | 18 | 19 | 20 | 21 |
| 22 | 23 | 24 | 25 | 26 | 27 | 28 |
Tags
- Clean Code
- Protocol
- Human interface guide
- Observable
- tableView
- 스위프트
- MVVM
- rxswift
- swiftUI
- 클린 코드
- UICollectionView
- RxCocoa
- combine
- 리펙토링
- HIG
- Refactoring
- uiscrollview
- ios
- scrollview
- ribs
- clean architecture
- uitableview
- map
- UITextView
- swift documentation
- 애니메이션
- SWIFT
- 리팩토링
- Xcode
- collectionview
Archives
- Today
- Total
김종권의 iOS 앱 개발 알아가기
[iOS - swift] 4. Autolayout 고급 (with SnapKit) - Stretchy 레이아웃 구현 본문
UI 컴포넌트 (swift)
[iOS - swift] 4. Autolayout 고급 (with SnapKit) - Stretchy 레이아웃 구현
jake-kim 2022. 2. 6. 02:131. Autolayout 고급 (with SnapKit) - Hugging, Compression, priority 개념
2. Autolayout 고급 (with SnapKit) - remakeConstraints, multipliedBy, dividedBy
3. Autolayout 고급 (with SnapKit) - Constraint 프로퍼티를 사용한 단순한 animation 구현
4. Autolayout 고급 (with SnapKit) - Stretchy 레이아웃 구현

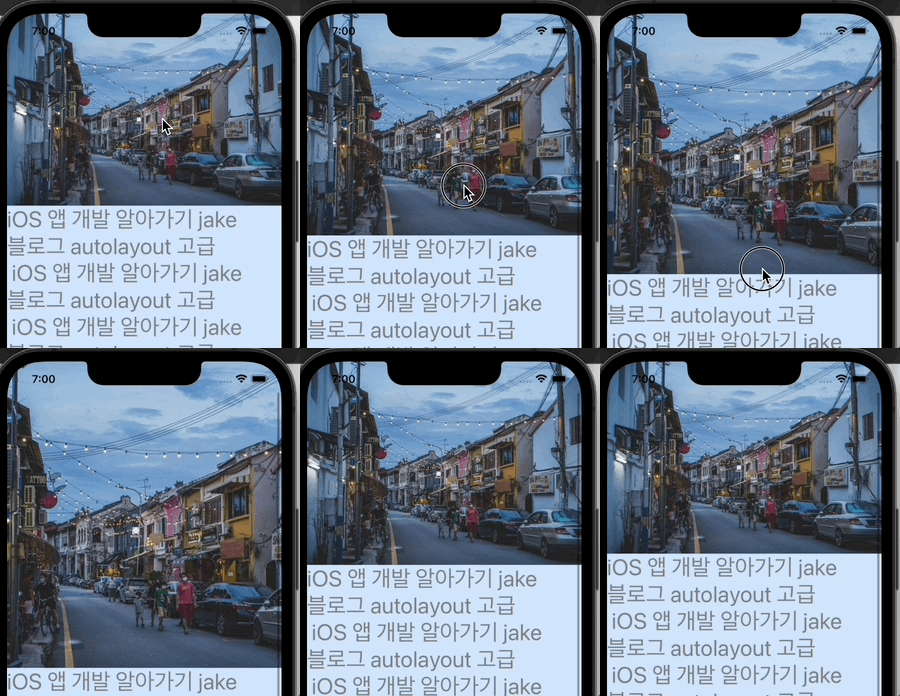
구현 아이디어
- UIImageView의 contentMode는 scaleAspectFill 이므로, 이미지의 height가 높아지면 width도 자동으로 높아지는 상태를 이용
- UIImageView와 이를 담고있는 containerView를 준비하고 레이아웃 설정
- containerView가 UIImageView를 addSubview()하고 있지는 않지만 autolayout에서 사용하는게 핵심
- containerView의 top은 scrollView.top와 같도록 설정
- UIImageView의 top은 rootView.top와 같도록 설정
(이 작업을 안하고 아래로 당기면 원래대로 rootView의 흰색부분이 보일것)
구현
- UI 준비 (UIImageView를 담을 containerView는 다른곳에서 참조할 필요 없으므로 메소드 안에서 따로 생성)
private let scrollView: UIScrollView = { let view = UIScrollView() view.contentInsetAdjustmentBehavior = .never // safe area전용 inset을 줄 것인지 view.contentInset = UIEdgeInsets(top: 0, left: 0, bottom: view.safeAreaInsets.bottom, right: 0) return view }() private let label: UILabel = { let view = UILabel() view.font = .systemFont(ofSize: 32) view.textColor = .gray view.numberOfLines = 0 view.backgroundColor = .systemBlue.withAlphaComponent(0.2) let text = "iOS 앱 개발 알아가기 jake 블로그 autolayout 고급 \n iOS 앱 개발 알아가기 jake 블로그 autolayout 고급\n iOS 앱 개발 알아가기 jake 블로그 autolayout 고급 \n" view.text = text + text + text return view }() private let imageView: UIImageView = { let view = UIImageView() view.image = UIImage(named: "sunset") view.contentMode = .scaleAspectFill return view }() - viewDidLoad() 블록 안에서 addSubview
let imageViewContainer = UIView() self.view.addSubview(self.scrollView) self.scrollView.addSubview(imageViewContainer) self.scrollView.addSubview(self.imageView) self.scrollView.addSubview(self.label) - UIScrollView 레이아웃 기본기 주의)
- 내부 뷰들의 left, right는 self.view와 같게 할 것: equalToSuperview() 하게되면 수평 스크롤 되는 현상 발생
- 내부 뷰들의 가장 위, 아래에 있는 view는 equalToSuperview()를 따로도록 설정 (수직 스크롤을 위함)
- 내부 뷰들의 크기는 내부 크기에 따라 자동으로 늘어나는 UILabel과 같은 intrinsicContentSize가 있어야함
(UITextView를 그냥 사용할시 적용 x 주의)
- scrollView 레이아웃
self.scrollView.snp.makeConstraints { $0.edges.equalToSuperview() } - containerView 레이아웃
- 스크롤의 맨 위에 존재해야하므로 top은 scrollView.top와 같도록 설정
- height값도 설정하여 width값이 늘어나면 height값도 늘어나도록 설정
(현재 imageViewContainer의 height값이 정해지지 않은 상태이므로 필수 제약)
imageViewContainer.snp.makeConstraints { $0.left.right.equalTo(self.view) // superview로 할 경우 horizontal scroll 영역 존재 $0.top.equalToSuperview() $0.height.equalTo(imageViewContainer.snp.width).multipliedBy(0.7) }
- imageView 레이아웃 핵심
- top이 superView가 아닌, rootView에 걸어두어서 스크롤 했을 때 이미지가 scrollView의 top에 고정되어 있지 않아 늘어나도록 설정 (이 설정 안할 경우, 밑으로 끝까지 당기면 윗쪽에 rootView의 배경이 보이는 형태)
- bottom top과 height를 동시에 설정하는 부분 - imageView는 container안에 있도록 하되, 스크롤을 당겼을때 더욱 커질 수 있으므로 height값을 imageViewContainer.height보다 커질 수 있는 제약을 부여
self.imageView.snp.makeConstraints {
  $0.left.right.bottom.equalTo(imageViewContainer)
  $0.top.equalTo(self.view).priority(999) // <-
  $0.height.greaterThanOrEqualTo(imageViewContainer.snp.height) // <-
}
- label 레이아웃 - 스크롤 뷰의 맨 아래에 위치하므로 bottom이 scrollView.bottom과 일치하도록 설정
self.label.snp.makeConstraints { $0.left.right.equalTo(self.view) $0.top.equalTo(imageViewContainer.snp.bottom) $0.bottom.equalToSuperview() }
bottom의 rootView 배경이 안보이도록 구현 방법

- 쉽게 rootView의 배경색과 label의 배경색을 같도록하여 처리
self.view.backgroundColor = self.label.backgroundColor
* 전체 코드: https://github.com/JK0369/ExAutolayout/tree/Chapter4
* 참고
'UI 컴포넌트 (swift)' 카테고리의 다른 글
Comments


