Notice
Recent Posts
Recent Comments
Link
| 일 | 월 | 화 | 수 | 목 | 금 | 토 |
|---|---|---|---|---|---|---|
| 1 | 2 | 3 | 4 | 5 | 6 | 7 |
| 8 | 9 | 10 | 11 | 12 | 13 | 14 |
| 15 | 16 | 17 | 18 | 19 | 20 | 21 |
| 22 | 23 | 24 | 25 | 26 | 27 | 28 |
Tags
- swift documentation
- MVVM
- scrollview
- tableView
- clean architecture
- uitableview
- 클린 코드
- Observable
- Human interface guide
- Protocol
- ribs
- combine
- 애니메이션
- 리팩토링
- collectionview
- 스위프트
- 리펙토링
- SWIFT
- uiscrollview
- map
- Xcode
- ios
- HIG
- UICollectionView
- Clean Code
- swiftUI
- UITextView
- Refactoring
- rxswift
- RxCocoa
Archives
- Today
- Total
김종권의 iOS 앱 개발 알아가기
[iOS - swift] 3. Autolayout 고급 (with SnapKit) - Constraint 프로퍼티를 사용한 단순한 animation 구현 본문
UI 컴포넌트 (swift)
[iOS - swift] 3. Autolayout 고급 (with SnapKit) - Constraint 프로퍼티를 사용한 단순한 animation 구현
jake-kim 2022. 2. 4. 03:071. Autolayout 고급 (with SnapKit) - Hugging, Compression, priority 개념
2. Autolayout 고급 (with SnapKit) - remakeConstraints, multipliedBy, dividedBy
3. Autolayout 고급 (with SnapKit) - Constraint 프로퍼티를 사용한 단순한 animation 구현
4. Autolayout 고급 (with SnapKit) - Stretchy 레이아웃 구현
* 미리 알아야 하는 개념) 코드로 UI 구현 시, SnapKit 기본 사용 방법
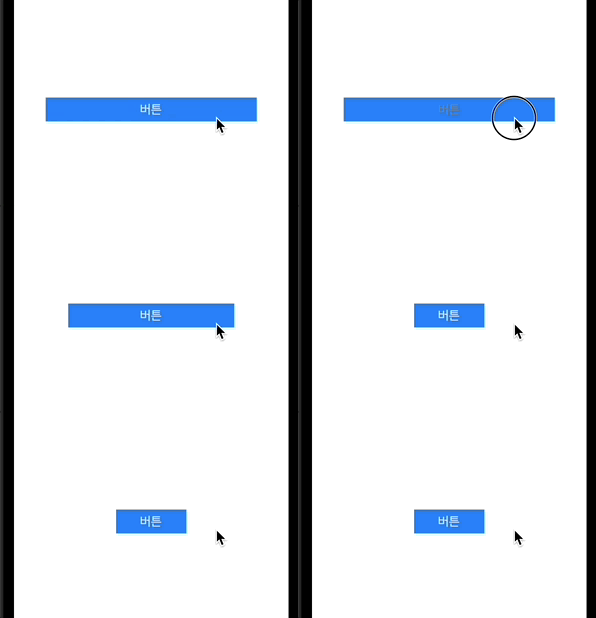
버튼 길이 감소 애니메이션

- SnapKit의 Constraint 타입의 프로퍼티를 저장해놓고, 버튼 탭 시 constraint.update하여 레이아웃 수정
- Constraint는 NSLayoutConstraint와 동일하며, 해당 인스턴스는 SnapKit에서 layout 설정하면서 동시에 인스턴스 획득이 가능
// Constraint 타입 선언 private var buttonWidthConstraint: Constraint? // 레이아웃 설정 블록 안에서 .constraint로 인스턴스 획득 가능 (동시에 레이아웃도 적용) self.button.snp.makeConstraints { $0.center.equalToSuperview() self.buttonWidthConstraint = $0.width.equalTo(300).constraint }
- Constraint는 NSLayoutConstraint와 동일하며, 해당 인스턴스는 SnapKit에서 layout 설정하면서 동시에 인스턴스 획득이 가능
- 버튼이 눌렸을 때 constraint.update를 통해 layout 업데이트
- 업데이트 이후 main run loop - update cycle 구간에서 애니메이션이 적용될 수 있도록, UIView.animate 블록 안에서 view.layoutIfNeeded() 호출
@objc private func didTapButton() { self.buttonWidthConstraint?.update(offset: 100) UIView.animate(withDuration: 0.5) { self.view.layoutIfNeeded() } }
- 업데이트 이후 main run loop - update cycle 구간에서 애니메이션이 적용될 수 있도록, UIView.animate 블록 안에서 view.layoutIfNeeded() 호출
TableView에서의 autolayout 애니메이션

- 구현 아이디어
- insert나 delete 될때마다 tableView.height값을 property로 놓고, tableView.contentSize.height만큼 update 시키는 것
- tableView.bottom >= insertButton.top (priority 999)
- priority가 999인 이유는, 밑에 insertButton의 compression의 우선순위가 1000으로 주어서 height가 커져도 insertButton이 밀리지 않도록 하기 위함 (= insertButton의 intrinsicSize가 작아지지 않게 하기 위함)
- UI 준비
private let tableView: UITableView = { let view = UITableView() view.register(UITableViewCell.self, forCellReuseIdentifier: "cell") return view }() private let bottomLabel: UILabel = { let label = UILabel() label.textColor = .white label.backgroundColor = .systemOrange label.text = "tableView 밑 label" label.textAlignment = .center return label }() private let insertButton: UIButton = { let button = UIButton() button.setTitle("추가", for: .normal) button.setTitleColor(.white, for: .normal) button.setTitleColor(.blue, for: .highlighted) button.backgroundColor = .systemBlue return button }() private let removeButton: UIButton = { let button = UIButton() button.setTitle("삭제", for: .normal) button.setTitleColor(.white, for: .normal) button.setTitleColor(.red, for: .highlighted) button.backgroundColor = .systemRed return button }() - dataSource와 Constraint 프로퍼티 선언
var dataSource = [0, 1, 2] private var tableViewHeight: Constraint? - viewDidLoad에서 레이아웃 설정
- tableView: 핵심은 height 이고 이 값 - 임시적으로 0으로 해놓고 viewDidAppear, 아이템이 insert, delete 될때 업데이트
self.tableView.snp.makeConstraints { $0.left.right.equalToSuperview() $0.top.equalTo(self.view.safeAreaLayoutGuide) $0.bottom.lessThanOrEqualTo(self.insertButton.snp.top) self.tableViewHeight = $0.height.equalTo(0).priority(999).constraint } self.insertButton.setContentCompressionResistancePriority(.init(rawValue: 1000), for: .vertical) - bottomLabel
self.bottomLabel.snp.makeConstraints { $0.left.right.equalToSuperview() $0.top.equalTo(self.tableView.snp.bottom) $0.bottom.lessThanOrEqualTo(self.insertButton.snp.top) $0.height.equalTo(80) } - insertButton, removeButton
self.insertButton.snp.makeConstraints { $0.bottom.left.equalTo(self.view.safeAreaLayoutGuide) $0.width.equalToSuperview().dividedBy(2) } self.removeButton.snp.makeConstraints { $0.bottom.right.equalTo(self.view.safeAreaLayoutGuide) $0.width.equalToSuperview().dividedBy(2) }
- tableView: 핵심은 height 이고 이 값 - 임시적으로 0으로 해놓고 viewDidAppear, 아이템이 insert, delete 될때 업데이트
- inset, remove 버튼에 관한 각 이벤트 처리 및 tableViewHeight 값 업데이트
@objc private func didTapInsertButton() { let newItem = self.dataSource.count let newIndexPath = IndexPath(row: newItem, section: 0) self.dataSource.append(newItem) self.tableView.beginUpdates() self.tableView.insertRows(at: [newIndexPath], with: .automatic) self.tableView.endUpdates() self.didUpdateTableViewContentSize() guard self.tableView.contentSize.height > self.tableView.frame.height else { return } self.tableView.scrollToRow(at: newIndexPath, at: .bottom, animated: true) } @objc private func didTapRemoveButton() { guard !self.dataSource.isEmpty else { return } let deleteIndexPath = IndexPath(row: self.dataSource.count - 1, section: 0) self.dataSource.removeLast() self.tableView.beginUpdates() self.tableView.deleteRows(at: [deleteIndexPath], with: .automatic) self.tableView.endUpdates() self.didUpdateTableViewContentSize() } private func didUpdateTableViewContentSize() { self.tableViewHeight?.update(offset: self.tableView.contentSize.height) UIView.animate(withDuration: 0.3) { self.view.layoutIfNeeded() } }
* 전체 코드: https://github.com/JK0369/ExAutolayout/tree/Chapter3
'UI 컴포넌트 (swift)' 카테고리의 다른 글
Comments


