Notice
Recent Posts
Recent Comments
Link
| 일 | 월 | 화 | 수 | 목 | 금 | 토 |
|---|---|---|---|---|---|---|
| 1 | 2 | 3 | 4 | 5 | 6 | 7 |
| 8 | 9 | 10 | 11 | 12 | 13 | 14 |
| 15 | 16 | 17 | 18 | 19 | 20 | 21 |
| 22 | 23 | 24 | 25 | 26 | 27 | 28 |
Tags
- clean architecture
- tableView
- 리펙토링
- uitableview
- Human interface guide
- 애니메이션
- scrollview
- HIG
- 스위프트
- uiscrollview
- Observable
- combine
- Refactoring
- ios
- Xcode
- swiftUI
- 리팩토링
- UICollectionView
- UITextView
- Protocol
- swift documentation
- Clean Code
- 클린 코드
- rxswift
- ribs
- RxCocoa
- MVVM
- SWIFT
- map
- collectionview
Archives
- Today
- Total
김종권의 iOS 앱 개발 알아가기
[iOS - swift] UITextView의 구조 (contentInset, textContainerInset, scrollIndicatorInsets) 본문
iOS 응용 (swift)
[iOS - swift] UITextView의 구조 (contentInset, textContainerInset, scrollIndicatorInsets)
jake-kim 2022. 2. 18. 02:01
UITextView
- 위 사진처럼 UITextView는 내부적으로 textInputView를 가지고 있는 형태
- textInputView를 감싸고 있는 프로퍼티는 textContainer이므로, textInputView 내부의 inset을 조절하고 싶은 경우에는 `textContainerInset` 프로퍼티를 사용

UITextView - UITextView는 UIScrollView를 상속받고 있으므로, scroll 속성도 갖고있는 상태
- UIScrollView에서의 내부 컨텐츠는 textInputView이고, 프레임은 UITextView의 레이아웃에 따름

contentInset, textContainerInset, scrollIndicatorInsets

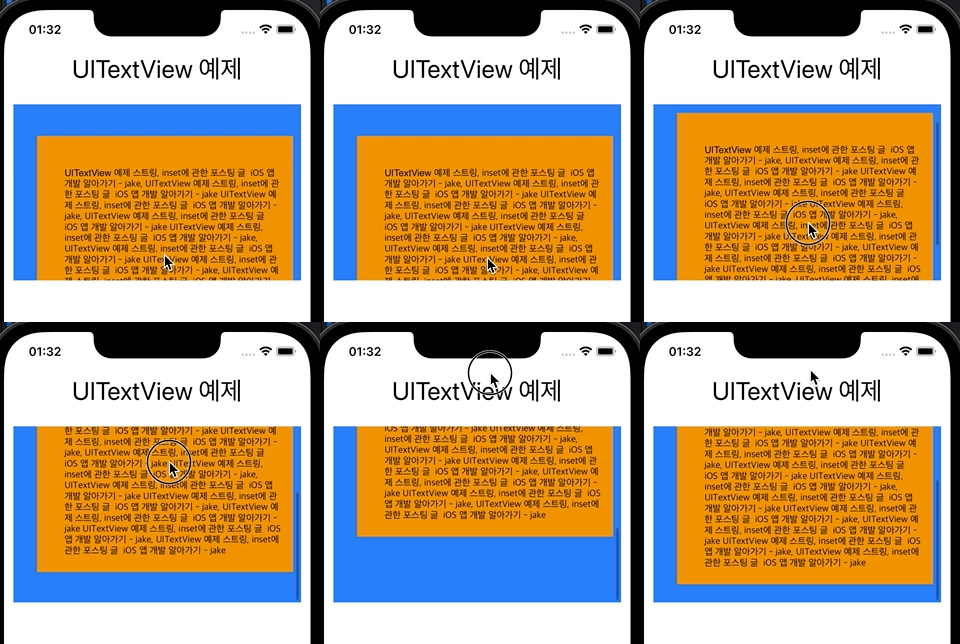
- UITextView에서는 내부적으로 textInputView와 UIScrollView를 가지고 있으므로, 그에따른 inset조절이 가능
myTextView.contentInset = .init(top: 40, left: 30, bottom: 20, right: 10) myTextView.textContainerInset = .init(top: 40, left: 30, bottom: 20, right: 10) myTextView.scrollIndicatorInsets = .init(top: 10, left: 10, bottom: 10, right: 20)
* 위 사진에 해당하는 뷰 전체 코드
import UIKit

class ViewController: UIViewController {
  private lazy var label: UILabel = {
    let label = UILabel()
    label.text = "UITextView 예제"
    label.font = .systemFont(ofSize: 32)
    return label
  }()
  private lazy var myTextView: UITextView = {
    let view = UITextView()
    view.text = "UITextView 예제 스트링, inset에 관한 포스팅 글  iOS 앱 개발 알아가기 - jake, UITextView 예제 스트링, inset에 관한 포스팅 글  iOS 앱 개발 알아가기 - jake UITextView 예제 스트링, inset에 관한 포스팅 글  iOS 앱 개발 알아가기 - jake, UITextView 예제 스트링, inset에 관한 포스팅 글  iOS 앱 개발 알아가기 - jake UITextView 예제 스트링, inset에 관한 포스팅 글  iOS 앱 개발 알아가기 - jake, UITextView 예제 스트링, inset에 관한 포스팅 글  iOS 앱 개발 알아가기 - jake UITextView 예제 스트링, inset에 관한 포스팅 글  iOS 앱 개발 알아가기 - jake, UITextView 예제 스트링, inset에 관한 포스팅 글  iOS 앱 개발 알아가기 - jake UITextView 예제 스트링, inset에 관한 포스팅 글  iOS 앱 개발 알아가기 - jake, UITextView 예제 스트링, inset에 관한 포스팅 글  iOS 앱 개발 알아가기 - jake"
    view.backgroundColor = .systemBlue
    view.textInputView.backgroundColor = .systemOrange
    view.contentInset = .init(top: 40, left: 30, bottom: 20, right: 10)
    view.textContainerInset = .init(top: 40, left: 30, bottom: 20, right: 10)
    view.scrollIndicatorInsets = .init(top: 10, left: 10, bottom: 10, right: 20)
    return view
  }()

  override func viewDidLoad() {
    super.viewDidLoad()

    self.view.addSubview(self.label)
    self.view.addSubview(self.myTextView)

    self.label.translatesAutoresizingMaskIntoConstraints = false
    self.label.topAnchor.constraint(equalTo: self.view.topAnchor, constant: 56).isActive = true
    self.label.centerXAnchor.constraint(equalTo: self.view.centerXAnchor).isActive = true

    self.myTextView.translatesAutoresizingMaskIntoConstraints = false
    self.myTextView.leadingAnchor.constraint(equalTo: self.view.leadingAnchor, constant: 12).isActive = true
    self.myTextView.trailingAnchor.constraint(equalTo: self.view.trailingAnchor, constant: -12).isActive = true
    self.myTextView.topAnchor.constraint(equalTo: self.view.topAnchor, constant: 120).isActive = true
    self.myTextView.bottomAnchor.constraint(equalTo: self.view.bottomAnchor, constant: -500).isActive = true
  }
}
* inset 별도로 UITextView에는 좌우 패딩이 5만큼 들어가 있는데, lineFragmentPadding 이 값에 관한 내용은 다음 포스팅 글 참고
'iOS 응용 (swift)' 카테고리의 다른 글
Comments


