Notice
Recent Posts
Recent Comments
Link
| 일 | 월 | 화 | 수 | 목 | 금 | 토 |
|---|---|---|---|---|---|---|
| 1 | 2 | 3 | 4 | 5 | 6 | 7 |
| 8 | 9 | 10 | 11 | 12 | 13 | 14 |
| 15 | 16 | 17 | 18 | 19 | 20 | 21 |
| 22 | 23 | 24 | 25 | 26 | 27 | 28 |
Tags
- swiftUI
- clean architecture
- HIG
- scrollview
- map
- tableView
- uiscrollview
- ios
- 리팩토링
- 클린 코드
- combine
- Protocol
- swift documentation
- uitableview
- MVVM
- Observable
- 스위프트
- UICollectionView
- Xcode
- collectionview
- 애니메이션
- 리펙토링
- SWIFT
- UITextView
- Refactoring
- RxCocoa
- Clean Code
- Human interface guide
- ribs
- rxswift
Archives
- Today
- Total
김종권의 iOS 앱 개발 알아가기
[iOS - swift] `더 보기` UI 구현 방법 (tableView, Section) 본문

아이디어
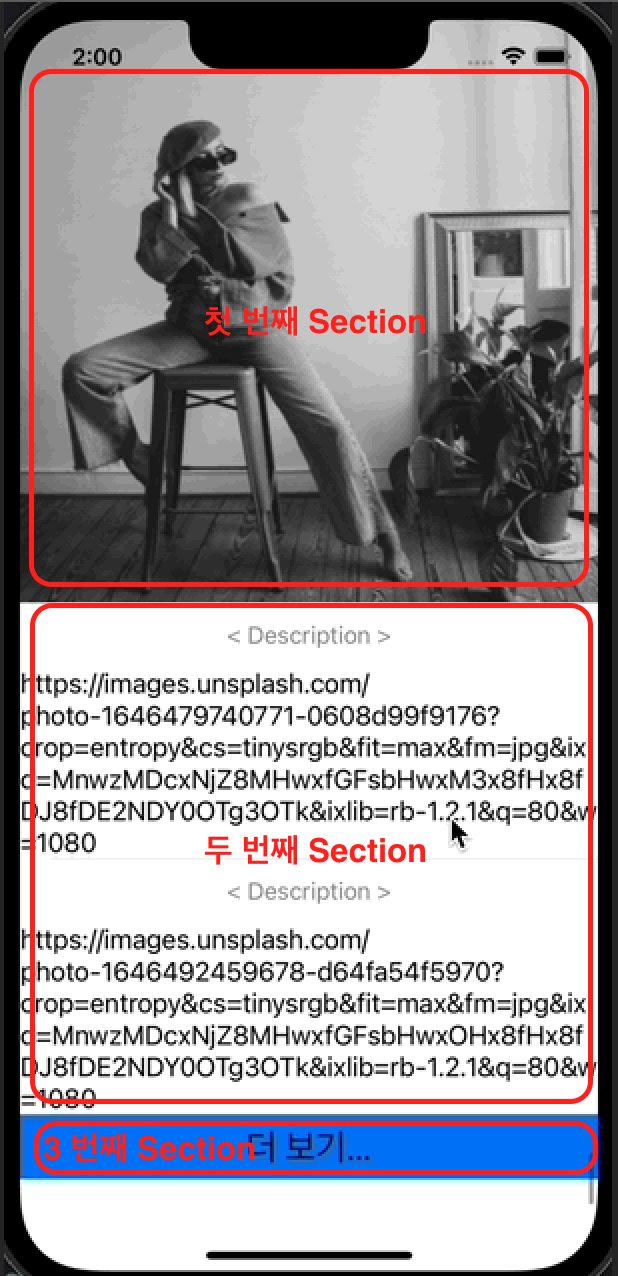
- Cell 타입이 총 3개 존재 (3개의 커스텀 셀 정의)
- Cell 타입 하나 당 Section 하나씩 배치
- Cell로만 이루어지지 않고 Section으로 나눈 이유?
- 분류 - TableView / Section / Cell
- -> Cell들은 서로 연관되어 있는지? 연관이 적으면 Section으로 나누기
- -> Section들은 표현하려는 방향이 같은지? 표현하려는 방향이 같으면 하나의 TableView에 표현
- Section으로 분리해야하는 구체적인 이유 - 멀티 Section에 관한 글 참고
- 분류 - TableView / Section / Cell

준비
- Unsplash API 사용 (이미지 데이터 획득)
- framework
  # Rx
  pod 'RxSwift'
  pod 'RxCocoa'
  pod 'RxGesture'

  # UI
  pod 'SnapKit'
  pod 'Then'

  # Nework
  pod 'Alamofire'

  # Caching
  pod 'Kingfisher'

  # Utils
  pod 'KeyedCodable'
Cell 3가지 구현
- PhotoCell, TitleCell, LoadingCell
- 이 중에 PhotoCell 구현 시 주의할 점
- Cell의 row height는 URL을 통해 이미지 로드를 하기 전에 정해졌으므로, image를 얻어온 경우 cell row height 업데이트가 필요
- cell에 reloadData 없이도 cell의 row height의 변경애 대한 반영하고 싶은 경우?
- beginUpdates(), endUpdates() 사용
- PhotoCell내부에 updateImagesSubject라는 프로퍼티를 놓고, Image를 불러온 경우 이벤트 방출 -> VC의 cellForRowAt에서 binding하여 beginUpdates(), endUpdates() 호출
// PhotoCell.swift
let updateImagesSubejct = PublishSubject<Void>()
var disposeBag = DisposeBag()

func prepare(urlString: String?) {
  self.photoImageView.kf.cancelDownloadTask()
  self.photoImageView.image = nil
  guard let urlString = urlString else { return }

  self.photoImageView.kf.setImage(
    with: URL(string: urlString),
    placeholder: UIImage(named: "placeholder"),
    options: [
      .processor(DownsamplingImageProcessor(size: CGSize(width: 300, height: 500))),
      .progressiveJPEG(ImageProgressive(isBlur: false, isFastestScan: true, scanInterval: 0.1)),
      .transition(.fade(0.3))
    ],
    completionHandler: { [weak self] _ in self?.updateImagesSubejct.onNext(()) }
  )
}

// ViewController.swift

  func tableView(_ tableView: UITableView, cellForRowAt indexPath: IndexPath) -> UITableViewCell {
    switch self.dataSource[indexPath.section] {
    case .image(let photos):
      let cell = tableView.dequeueReusableCell(withIdentifier: "PhotoCell", for: indexPath) as! PhotoCell
      cell.prepare(urlString: photos[indexPath.row].url)
      cell.updateImagesSubejct // <-
        .bind {
          tableView.beginUpdates()
          tableView.endUpdates()
        }
        .disposed(by: cell.disposeBag)
      return cell

    ...
  }
Section 모델 정의
// PhotoSection.swift

enum PhotoSection {
  case image([Photo])
  case description([Photo])
  case loading
}
ViewController에서 사용
- tableView에 3가지 cell 등록
// ViewController.swift

  private let tableView = UITableView().then {
    $0.register(PhotoCell.self, forCellReuseIdentifier: "PhotoCell")
    $0.register(TitleCell.self, forCellReuseIdentifier: "TitleCell")
    $0.register(LoadingCell.self, forCellReuseIdentifier: "LoadingCell")
    $0.rowHeight = UITableView.automaticDimension
    $0.estimatedRowHeight = 1000
    $0.tableFooterView = UIView()
    $0.separatorStyle = .none
}- dataSource 준비
private var dataSource = [PhotoSection]()- 데이터를 불러오는 API 호출 후 항상 "더 보기" LoadingCell은 마지막에 위치해야하므로, 마지막에 있는 cell을 삭제 후 다시 append하는 로직
// ViewController.swift

  private func refresh() {
    self.isRefreshing = true
    self.page += 1
    API.getPhotos(page: self.page) { [weak self] photos in
      guard let ss = self else { return }
      ss.isRefreshing = false
      let photoDataSource = photos.filter { $0.description == nil }
      let descriptionDataSource = photos.filter { $0.description != nil }
      if !ss.dataSource.isEmpty {
        ss.dataSource.remove(at: ss.dataSource.count - 1)
      }
      ss.dataSource.append(
        contentsOf: [
          .image(photoDataSource),
          .description(descriptionDataSource),
          .loading
        ]
      )
      ss.tableView.reloadData()
    }
}- numberOfRowsInSection에서 section에 따라 cell의 count 반환
  // in extension ViewController: UITableViewDataSource { ... }

  func tableView(_ tableView: UITableView, numberOfRowsInSection section: Int) -> Int {
    switch self.dataSource[section] {
    case let .image(photos):
      return photos.count
    case let .description(photos):
      return photos.count
    case .loading:
      return 1
    }
}- CellForRowAt에서
  // in extension ViewController: UITableViewDataSource { ... }

  func tableView(_ tableView: UITableView, cellForRowAt indexPath: IndexPath) -> UITableViewCell {
    switch self.dataSource[indexPath.section] {
    case .image(let photos):
      let cell = tableView.dequeueReusableCell(withIdentifier: "PhotoCell", for: indexPath) as! PhotoCell
      cell.prepare(urlString: photos[indexPath.row].url)
      cell.updateImagesSubejct
        .bind {
          tableView.beginUpdates()
          tableView.endUpdates()
        }
        .disposed(by: cell.disposeBag)
      return cell
    case .description(let photos):
      let cell = tableView.dequeueReusableCell(withIdentifier: "TitleCell", for: indexPath) as! TitleCell
      cell.prepare(title: photos[indexPath.row].url)
      return cell
    case .loading:
      let cell = tableView.dequeueReusableCell(withIdentifier: "LoadingCell", for: indexPath) as! LoadingCell
      cell.prepare(mode: self.isRefreshing ? .refreshing : .more)
      return cell
    }
}- "더 보기" Cell을 탭한 경우 데이터를 더 불러오도록 설정
extension ViewController: UITableViewDelegate {
  func tableView(_ tableView: UITableView, didSelectRowAt indexPath: IndexPath) {
    tableView.deselectRow(at: indexPath, animated: false)
    guard case .loading = self.dataSource[indexPath.section] else { return }
    self.refresh()
  }
}
* 전체 코드: https://github.com/JK0369/ExMultiSection
'iOS 응용 (swift)' 카테고리의 다른 글
Comments


