Notice
Recent Posts
Recent Comments
Link
| 일 | 월 | 화 | 수 | 목 | 금 | 토 |
|---|---|---|---|---|---|---|
| 1 | 2 | 3 | 4 | 5 | 6 | 7 |
| 8 | 9 | 10 | 11 | 12 | 13 | 14 |
| 15 | 16 | 17 | 18 | 19 | 20 | 21 |
| 22 | 23 | 24 | 25 | 26 | 27 | 28 |
Tags
- map
- UITextView
- swift documentation
- Xcode
- uitableview
- UICollectionView
- SWIFT
- Human interface guide
- MVVM
- clean architecture
- ios
- Refactoring
- 애니메이션
- HIG
- Clean Code
- Protocol
- rxswift
- 클린 코드
- 리팩토링
- 리펙토링
- Observable
- combine
- 스위프트
- uiscrollview
- swiftUI
- collectionview
- RxCocoa
- scrollview
- ribs
- tableView
Archives
- Today
- Total
김종권의 iOS 앱 개발 알아가기
[iOS - swift] ContentHugging, ContentCompressionResistance 디폴트 값 (defaultLow, defaultHigh), autolayout과의 우선순위 본문
iOS 기본 (swift)
[iOS - swift] ContentHugging, ContentCompressionResistance 디폴트 값 (defaultLow, defaultHigh), autolayout과의 우선순위
jake-kim 2022. 5. 18. 01:13Hugging과 Compression 개념
- Hugging
- 뷰가 고유 크기보다 커지는 것을 방지하기위해 우선 순위를 설정하는것
- 커지지 않게 하다 = "Hugging"

- Compression
- 뷰가 고유 크기보다 작게 되는것을 방지하기위해 우선 순위를 설정하는것
- 작게 되지 않게 하다 = "CompressionResistance"

* Hugging, Compression 관련한 더욱 자세한 개념은 이전 포스팅 글 참고
Default Priority 값

* 위 표는 code base기준이므로, Interface Builder 사용 시 다른 표 참고
- UISwitch와 UILabel을 코드로 만들었을 때, horizontal의 디폴트 hugging 값이 각각 다르며, 이처럼 UI마다 각각 다른 default값이 존재
- 핵심
- code base와 Interface builder를 사용하여 각각 UI를 생성한 경우 default proiority값이 다른 것
- compression resistance의 디폴트 값은 모두 750
- hugging의 디폴트 값이 큰 경우, 해당 뷰가 고유 크기보다 커지지 않도록 하는 UI
- hugging의 디폴트 값이 작은 경우, 해당 뷰가 고유 크기보다 커져도 괜찮은 UI
- 디폴트 값은 250아니면 750으로 존재
- UISwitch, UIActivityIndicatorView와 같은 요소들은 해당 뷰가 고유 크기보다 커지면 어색한 형태가 되므로, horizontal, vertical 각각 디폴트 값은 높은 750
- 일반적으로 많이 사용하는 UIButton, UIImageView, UILabel, UITextField, UITextView, UIView같은 경우 모두 hugging의 디폴트 값은 250
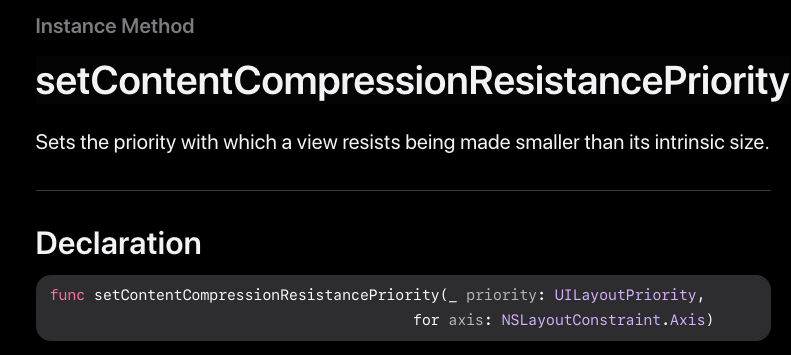
setContentHuggingPriority, setContentCompressionResistancePriority
- 아래처럼 코드로 Hugging, Compression을 변경하는 경우 값
- defaultLow, defaultHigh는 위에서 알아본대로 디폴트값에 사용되는 250과 750으로 존재
button.setContentHuggingPriority(.defaultLow, for: .horizontal)
button.setContentCompressionResistancePriority(.defaultHigh, for: .horizontal)
autolayout과의 우선순위
- 핵심 우선순위: 가장 마지막에 추가된 뷰 < hugging, compression < autolayout
1) compression값이 모두 같을 때, 중간에 있는 content크기가 커지면 맨 뒤에 추가된 뷰는 마치 compression값이 작은것처럼 축소되는 현상이 발생
2) compression값이 모두 같을 때, autolayout으로 size를 지정해놓지 않으면 compression이 작은 것처럼 결과가 발생 (= 뷰가 고유 크기보다 작아지는 현상)
ex) 4개의 뷰 존재하고, 2번째 label의 content 크기가 커질때 상황은?

- (레이아웃 코드)
NSLayoutConstraint.activate([
  self.containerView.leftAnchor.constraint(equalTo: self.view.leftAnchor),
  self.containerView.rightAnchor.constraint(equalTo: self.view.rightAnchor),
  self.containerView.heightAnchor.constraint(equalToConstant: 200),
  self.containerView.centerYAnchor.constraint(equalTo: self.view.centerYAnchor),
])
NSLayoutConstraint.activate([
  self.sampleView.leftAnchor.constraint(equalTo: self.containerView.leftAnchor),
  self.sampleView.bottomAnchor.constraint(equalTo: self.containerView.bottomAnchor),
  self.sampleView.topAnchor.constraint(equalTo: self.containerView.topAnchor),
])
NSLayoutConstraint.activate([
  self.sampleLabel.leftAnchor.constraint(equalTo: self.sampleView.rightAnchor),
  self.sampleLabel.bottomAnchor.constraint(equalTo: self.containerView.bottomAnchor),
  self.sampleLabel.topAnchor.constraint(equalTo: self.containerView.topAnchor),
])
NSLayoutConstraint.activate([
  self.sample2Label.leftAnchor.constraint(equalTo: self.sampleLabel.rightAnchor),
  self.sample2Label.bottomAnchor.constraint(equalTo: self.containerView.bottomAnchor),
  self.sample2Label.topAnchor.constraint(equalTo: self.containerView.topAnchor),
])
NSLayoutConstraint.activate([
  self.sampleButton.leftAnchor.constraint(equalTo: self.sample2Label.rightAnchor),
  self.sampleButton.rightAnchor.constraint(equalTo: self.containerView.rightAnchor),
  self.sampleButton.bottomAnchor.constraint(equalTo: self.containerView.bottomAnchor),
  self.sampleButton.topAnchor.constraint(equalTo: self.containerView.topAnchor),
])

// horizontal 모두 UILayoutPriority(rawValue: 250.0)
print(self.containerView.contentHuggingPriority(for: .horizontal))
print(self.sampleView.contentHuggingPriority(for: .horizontal))
print(self.sampleLabel.contentHuggingPriority(for: .horizontal))
print(self.sample2Label.contentHuggingPriority(for: .horizontal))
print(self.sampleButton.contentHuggingPriority(for: .horizontal))

// vertical 모두 UILayoutPriority(rawValue: 750.0)
print(self.containerView.contentCompressionResistancePriority(for: .vertical))
print(self.sampleView.contentCompressionResistancePriority(for: .vertical))
print(self.sampleLabel.contentCompressionResistancePriority(for: .vertical))
print(self.sample2Label.contentCompressionResistancePriority(for: .vertical))
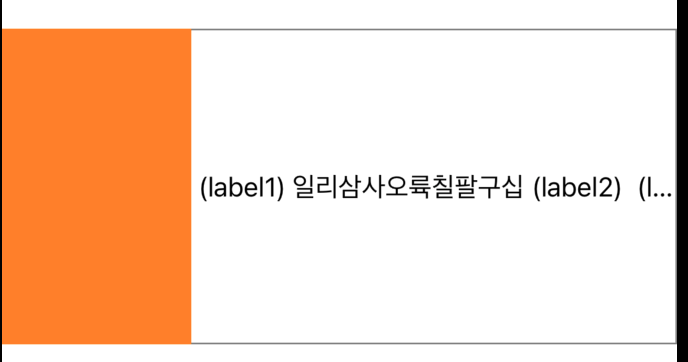
print(self.sampleButton.contentCompressionResistancePriority(for: .vertical))- label1의 text를 늘린 경우
- 오랜지뷰의 width값이 고정되지 않았으므로 compression이 작은것처럼 동작
label.text = " (label1) 일리삼사오륙칠팔구십"
- 만약 오렌지뷰의 width값을 오토레이아웃으로 고정시킨경우
- 오렌지뷰는 고정되며, 오른쪽에 있던 UIButton이 줄어든 상태
- compression값이 모두 같을 때, autolayout으로 size를 지정해놓지 않으면 compression이 작은 것처럼 결과가 발생
self.sampleView.widthAnchor.constraint(equalToConstant: 120)
- 만약 가장 오른쪽에 있는게 UIButton이 아닌 UILabel인 경우?
- UILabel이라도 동일하게 잘리는 현상이 발생
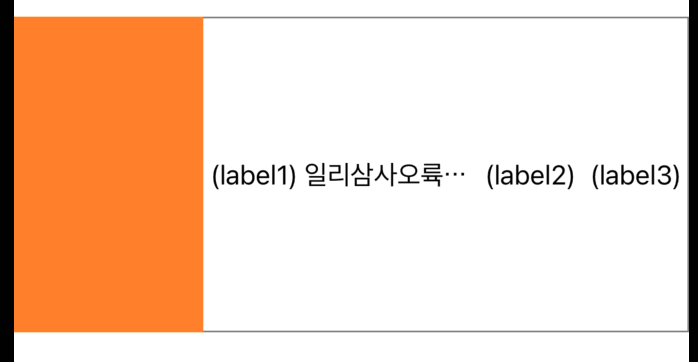
- compression값이 같을 때, 중간 뷰의 content가 커지면 마지막에 있는 뷰의 compression이 작아지는 현상

- 맨 마지막 label의 compression을 크게 한 경우
- 중간 label의 compression이 작으므로 줄어드는 형태
label.setContentCompressionResistancePriority(.required, for: .horizontal)
- 중간 label의 compression으로 .required한 경우
- 오렌지뷰의 compression이 750이고 첫 번째 label의 compression이 750, 나머지 두 label은 1000이지만, 오렌지뷰는 오토레이아웃으로 width값이 고정되어 있으므로 고정

'iOS 기본 (swift)' 카테고리의 다른 글
| [iOS - swift] custom loading 구현 방법 (UIWindow 사용) (5) | 2022.05.22 |
|---|---|
| [iOS - swift] View와 Layer의 차이 (UIView, CALayer) (0) | 2022.05.19 |
| [iOS - swift] NSLock(), Thread Safe 개념 (2) | 2022.04.28 |
| [iOS - swift] UIButton 하나로 토글 버튼 구현 방법 (+ RxSwift, RxCocoa, isHighlighted, withLatestFrom) (0) | 2022.04.26 |
| [iOS - swift] allSatisfy 연산자 (Collection, Sequence 개념) (0) | 2022.04.23 |
Comments


