Notice
Recent Posts
Recent Comments
Link
| 일 | 월 | 화 | 수 | 목 | 금 | 토 |
|---|---|---|---|---|---|---|
| 1 | 2 | 3 | 4 | 5 | 6 | 7 |
| 8 | 9 | 10 | 11 | 12 | 13 | 14 |
| 15 | 16 | 17 | 18 | 19 | 20 | 21 |
| 22 | 23 | 24 | 25 | 26 | 27 | 28 |
Tags
- uiscrollview
- 리팩토링
- 리펙토링
- tableView
- uitableview
- Human interface guide
- ribs
- ios
- Protocol
- 클린 코드
- Xcode
- 애니메이션
- UICollectionView
- UITextView
- scrollview
- swiftUI
- combine
- Clean Code
- map
- SWIFT
- swift documentation
- Observable
- HIG
- collectionview
- Refactoring
- rxswift
- clean architecture
- RxCocoa
- 스위프트
- MVVM
Archives
- Today
- Total
김종권의 iOS 앱 개발 알아가기
[iOS - SwiftUI] List, Grid, FittedGrid 구현 방법 (이미지 contentMode fit 적용 grid) 본문
iOS 응용 (SwiftUI)
[iOS - SwiftUI] List, Grid, FittedGrid 구현 방법 (이미지 contentMode fit 적용 grid)
jake-kim 2022. 10. 7. 23:28List, Grid, FittedGrid 개념
- List - 1줄로 된 스크롤 뷰
- Grid - n줄로 된 스크롤 뷰이며, 각각의 크기가 Fixed로 정해진 값으로 표출
- FittedGrid - 이미지와 같은 경우, width는 디바이스의 크기만큼 고정하면서 height값은 이미지의 비율만큼 유지하는 그리드 뷰
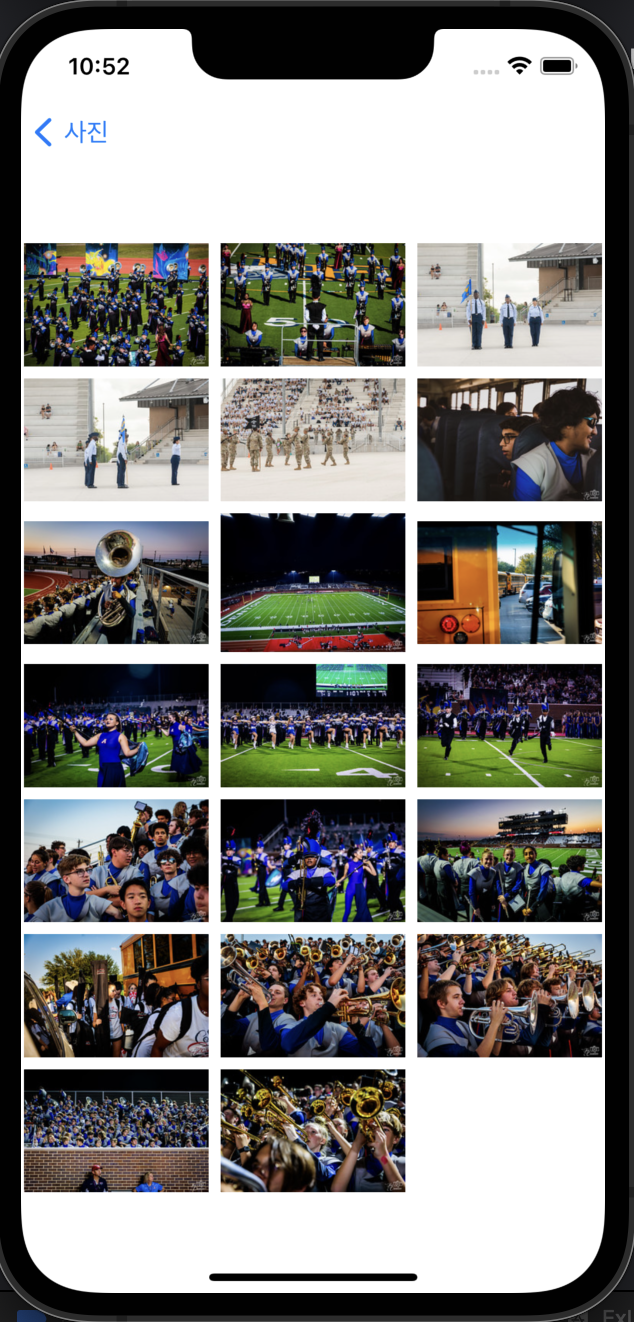
| List | Grid | FittedGrid |
 |
 |
 |
구현 아이디어
- 모두 ScrollView, Stack, ForEach, NavigationLink로 구현
- List에도 List라는 SwiftUI에서 제공해주는 컴포넌트가 있지만, 디폴트값으로 패딩이 적용되어 있고 disclosure indicator가 있는 경우가 존재하여 불필요
예제에 사용할 API
- 사용 API - 이미지 리스트를 불러오는 Flickr
https://api.flickr.com/services/feeds/photos_public.gne?tags=texas&tagmode=any&format=json&nojsoncallback=1- API Decoding 모델 정의
struct PhotoModel: Codable {
  struct Item: Codable {
    struct Media: Codable {
      let m: String
    }
    let media: Media
    let description: String
  }
  let items: [Item]
}

extension PhotoModel {
  var url: String? {
    items.first?.media.m
  }
  var photoUrlStrings: [String] {
    items.map(\.media.m)
  }
  var coreItems: [(String, String)] {
    var res = [(String, String)]()
    for i in 0..<items.count {
      res.append((items[i].media.m, items[i].description))
    }
    return res
  }
}- UI에 표출될때 사용될 전용 Model 정의
- 뷰쪽에서 urlString이 아닌 UIImage 그대로 사용할것이므로 모델에 UIImage 프로퍼티 선언
- ForEach를 사용하여 표출할것이므로 Identifiable 준수
- 이미지를 표출할때 비율을 알아야하므로 width, height 필요
struct Photo: Identifiable {
  let url: String
  let uiImage: UIImage
  let width: CGFloat
  let height: CGFloat
}

extension Photo {
  var id: String { url }
}

extension Photo: Hashable {}- 이미지 캐싱에 사용할 ImageCache도 구현
import Foundation
import UIKit

final class ImageCache {
  static let shared = NSCache<NSString, UIImage>()
}
예제에 사용할 ViewModel 구현
- viewModel의 기능은 API를 통해 photo를 가져오고, photos 상태를 저장하고 있는 상태
import Foundation
import UIKit

final class ContentViewModel: ObservableObject {
  @Published var photos = [Photo]()

  func fetchPhoto() {
    DispatchQueue.global().async {
      guard
        let url = URL(string: "https://api.flickr.com/services/feeds/photos_public.gne?tags=texas&tagmode=any&format=json&nojsoncallback=1")
      else { return }
      URLSession.shared.dataTask(with: url) { [weak self] data, response, error in
        guard
          let ss = self,
          let data = data,
          let photoModel = try? JSONDecoder().decode(PhotoModel.self, from: data)
        else { return }

        var newPhotos = [Photo]()
        photoModel
          .coreItems
          .forEach { urlString, description in
            let widthHeight = ss.getWidthHeight(description: description)
            if let uiImage = ImageCache.shared.object(forKey: urlString as NSString) {
              newPhotos.append(.init(url: urlString, uiImage: uiImage, width: widthHeight.0, height: widthHeight.1))
            } else {
              guard
                let url = URL(string: urlString),
                let data = try? Data(contentsOf: url),
                let uiImage = UIImage(data: data)
              else { return }
              ImageCache.shared.setObject(uiImage, forKey: urlString as NSString)
              newPhotos.append(.init(url: urlString, uiImage: uiImage, width: widthHeight.0, height: widthHeight.1))
            }
          }
        DispatchQueue.main.async {
          ss.photos = ss.photos + newPhotos
        }
      }.resume()
    }
  }

  private func getWidthHeight(description: String) -> (Double, Double) {
    let array = description.split(separator: " ").map(String.init)
    let widthStr = array
      .first(where: { $0.prefix(5) == "width" })!
      .replacingOccurrences(of: "\"", with: "")
      .replacingOccurrences(of: "width=", with: "")
    let heightStr = array
      .first(where: { $0.prefix(6) == "height" })!
      .replacingOccurrences(of: "\"", with: "")
      .replacingOccurrences(of: "height=", with: "")
    return (Double(widthStr)!, Double(heightStr)!)
  }
}
View 준비
List, Grid, FittedGrid 네비게이션 링크가 있고, 탭하면 각각의 뷰 형태를 확인이 가능)

- ContentView
- 초기화 될 때 viewModel에 이미지를 가져오도록 요청
import SwiftUI

struct ContentView: View {
  @ObservedObject var viewModel = ContentViewModel()

  init() {
    viewModel.fetchPhoto()
  }

  var body: some View {
    NavigationView {
      VStack(spacing: 20) {
        NavigationLink("List") {
          getList()
        }
        NavigationLink("Grid") {
          getGrid()
        }
        NavigationLink("FittedGrid") {
          getFittedGrid()
        }
      }
      .navigationTitle("사진")
    }
  }

  @ViewBuilder
  private func getList() -> some View {
  	// TODO
  }

  @ViewBuilder
  private func getGrid() -> some View {
  	// TODO
  }

  @ViewBuilder
  private func getFittedGrid() -> some View {
  	// TODO
  }
}
List 구현

- Image의 width는 디바이스의 너비만큼 적용되어야 하므로 photoWidth 프로퍼티 추가
  private var photoWidth: CGFloat {
    UIScreen.main.bounds.width
}- ScrollView, LazyVStack, ForEach, NavgationLink를 사용하여 구현
  @ViewBuilder
  private func getList() -> some View {
    ScrollView {
      LazyVStack {
        ForEach(viewModel.photos) { photo in
          NavigationLink(
            destination: {
              getImage(photo: photo, forceWidth: photoWidth)
            },
            label: {
              getImage(photo: photo, forceWidth: photoWidth)
            }
          )
        }
      }
    }
  }

  @ViewBuilder
  private func getImage(photo: Photo, forceWidth: Double) -> some View {
    Image(uiImage: photo.uiImage)
      .resizable()
      .frame(
        width: forceWidth,
        height: getHeight(forceWidth: forceWidth, imageWidth: photo.width, imageHeight: photo.height)
      )
  }

  private func getHeight(forceWidth: Double, imageWidth: Double, imageHeight: Double) -> Double {
    forceWidth * imageHeight / imageWidth
  }
Grid 구현

- Grid는 Stack대신에 LazyVGrid를 사용하여 구현한다는 점만 차이가 있고, 나머지는 List와 동일
  private var threeDividedWidth: CGFloat {
    (UIScreen.main.bounds.width - 20) / 3 // -20: 좌우 패딩
  }

  @ViewBuilder
  private func getGrid() -> some View {
    let gridItems: [GridItem] = [
      GridItem(.fixed(threeDividedWidth)),
      GridItem(.fixed(threeDividedWidth)),
      GridItem(.fixed(threeDividedWidth))
    ]

    ScrollView {
      LazyVGrid(columns: gridItems) {
        ForEach(viewModel.photos) { photo in
          NavigationLink(
            destination: {
              getImage(photo: photo, forceWidth: threeDividedWidth)
            },
            label: {
              getImage(photo: photo, forceWidth: threeDividedWidth)
            }
          )
        }
      }
    }
  }
getFittedGrid

- 데이터를 우선 2개의 배열로 각각 쪼갠 후, 그 각각의 배열을 HStack안에 LazyVStack으로 넣으면 구현 완료
- 하나의 배열을 2개의 배열로 쪼개는 함수를 Array extension으로 구현
extension Array {
  var splitTwoArray: [Self] {
    var res = [[Element]]()

    var list1 = [Element]()
    var list2 = [Element]()

    self
      .enumerated()
      .forEach { ind, val in
        ind % 2 == 0 ? list1.append(val) : list2.append(val)
      }

    res.append(list1)
    res.append(list2)

    return res
  }
}- ScrollView, HStack, LazyVStack, ForEach, NavigationLink로 구현
  @ViewBuilder
  private func getFittedGrid() -> some View {
    let splitTwoArray = viewModel.photos.splitTwoArray
    let array1 = splitTwoArray[0]
    let array2 = splitTwoArray[1]

    ScrollView {
      HStack(alignment: .top) {
        LazyVStack(spacing: 8) {
          ForEach(array1) { photo in
            NavigationLink(
              destination: {
                getImage(photo: photo, forceWidth: twoDividedWidth)
              },
              label: {
                getImage(photo: photo, forceWidth: twoDividedWidth)
              }
            )
          }
        }
        LazyVStack(spacing: 8) {
          ForEach(array2) { photo in
            NavigationLink(
              destination: {
                getImage(photo: photo, forceWidth: twoDividedWidth)
              },
              label: {
                getImage(photo: photo, forceWidth: twoDividedWidth)
              }
            )
          }
        }
      }
    }
  }
* 전체 코드: https://github.com/JK0369/ExListGridFittedGrid-SwiftUI
'iOS 응용 (SwiftUI)' 카테고리의 다른 글
Comments


