Notice
Recent Posts
Recent Comments
Link
| 일 | 월 | 화 | 수 | 목 | 금 | 토 |
|---|---|---|---|---|---|---|
| 1 | 2 | 3 | 4 | 5 | 6 | 7 |
| 8 | 9 | 10 | 11 | 12 | 13 | 14 |
| 15 | 16 | 17 | 18 | 19 | 20 | 21 |
| 22 | 23 | 24 | 25 | 26 | 27 | 28 |
Tags
- 스위프트
- uitableview
- clean architecture
- RxCocoa
- swiftUI
- Protocol
- 클린 코드
- Xcode
- Human interface guide
- 리펙토링
- swift documentation
- map
- Refactoring
- collectionview
- rxswift
- ios
- MVVM
- SWIFT
- uiscrollview
- scrollview
- 애니메이션
- 리팩토링
- UICollectionView
- Observable
- combine
- ribs
- UITextView
- tableView
- Clean Code
- HIG
Archives
- Today
- Total
김종권의 iOS 앱 개발 알아가기
[iOS - SwiftUI] 2. Live Activity (ActivityKit, Dynamic Island, 잠금 화면) - UI 구현 방법 본문
iOS 응용 (SwiftUI)
[iOS - SwiftUI] 2. Live Activity (ActivityKit, Dynamic Island, 잠금 화면) - UI 구현 방법
jake-kim 2022. 11. 21. 23:081. Live Activity (ActivityKit, Dynamic Island, 잠금 화면) - 개념
2. Live Activity (ActivityKit, Dynamic Island, 잠금 화면) - UI 구현 방법
3. Live Activity (ActivityKit, Dynamic Island, 잠금 화면) - UIKit에서 다이나믹 아일랜드 적용 방법
* Live Activity 기본적인 세팅 방법은 이전 포스팅 글인, 1번 글 참고
Dynamic Island의 UI 구현 방법
- 1번글에서 자동으로 생성된DynamicIslandWidgetLiveActivity코드
import ActivityKit
import WidgetKit
import SwiftUI

struct DynamicIslandWidgetAttributes: ActivityAttributes {
    public struct ContentState: Codable, Hashable {
        // Dynamic stateful properties about your activity go here!
        var value: Int
    }

    // Fixed non-changing properties about your activity go here!
    var name: String
}

struct DynamicIslandWidgetLiveActivity: Widget {
    var body: some WidgetConfiguration {
        ActivityConfiguration(for: DynamicIslandWidgetAttributes.self) { context in
            // Lock screen/banner UI goes here
            VStack {
                Text("Hello")
            }
            .activityBackgroundTint(Color.cyan)
            .activitySystemActionForegroundColor(Color.black)

        } dynamicIsland: { context in
            DynamicIsland {
                // Expanded UI goes here.  Compose the expanded UI through
                // various regions, like leading/trailing/center/bottom
                DynamicIslandExpandedRegion(.leading) {
                    Text("Leading")
                }
                DynamicIslandExpandedRegion(.trailing) {
                    Text("Trailing")
                }
                DynamicIslandExpandedRegion(.bottom) {
                    Text("Bottom")
                    // more content
                }
            } compactLeading: {
                Text("L")
            } compactTrailing: {
                Text("T")
            } minimal: {
                Text("Min")
            }
            .widgetURL(URL(string: "http://www.apple.com"))
            .keylineTint(Color.red)
        }
    }
}- 위 코드 중 DynamicIslandWidgetLiveActivity 코드를 보면 Lock Screen부분과 dynamicIsland부분으로 나누어진 것 확인이 가능
- ActivityConfiguration의 클로저 안에서 Live Activity의 두 요소 (Lock screen/banner, dynamicIsland) 구현부가 나누어서 존재
struct DynamicIslandWidgetLiveActivity: Widget {
    var body: some WidgetConfiguration {
        ActivityConfiguration(for: DynamicIslandWidgetAttributes.self) { context in
            // Lock screen/banner UI goes here
            ...
        } dynamicIsland: { context in
            ...
        }
    }
}
Live Activity - 잠금화면 UI
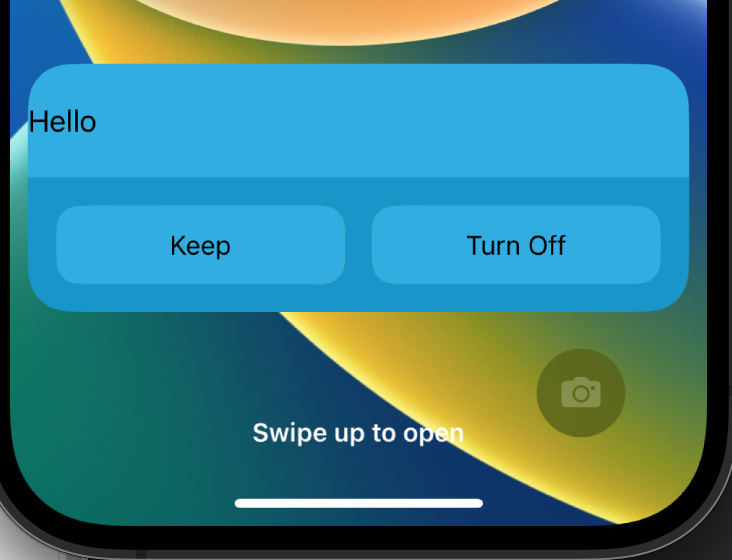
- Lock screen/banner 부분을 보면 ContentView에 작성하듯, 일반적인 코드가 존재
// Lock screen/banner UI goes here
VStack {
    Text("Hello")
}
.activityBackgroundTint(Color.cyan)
.activitySystemActionForegroundColor(Color.black)
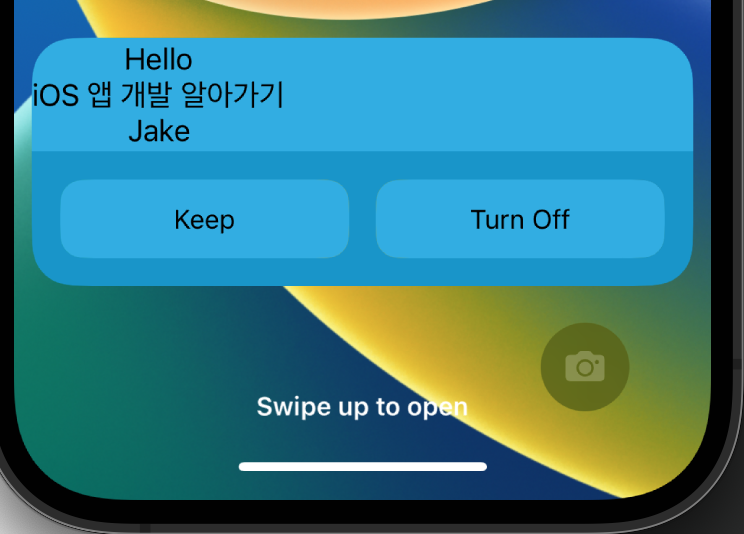
- VStack 안에 더 추가하면,
VStack {
  Text("Hello")
  Text("iOS 앱 개발 알아가기")
  Text("Jake")
}
.activityBackgroundTint(Color.cyan)
.activitySystemActionForegroundColor(Color.black)
- 내용이 더 길어져도 그만큼 표시 가능

Dynamic Island
- dynamic island는 위에서 알아본대로, ActivityConfiguration의 파라미터 중, dynamicIsland 부분의 클로저에서 구현
struct DynamicIslandWidgetLiveActivity: Widget {
  var body: some WidgetConfiguration {
    ActivityConfiguration(for: DynamicIslandWidgetAttributes.self) { context in
      // Lock screen/banner UI goes here
	  ...
    } dynamicIsland: { context in
      DynamicIsland {
        // Expanded UI goes here.  Compose the expanded UI through
        // various regions, like leading/trailing/center/bottom
        DynamicIslandExpandedRegion(.leading) {
          Text("Leading")
        }
        DynamicIslandExpandedRegion(.trailing) {
          Text("Trailing")
        }
        DynamicIslandExpandedRegion(.bottom) {
          Text("Bottom")
          // more content
        }
      } compactLeading: {
        Text("L")
      } compactTrailing: {
        Text("T")
      } minimal: {
        Text("Min")
      }
      .widgetURL(URL(string: "http://www.apple.com"))
      .keylineTint(Color.red)
    }
  }
}- 코드에서도 알 수 있듯이, Dynamic Island는 크게 3가지 상태가 존재
- Expended Region (leading, trailing, bottom, center) - 다이나믹 아일랜드 부분을 길게 누른 경우
- compact (leading, trailing) - 다이나믹 아일랜드 디폴트 상태
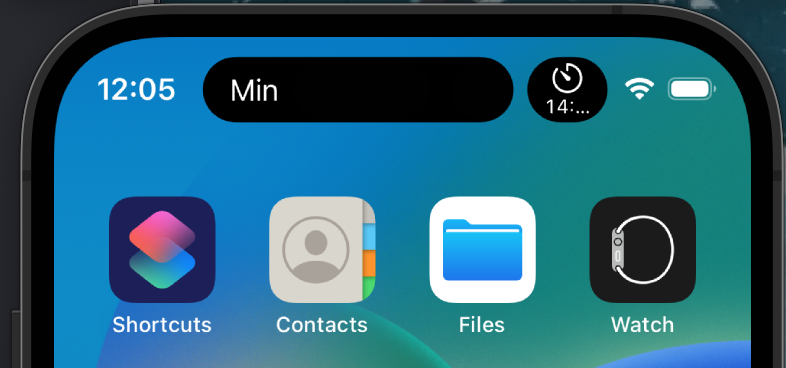
- minimal - dynamic island 두 가지를 실행한 경우, 최초에 실행된 앱


- UI 구현 방법 - Expanded View
- .bottom부분에 여러가지 컨텐트를 넣으면 자연스럽게 밑으로 길어지는 dynamic island 형태
  var body: some WidgetConfiguration {
    ActivityConfiguration(for: DynamicIslandWidgetAttributes.self) { context in
      // Lock screen/banner UI goes here
      ...
    } dynamicIsland: { context in
      DynamicIsland {
        // Expanded UI goes here.  Compose the expanded UI through
        // various regions, like leading/trailing/center/bottom
        DynamicIslandExpandedRegion(.leading) {
          Text("Leading")
        }
        DynamicIslandExpandedRegion(.trailing) {
          Text("Trailing")
        }
        DynamicIslandExpandedRegion(.center) {
          Text("Center")
        }
        DynamicIslandExpandedRegion(.bottom) {
          VStack {
            Text("Bottom")
            Text("Content1")
            Text("Content2")
            Text("Content3")
          }
        }
      } compactLeading: {
        Text("L")
      } compactTrailing: {
        Text("T")
      } minimal: {
        Text("Min")
      }
      .widgetURL(URL(string: "http://www.apple.com"))
      .keylineTint(Color.red)
    }
  }
- UI 구현 방법 - compact
- compactLeading, compactTrailing 부분을 수정하여 적용
struct DynamicIslandWidgetLiveActivity: Widget {
  var body: some WidgetConfiguration {
    ActivityConfiguration(for: DynamicIslandWidgetAttributes.self) { context in
      // Lock screen/banner UI goes here
      ...

    } dynamicIsland: { context in
      DynamicIsland {
        ...
      } compactLeading: {
        Text("This is leading")
      } compactTrailing: {
        Text("This is trailing")
      } minimal: {
        ...
      }
    }
  }
}
- UI 구현 방법 - minimal
- minimal 파라미터 클로저에 적용
struct DynamicIslandWidgetLiveActivity: Widget {
  var body: some WidgetConfiguration {
    ActivityConfiguration(for: DynamicIslandWidgetAttributes.self) { context in
      // Lock screen/banner UI goes here
      ...

    } dynamicIsland: { context in
      DynamicIsland {
        ...
      } compactLeading: {
        ...
      } compactTrailing: {
        ...
      } minimal: {
        Text("Min")
      }
    }
  }
}
- DynamicIsland의 메소드
- widgetURL(_:) - 딥링크 처리
- keylineTint() - 다이나믹 아일랜드의 테두리 색상 (기본값은 검정색 배경과 하얀색 테스트)
- contentMargins() - 다이나믹 아일랜드의 여백 설정
* 전체 코드: https://github.com/JK0369/ExActivityKit
* 참고
https://developer.apple.com/news/?id=mis6swzt
https://developer.apple.com/documentation/activitykit/activityauthorizationerror
https://developer.apple.com/documentation/activitykit/displaying-live-data-with-live-activities
'iOS 응용 (SwiftUI)' 카테고리의 다른 글
Comments


