
Notice
Recent Posts
Recent Comments
Link
| 일 | 월 | 화 | 수 | 목 | 금 | 토 |
|---|---|---|---|---|---|---|
| 1 | 2 | 3 | 4 | 5 | 6 | |
| 7 | 8 | 9 | 10 | 11 | 12 | 13 |
| 14 | 15 | 16 | 17 | 18 | 19 | 20 |
| 21 | 22 | 23 | 24 | 25 | 26 | 27 |
| 28 | 29 | 30 | 31 |
Tags
- scrollview
- Protocol
- MVVM
- clean architecture
- combine
- swiftUI
- map
- 클린 코드
- ribs
- Clean Code
- 애니메이션
- rxswift
- collectionview
- 리팩토링
- Observable
- swift documentation
- ios
- Refactoring
- tableView
- SWIFT
- 리펙토링
- uiscrollview
- Human interface guide
- UICollectionView
- Xcode
- UITextView
- uitableview
- HIG
- 스위프트
- RxCocoa
Archives
- Today
- Total
김종권의 iOS 앱 개발 알아가기
[iOS - swift] Custom TabBarController 구현 방법 (커스텀 탭바 컨트롤러, containerView) 본문
UI 컴포넌트 (swift)
[iOS - swift] Custom TabBarController 구현 방법 (커스텀 탭바 컨트롤러, containerView)
jake-kim 2023. 2. 10. 22:38
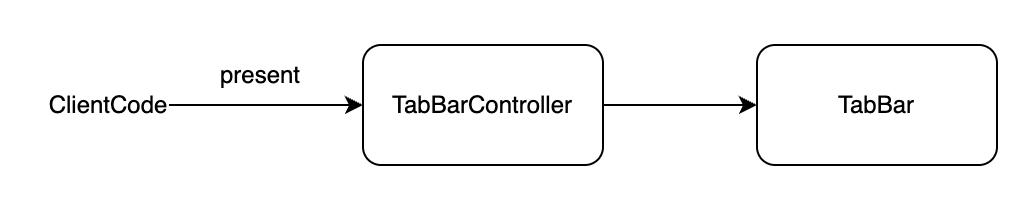
탭바 컨트롤러 구현 아이디어
- 탭바 컨트롤러를 사용하는쪽(ClientCode)에서 TabBarController를 의존하고, TabBarController에서는 TabBar를 의존하는 형태
- 핵심: ClientCode에서는 TabBar의 존재 유무를 몰라도 되게끔 구현하여 결합도를 줄이는 방향
- TabBarController 구현 핵심: ViewController 간 부모-자식 구조 사용
- addChild를 사용 (addChild가 아닌 addSubView만 하면 부모 자식 관계가 성립하지 않으므로 주의)
- addChild 후에 addSubview로 뷰도 추가
- 마지막으로 didMove(toParent:) 호출
// A가 부모이고 B가 자식인 상황
A.addChild(B)
A.view.addSubview(B.view)
B.didMove(toParent: A)
* didMove(toParent:)호출 이유: UIViewController의 생명주기 관련 didMove(toParent:)를 추후에 필요할때 사용하기 위함
(일종의 viewWillAppear과 같은 콜백 메소드라고 이해)
override func didMove(toParent parent: UIViewController?) {
    super.didMove(toParent: parent)

    print("didMove 호출 parent(\(parent)) !!!")
}
* 제거할땐 아래처럼 호출
(구체적인 개념 내용은 이전 포스팅 글 참고)
B.willMove(toParent: nil) // 제거되기 직전에 호출
B.removeFromParent() // parentVC로 부터 관계 삭제
B.view.removeFromSuperview() // parentVC.view.addsubView()와 반대 기능
커스텀 탭바 준비
* 코드로 UI 구현의 편의를 위해 사용한 프레임워크
pod 'RxSwift'
pod 'RxCocoa'
pod 'SnapKit'
pod 'Then'- 탭바 구현
* UIStackView를 이용한 커스텀 탭바 자세한 구현 방법은 이전 포스팅 글 참고

- 커스텀 탭바에서는 rx 인터페이스로 두 가지 프로퍼티 제공
extension Reactive where Base: CustomTabBar {
    var tapButton: Observable<Int> {
        base.tapSubject
    }

    var changeIndex: Binder<Int> {
        Binder(base) { base, index in
            base.selectedIndex = index
        }
    }
}
탭바 컨트롤러 구현
- 위에서 구현한 TabBar를 의존하게끔 TabBarController를 구현할 것이므로, TabBar를 인스턴스로 가지고 있는 형태로 구현
- TabBar 인스턴스를 가지고 있는 TabBarController
final class CustomTabBarController: UIViewController {
    fileprivate let tabBar = CustomTabBar()
}- 상태 관리를 한곳에서 해야만, 상태 관리에 용이하므로 탭바의 상태는 오직 tabBar에서만 관리하도록 구현
- 상태 관리를 한곳에서 한다는 의미: tabItem과 같은 property를 CustomTabBarController에 선언하지 않고 tabBar에서만 선언하여, 이 property를 바꾸고 싶을땐 tabBar에서만 변경하도록 구현
- 때문에 tabBarController에서의 프로퍼티는 3가지만 정의
fileprivate let tabBar = CustomTabBar()
private var childVCs = [UIViewController]()
private let disposeBag = DisposeBag()- 레이아웃 구현 - 초기화문에서 호출하는 setUp()에서 각각 UI에 대한 구현
- setUpTabBar(): TabBar의 레이아웃
- setUpTabBarControllers(): TabBarController에 들어갈 ViewController들을 각각 생성하여 addChild하는 메소드
- setUpBind(): tabBar에서 특정 버튼이 눌릴경우 TabBarController안에 있는 ViewController에도 반영해야하므로 여기서 바인딩하고 있다가 반영
init() {
    super.init(nibName: nil, bundle: nil)
    setUp()
}

required init?(coder: NSCoder) {
    fatalError()
}

private func setUp() {
    setUpTabBar()
    setUpTabBarControllers()
    setUpBind()
}- setUpTabBarControllers() 구현
- 핵심: 현재 뷰컨이 parentViewController가 될 것이므로 addChild, addSubview, didMove 메소드를 호출하여 부모-자식 관계 형성
private func setUpTabBarControllers() {
    tabBar.items
        .forEach { item in
            let vc = UIViewController().then {
                $0.view.backgroundColor = .white
            }
            let title = String(describing: item)
            addLabel(in: vc, text: title)

            addChild(vc)
            view.addSubview(vc.view)
            vc.didMove(toParent: self)

            vc.view.snp.makeConstraints {
                $0.top.leading.trailing.equalToSuperview()
                $0.bottom.equalTo(tabBar.snp.top)
            }

            childVCs.append(vc)
        }

    guard let shouldFrontView = childVCs[0].view else { return }
    view.bringSubviewToFront(shouldFrontView)
}

private func addLabel(in vc: UIViewController, text: String?) {
    let label = UILabel().then {
        $0.font = .systemFont(ofSize: 24)
        $0.textColor = .black
        $0.text = text
    }
    vc.view.addSubview(label)

    label.snp.makeConstraints {
        $0.center.equalToSuperview()
    }
}- setUpBind() 메소드 구현
- tabBar에서 특정 버튼이 눌릴경우 TabBarController안에 있는 ViewController에도 반영해야하므로 여기서 바인딩하고 있다가 반영
- bringSubviewToFront() 메소드를 사용하여 쉽게 구현
private func setUpBind() {
    tabBar.rx.tapButton
        .bind(with: self) { ss, index in
            guard let shouldFrontView = ss.childVCs[index].view else { return }
            ss.view.bringSubviewToFront(shouldFrontView)
        }
        .disposed(by: disposeBag)
}- 사용하는쪽(클라이언트 코드)에서 tabBar의 아이템을 변경할 수 있어야하므로 rx 인터페이스까지 뚫어주면 완성
extension Reactive where Base: CustomTabBarController {
    var changeIndex: Binder<Int> {
        Binder(base) { base, index in
            base.tabBar.rx.changeIndex.onNext(index)
        }
    }
}- 클라이언트 코드
- 일반적인 방법은 window에 rootViewController로 넣어서 사용하지만 편의를 위해, ViewController에서 present하여 완성
class ViewController: UIViewController {
    override func viewDidLoad() {
        super.viewDidLoad()

    }

    override func viewDidAppear(_ animated: Bool) {
        super.viewDidAppear(animated)

        let tabBarController = CustomTabBarController().then {
            $0.modalPresentationStyle = .fullScreen
        }

        present(tabBarController, animated: true)
    }
}
* 전체코드: https://github.com/JK0369/ExCustomTabBarController
* 참고
https://developer.apple.com/documentation/uikit/uiviewcontroller
'UI 컴포넌트 (swift)' 카테고리의 다른 글
'UI 컴포넌트 (swift)' Related Articles
more


Comments