Notice
Recent Posts
Recent Comments
Link
| 일 | 월 | 화 | 수 | 목 | 금 | 토 |
|---|---|---|---|---|---|---|
| 1 | 2 | 3 | 4 | 5 | 6 | 7 |
| 8 | 9 | 10 | 11 | 12 | 13 | 14 |
| 15 | 16 | 17 | 18 | 19 | 20 | 21 |
| 22 | 23 | 24 | 25 | 26 | 27 | 28 |
Tags
- RxCocoa
- combine
- 스위프트
- Clean Code
- 리펙토링
- Refactoring
- MVVM
- 리팩토링
- ios
- ribs
- UITextView
- rxswift
- Protocol
- Human interface guide
- SWIFT
- scrollview
- collectionview
- swift documentation
- uitableview
- 클린 코드
- clean architecture
- map
- swiftUI
- tableView
- UICollectionView
- 애니메이션
- Xcode
- Observable
- uiscrollview
- HIG
Archives
- Today
- Total
김종권의 iOS 앱 개발 알아가기
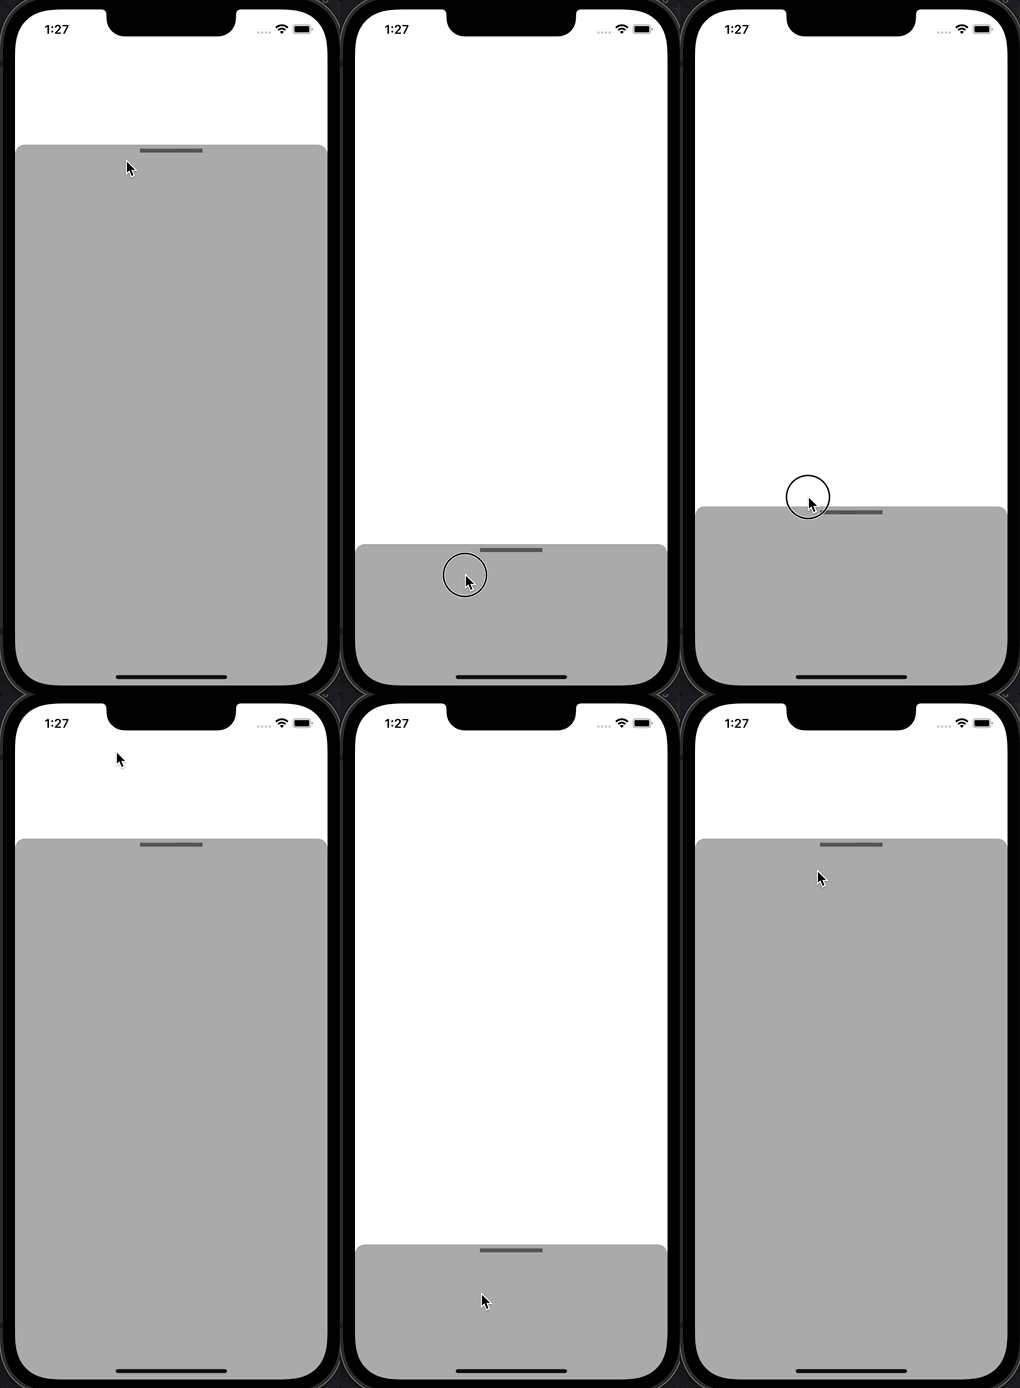
[iOS - swift] BottomSheet 구현 방법 (bottom sheet, floating panel) 본문
UI 컴포넌트 (swift)
[iOS - swift] BottomSheet 구현 방법 (bottom sheet, floating panel)
jake-kim 2022. 6. 29. 02:11
구현 아이디어 - 뷰의 구조
- 레이아웃을 쉽게하기 위해서 뷰 2개를 사용
- 맨 아래에 깔린 뷰 - 터치 이벤트가 아래 뷰에 전달되는 PassThroughView를 사용
- 그 위에 UIView를 얹는 형태 (= bottomSheetView)
- BottomSheetView의 constraint
- left.right.bottom은 superview와 같도록 정의
- top은 미리 정의해둔 yPosition만큼 top의 간격만큼 처리
// tip(아래쪽에 붙어있는 모드)과 full로 정하고, 각 yPosition을 계산

enum Mode {
  case tip
  case full
}
private enum Const {
  static let bottomSheetRatio: (Mode) -> Double = { mode in
    switch mode {
    case .tip:
      return 0.8 // 위에서 부터의 값 (밑으로 갈수록 값이 커짐)
    case .full:
      return 0.2
    }
  }
  static let bottomSheetYPosition: (Mode) -> Double = { mode in
    Self.bottomSheetRatio(mode) * UIScreen.main.bounds.height
  }
}
구현 아이디어 - gesture
- UIPanGestureRecognizer를 사용하면 translation값 (움직인 거리)를 확인
- 움직인 거리가 미리 정해둔 위치의 범위 안이면 움직이도록 autolayout + 애니메이션 적용
- UIPanGestureRecognizer를 사용하면 velocity (방향)을 확인
- 스와이프 방향이 위쪽이면 뷰가 위로가도록, 스와이프 방향이 아래쪽이면 뷰를 아래쪽으로 가도록 autolayout + 애니메이션 적용
// UIPanGestureRecognizer 적용 방법

self.backgroundColor = .clear
let panGesture = UIPanGestureRecognizer(target: self, action: #selector(didPan))
self.addGestureRecognizer(panGesture)

@objc private func didPan(_ recognizer: UIPanGestureRecognizer) {
  // 움직인 거리
  let translationY = recognizer.translation(in: self).y

  // 방향
  recognizer.velocity(in: self).y
}
구현에 사용한 프레임워크
- UI 레이아웃 구현에 편의를 위해 SnapKit 사용
구현
- (사용하는쪽에서 아래처럼 사용가능하도록 설계)
import UIKit
import SnapKit

class ViewController: UIViewController {
  private let bottomSheetView: BottomSheetView = {
    let view = BottomSheetView()
    view.bottomSheetColor = .lightGray
    view.barViewColor = .darkGray
    return view
  }()

  override func viewDidLoad() {
    super.viewDidLoad()

    self.view.addSubview(self.bottomSheetView)
    self.bottomSheetView.snp.makeConstraints {
      $0.edges.equalToSuperview()
    }
  }
}- BottomSheet의 맨 아래 뷰에 사용될 PassThroughView 정의
import UIKit

class PassThroughView: UIView {
  override func hitTest(_ point: CGPoint, with event: UIEvent?) -> UIView? {
    let hitView = super.hitTest(point, with: event)
    // superview가 터치 이벤트를 받을 수 있도록,
    // 해당 뷰 (subview)가 터치되면 nil을 반환하고 다른 뷰일경우 UIView를 반환
    return hitView == self ? nil : hitView
  }
}- BottomSheetView 선언
import UIKit
import SnapKit

final class BottomSheetView: PassThroughView {

}- 상수 선언
- tip: 아래 붙어있는 모양
- full: 펼쳐진 모양
  // MARK: Constants
  enum Mode {
    case tip
    case full
  }
  private enum Const {
    static let duration = 0.5
    static let cornerRadius = 12.0
    static let barViewTopSpacing = 5.0
    static let barViewSize = CGSize(width: UIScreen.main.bounds.width * 0.2, height: 5.0)
    static let bottomSheetRatio: (Mode) -> Double = { mode in
      switch mode {
      case .tip:
        return 0.8 // 위에서 부터의 값 (밑으로 갈수록 값이 커짐)
      case .full:
        return 0.2
      }
    }
    static let bottomSheetYPosition: (Mode) -> Double = { mode in
      Self.bottomSheetRatio(mode) * UIScreen.main.bounds.height
    }
}- UI 선언
- bottomSheetView
- barView: 손잡이 모양 뷰
  // MARK: UI
  private let bottomSheetView: UIView = {
    let view = UIView()
    view.backgroundColor = .lightGray
    return view
  }()
  private let barView: UIView = {
    let view = UIView()
    view.backgroundColor = .darkGray
    view.isUserInteractionEnabled = false
    return view
}()- property 선언
- mode프로퍼티에서는 모드가 변경될때 알아서 layout도 변경되도록 구현
- updateConstraint(offset:) 메소드는 여러곳에서 중복사용되므로 메소드로 따로 빼서 구현
  // MARK: Properties
  var mode: Mode = .tip {
    didSet {
      switch self.mode {
      case .tip:
        break
      case .full:
        break
      }
      self.updateConstraint(offset: Const.bottomSheetYPosition(self.mode))
    }
  }
  var bottomSheetColor: UIColor? {
    didSet { self.bottomSheetView.backgroundColor = self.bottomSheetColor }
  }
  var barViewColor: UIColor? {
    didSet { self.barView.backgroundColor = self.barViewColor }
}- 초기화 및 레이아웃
  // MARK: Initializer
  @available(*, unavailable)
  required init?(coder: NSCoder) {
    fatalError("init() has not been implemented")
  }
  override init(frame: CGRect) {
    super.init(frame: frame)

    self.backgroundColor = .clear
    let panGesture = UIPanGestureRecognizer(target: self, action: #selector(didPan)) // didPan 메소드는 아래서 구현
    self.addGestureRecognizer(panGesture)

    self.bottomSheetView.layer.maskedCorners = [.layerMinXMinYCorner, .layerMaxXMinYCorner]
    self.bottomSheetView.layer.cornerRadius = Const.cornerRadius
    self.bottomSheetView.clipsToBounds = true

    self.addSubview(self.bottomSheetView)
    self.bottomSheetView.addSubview(self.barView)

    self.bottomSheetView.snp.makeConstraints {
      $0.left.right.bottom.equalToSuperview()
      $0.top.equalTo(Const.bottomSheetYPosition(.tip))
    }
    self.barView.snp.makeConstraints {
      $0.centerX.equalToSuperview()
      $0.top.equalToSuperview().inset(Const.barViewTopSpacing)
      $0.size.equalTo(Const.barViewSize)
    }
}- didPan 메소드 구현
  // MARK: Methods
  @objc private func didPan(_ recognizer: UIPanGestureRecognizer) {
    let translationY = recognizer.translation(in: self).y
    let minY = self.bottomSheetView.frame.minY
    let offset = translationY + minY

    if Const.bottomSheetYPosition(.full)...Const.bottomSheetYPosition(.tip) ~= offset {
      self.updateConstraint(offset: offset)
      recognizer.setTranslation(.zero, in: self)
    }
    UIView.animate(
      withDuration: 0,
      delay: 0,
      options: .curveEaseOut,
      animations: self.layoutIfNeeded,
      completion: nil
    )

    guard recognizer.state == .ended else { return }
    UIView.animate(
      withDuration: Const.duration,
      delay: 0,
      options: .allowUserInteraction,
      animations: {
        // velocity를 이용하여 위로 스와이프인지, 아래로 스와이프인지 확인
        self.mode = recognizer.velocity(in: self).y >= 0 ? Mode.tip : .full
      },
      completion: nil
    )
}- bottomSheetView의 레이아웃을 업데이트하는 메소드 정의
  private func updateConstraint(offset: Double) {
    self.bottomSheetView.snp.remakeConstraints {
      $0.left.right.bottom.equalToSuperview()
      $0.top.equalToSuperview().inset(offset)
    }
  }
* 전체 코드: https://github.com/JK0369/ExBottomSheetImplementation
* 참고
https://aniltaskiran.medium.com/using-ios-bottom-sheet-61cfd29f905e
'UI 컴포넌트 (swift)' 카테고리의 다른 글
| [iOS - Swift] TimerView 구현 방법 (썸네일 테두리 회전 뷰, progress, CAShapeLayer, UIBezierPath) (0) | 2022.09.08 |
|---|---|
| [iOS - swift] Wave Animation (웨이브 애니메이션) (2) | 2022.06.30 |
| [iOS - swift] 인스타그램 썸네일 프로필 UI 구현 방법 (0) | 2022.06.28 |
| [iOS - swift] 2. 스크롤 영역을 암시해주는 Carousel 구현 - 포커스 영역 이펙트 (7) | 2022.06.27 |
| [iOS - swift] 1. 스크롤 영역을 암시해주는 Carousel 구현 방법 (UICollectionView, 수평 스크롤 뷰, paging 구현) (0) | 2022.06.26 |
Comments


