| 일 | 월 | 화 | 수 | 목 | 금 | 토 |
|---|---|---|---|---|---|---|
| 1 | 2 | 3 | 4 | 5 | 6 | |
| 7 | 8 | 9 | 10 | 11 | 12 | 13 |
| 14 | 15 | 16 | 17 | 18 | 19 | 20 |
| 21 | 22 | 23 | 24 | 25 | 26 | 27 |
| 28 | 29 | 30 | 31 |
- UICollectionView
- collectionview
- scrollview
- map
- swiftUI
- UITextView
- 리팩토링
- combine
- SWIFT
- Human interface guide
- ribs
- 리펙토링
- 클린 코드
- MVVM
- Observable
- Clean Code
- Refactoring
- Protocol
- 스위프트
- ios
- uiscrollview
- RxCocoa
- HIG
- 애니메이션
- rxswift
- swift documentation
- tableView
- uitableview
- Xcode
- clean architecture
- Today
- Total
김종권의 iOS 앱 개발 알아가기
[iOS - UI Custom] 12. table view (programmatically) 본문
[iOS - UI Custom] 12. table view (programmatically)
jake-kim 2020. 4. 30. 21:00

(위와 같이 데이터가 없는 곳에도 줄 간격이 생기므로, 이것을 제거하려면 다음 코드를 추가)
self.tableView.separatorStyle = .none* table view를 custom 한다는 것 <=> UITableViewCell을 상속받아서 custom

1. UITableCell을 상속받아서 custom
- contentView.addSubview(객체)로 추가, autolayout 설정, 56~57 라인

2. UITableView객체 생성 및 초기화
1) 기존 UItableView객체에 등록할 것 : custom한 cell의 classForCoder()를 선언, 16번 라인
객체.register(CSTableCell.classForCoder(), foeCellReuseIdentifier: "myCell")

2) 테이블 구성 정의
- cell을 가져올 땐 as!로 커스텀 한 cell클래스를 캐스팅, 33번 라인

-cell을 커스텀할 땐, 색깔 주의 : 테이블뷰는 검은색, cell선택시도 검은색이 되므로 초기화 필요
    // 테이블 셀 프로퍼티 세팅
    private func setCellTextColor (cell: UITableViewCell) {
        cell.backgroundColor = .white
        cell.textLabel?.textColor = .lightGray
        cell.detailTextLabel?.textColor = .lightGray
    }
※ 디폴트로 지정된 테이블 셀 사용시, 다음과 같이 프로그래밍 (단, right detail, value1은 되지 않으니, accessory view를 추가해서 넣기)
cf) accessory view이벤트 처리 : tableView(:accessryButtonTappedForRowWith:)


- default(텍스트 한 개)
- value1(왼쪽 텍스트, 오른쪽엔 파랗고 작은 텍스트), 환경설정 전용 UI
- value2(위와 UI동일), 연락처 전용 UI
- subtitle
let cell = tableView.dequeueReusableCell(withIdentifier: "cell1") ?? UITableViewCell(style: .default, reuseIdentifier: "cell1")
cell.textLabel!.text = "foo"
return cell
* storyboard없이 100% programmtically사용시 주의사항
커스텀 Cell이 아닌, 디폴트를 이용하려면, tableView.register(cellClass:forCellReuseIdentification:)에 다음과 같이 작성
tableView.register(UITableViewCell.self, forCellReuseIdentifier: "cell")커스텀 같은 경우에는 첫 번째 인자가 UITableViewCell.classForCoder인 것을 기억
* 위의 속성 이용 예제(한 테이블 뷰에 두 가지 cell각각 표현하기 == 마치 두 개의 테이블 뷰 사용하는 것 처럼 구현하기)

if self.isBeforeInputText {
            let cell = tableView.dequeueReusableCell(withIdentifier: "cell1") ?? UITableViewCell(style: .default, reuseIdentifier: "cell1")
            self.setCellTextColor(cell: cell)
            cell.textLabel?.text = self.oldSearchList[indexPath.row]
            return cell
        } else {
            let cell = tableView.dequeueReusableCell(withIdentifier: "cell2") ?? UITableViewCell(style: .subtitle, reuseIdentifier: "cell2")

            // cell에 들어갈 출발 버튼
            let startBtn = UIButton(type: .roundedRect)
            startBtn.setTitleColor(.black, for: .normal)

            startBtn.setTitle("경로", for: .normal)
            startBtn.frame = CGRect(x: 0, y: 0, width: 50, height: 35)
            startBtn.backgroundColor = .lightGray

            self.setCellTextColor(cell: cell)
            cell.accessoryView = startBtn

            cell.textLabel?.text = self.newSearchList[indexPath.row].title
            cell.detailTextLabel?.text = self.newSearchList[indexPath.row].subTitle
            cell.detailTextLabel?.adjustsFontSizeToFitWidth = true
            return cell
        }
3. 섹션 헤더 나누기(storyboard에서 사용방법)

- A 테이블뷰컨트롤러에서 한 행을 선택(didSelected)하면 다른 B 테이블뷰컨트롤러로 이동하여 거기에 상세 정보 나타내는 것

1) B 테이블뷰컨트롤러에서 cell의 크기를 2로 수정

2) 섹션별 목록 구성 - 세 가지 메소드 오버라이딩
(1) numberOfSections(in:)

(2) tableView(_:viewForHeaderInSection:) : 각 세션 헤더에 들어갈 뷰를 반환하는 메소드

* 뷰가 아닌 단순히 헤더에 텍스트만 표시할 경우 : tableView(_:titleForHeaderInSection:)

(4) tableView(_:heightForHeaderInSection:) : 각 섹션 헤더의 높이를 결정

(5) tableView(_:numberOfRowsInSection:)

(6) 각 row에 접근하는 경우 기존과 유사하게, indexPathrow가 아닌, indexPath.section == 0,,, 이런 식으로 접근할 것
- tableView(_:cellForRowAt:)

4. 새로고침

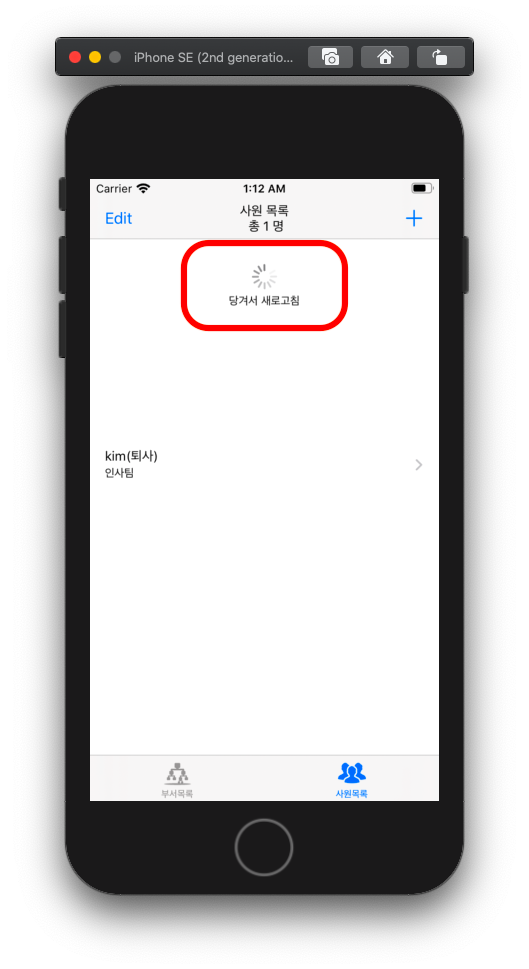
- tableView의 속성 중 refreshControl로 객체 참조 UIRefreshControl(), 18번라인
refreshControl종료, 26번라인 (해주지 않는다면, 위 실행화면에서 "당겨서 새로고침"이미지가 사라지지 않음)

5. 테이블 뷰에 편집모드 설정 (Edit버튼)


방법 - 1) 기존에 제공하는 UI추가 (default는 delete모드)
         /// 네비게이션바에 왼쪽상단에 Edit이라는 버튼, 셀을 삭제할 수 있는 편집 모드가 구현된 버튼
        self.navigationItem.leftBarButtonItem = self.editButtonItem
방법 - 2) 커스터마이징
(1) tableView.setEditing(true, animated: true) 사용하여 변경, "Edit"이름도 클릭 시 "Done"으로 설정
* 아래에는 self.isEditing, self.setEditing()이지만, self.tableView.으로 접근해야 됨

(2) tableView(_:editingStyleForRowAt:) -> UITableViewCell.EditingStyle
- 모든 행을 delete형으로 선택(옵션 : delete, insert, ...)

(3) 스와이프 이벤트
talbieView.allowsSelectionDuringEditing = true
(4) edit한 행에 대한 이벤트에 반응하는 메소드 tableView(_:commit:forRowAt:)

6. 편집모드에 이어서 각 스타일(delete, insert 등)에 맞추어 코딩
1) 삽입, 삭제를 결정하려면 아래 메소드에 구현
-> 모두 tableView(_:commit:forRowAt)에서 접근
    override func tableView(_ tableView: UITableView, commit editingStyle: UITableViewCell.EditingStyle, forRowAt indexPath: IndexPath) {
        if editingStyle == .insert {
            // 데이터 등록 화면
        } else if editingStyle == .delete {
            // 삭제 화면
        }
    }
2) UI적으로 해당 행 사라지게 하기
tableView.deleteRows(at: [indexPath], with: .fade)
7. cell의 위치를 프로그래밍적으로 조정하는 방법
cell을 tap할 시, addTextField가 생겨서 입력한 경우 이 cell을 맨 위로 올리고 싶을 때,
tableView(_:didSelectRowAt:)에서, tableView.moveRow사용
let cell = self.tableView.cellForRow(at: indexPath)
cell?.textLabel?.text = title
cell?.detailTextLabel?.text = contents

let firstIndexPath = IndexPath(item: 0, section: 0)
self.tableView.moveRow(at: indexPath, to: firstIndexPath)
※ 주의사항 : tableView.reloadData()와 tableView.moveRow()동시에 쓰면 오류
self.list의 내용을 바꾸고 reloadData()를 실행하던가, self.list의 내용을 바꾸고 cell을 위치를 바꾸는 방법 두 가지중 한가지 선택할 것
8. 테이블 뷰 특정 셀 삽입 & 갱신 & 삭제
1) 삽입 : insertRows(at:with:)
let newIndexPath = IndexPath(row: meals.count, section: 0)
meals.append(meal)
tableView.insertRows(at: [newIndexPath], with: .automatic)
2) 갱신 : reloadRows(at:with:)
if let selectedIndexPath = tableView.indexPathForSelectedRow {
	// Update an existing meal.
	meals[selectedIndexPath.row] = meal
	tableView.reloadRows(at: [selectedIndexPath], with: .none)
}
3) 삭제 : deleteRows(at:with:)
meals.remove(at: indexPath.row)
tableView.deleteRows(at: [indexPath], with: .fade)'iOS 실전 (swift) > UI 커스텀(프로그래밍적 접근)' 카테고리의 다른 글
| [iOS - UI Custom] 14. slide-out bar (side bar)만들기 (CGAffineTransform사용) (2) | 2020.05.01 |
|---|---|
| [iOS - UI Custom] 13. storyboard제거하여 SceneDelegate에 코딩하기 (0) | 2020.04.30 |
| [iOS - UI Custom] 11. Auto layout (programmatically) (0) | 2020.04.26 |
| [iOS - UI Custom] 10. 사이드 바(side bar, slide and out) (0) | 2020.04.18 |
| [iOS - UI Custom] 9. 커스텀 클래스(UIControl상속) - UIStepper (0) | 2020.04.18 |


