Notice
Recent Posts
Recent Comments
Link
| 일 | 월 | 화 | 수 | 목 | 금 | 토 |
|---|---|---|---|---|---|---|
| 1 | 2 | 3 | 4 | 5 | 6 | 7 |
| 8 | 9 | 10 | 11 | 12 | 13 | 14 |
| 15 | 16 | 17 | 18 | 19 | 20 | 21 |
| 22 | 23 | 24 | 25 | 26 | 27 | 28 |
Tags
- RxCocoa
- UICollectionView
- swift documentation
- Xcode
- 리팩토링
- ribs
- HIG
- Observable
- clean architecture
- map
- rxswift
- combine
- 스위프트
- uitableview
- Refactoring
- MVVM
- Clean Code
- Human interface guide
- SWIFT
- 리펙토링
- tableView
- UITextView
- 애니메이션
- 클린 코드
- Protocol
- uiscrollview
- collectionview
- scrollview
- ios
- swiftUI
Archives
- Today
- Total
김종권의 iOS 앱 개발 알아가기
[iOS - UI Custom] 3. UIKit객체별 속성지정 본문

* UIKit관련 객체
- TextField, Switch, Stepper, Label
* 변수 준비
|
1
2
3
4
5
6
7
8
9
10
11
|
class ViewController: UIViewController {
var tF: UITextField!
var s: UISwitch!
var stepper: UIStepper!
var l: UILabel!
override func viewDidLoad() {
// 이곳에 각 속성 정의
}
}
|
1) TextField
|
1
2
3
4
5
6
7
8
9
|
tF = UITextField()
tF.frame= CGRect(x: 10, y: 50, width: self.view.frame.width, height: 200)
tF.font = .systemFont(ofSize: 15)
tF.borderStyle = .roundedRect // .line / .bezel / .none
tF.textAlignment = .left
tF.adjustsFontSizeToFitWidth = true // 텍스트 너비에 따라 폰트 사이즈 변화
tF.placeholder = "일기 작성"
tF.autocapitalizationType = .none // .allCharacters / .sentences / .words
self.view.addSubview(tF)
|
2) Switch
|
1
2
3
4
5
|
s = UISwitch()
s.frame = CGRect(x: tF.frame.origin.x, y: tF.frame.origin.y + tF.frame.height + 10, width: 100, height: 100)
s.isOn = true
s.setOn(true, animated: true)
self.view.addSubview(s)
|
3) Stepper
|
1
2
3
4
5
6
7
|
stepper = UIStepper()
stepper.frame = CGRect(x: s.frame.origin.x, y: s.frame.origin.y + s.frame.height + 10, width: 100, height: 100)
stepper.minimumValue = 0
stepper.maximumValue = 100
stepper.stepValue = 1
stepper.value = 0
self.view.addSubview(stepper)
|
4) Label
|
1
2
3
4
5
6
7
|
lbl = UILabel()
lbl.frame = CGRect(x: 100, y: 100, width: 30, height: 50)
lbl.font = .systemFont(ofSize: 15)
lbl.textColor = .red
lbl.text = "레이블"
lbl.sizeToFit() // 컨텐츠의 내용에 맞게 레이블 크기 변경
self.view.addSubview(lbl)
|
5) 중앙정렬 하는 방법 : center속성 사용
- center란, 중앙의 기준점 잡는 것
|
1
2
3
4
5
|
// x좌표를 루트뷰의 중앙으로 이동
lbl.center = CGPoint(x: self.view.frame.width / 2, y: 100)
// 바로 대입 방법
labl.center = self.view.center
|

6) Slider
|
1
2
3
4
5
|
let slider = UISlider()
slider.minimumValue = 0
slider.maximumValue = 100
slider.frame = CGRect(x: 0, y: 0, width: 170, height: 30)
self.view.addSubview(slider)
|
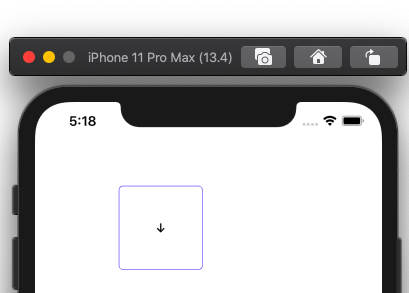
7) Button
|
1
2
3
4
5
6
7
8
9
10
11
12
13
14
15
|
self.btn = UIButton()
self.btn.frame = CGRect(x: 100, y: 100, width: 100, height: 100)
btn.tag= -1
btn.setTitle("↓", for: .normal) // .normal속성은 평상시의 상태를 의미. 선택되었을 때의 상태지정은 .selected
btn.setTitleColor(.black, for: .normal) // 생성시 처음 값은 white이므로 지정해줘야 함
btn.titleLabel?.font = .boldSystemFont(ofSize: 15)
btn.layer.masksToBounds= true
// btn.layder.cornerRadius = 120 한 경우, 모서리에 있던 text를 가릴 것이냐(true), 안가릴 것이냐(false)
// "btn.layout.masksToBounds = true"는 "btn.clipsToBounds = true"와 동일
btn.layer.cornerRadius= 5
btn.layer.borderWidth= 0.5
btn.layer.borderColor = UIColor.blue.cgColor
self.view.addSubview(btn)
|

'iOS 실전 (swift) > UI 커스텀(프로그래밍적 접근)' 카테고리의 다른 글
| [iOS - UI Custom] 6. 경고창(UIAlertController) (0) | 2020.04.17 |
|---|---|
| [iOS - UI Custom] 5. TabBar Controller (0) | 2020.04.17 |
| [iOS - UI Custom] 4. Navigation Controller (0) | 2020.04.17 |
| [iOS - UI Custom] 2. storyboard없이 UI배치하기 (0) | 2020.04.16 |
| [iOS - UI Custom] 1. UI 커스터마이징의 원리 (0) | 2020.04.16 |
Comments


