
| 일 | 월 | 화 | 수 | 목 | 금 | 토 |
|---|---|---|---|---|---|---|
| 1 | 2 | 3 | 4 | |||
| 5 | 6 | 7 | 8 | 9 | 10 | 11 |
| 12 | 13 | 14 | 15 | 16 | 17 | 18 |
| 19 | 20 | 21 | 22 | 23 | 24 | 25 |
| 26 | 27 | 28 | 29 | 30 | 31 |
- Clean Code
- RxCocoa
- UITextView
- Xcode
- collectionview
- Protocol
- clean architecture
- 클린 코드
- 리팩토링
- 스위프트
- 클로드코드
- SWIFT
- HIG
- swiftUI
- ios
- map
- MVVM
- 리펙토링
- 애니메이션
- claude code
- uiscrollview
- rxswift
- Human interface guide
- Refactoring
- UICollectionView
- combine
- swift documentation
- uitableview
- tableView
- Observable
- Today
- Total
김종권의 iOS 앱 개발 알아가기
[iOS - UI Custom] 5. TabBar Controller 본문
1. TabBar Controller : UITabBar와 UITabItem으로 구성
* 탭 바에서의 접근은 모두 Controller통해 접근함
- tabBar : tabBarController.tabBar. (barTintColor)
- item : tabBarController.tabBar.items
※ 네비게이션 컨트롤러는 다름
- bar에 접근 : navigationController -> navigationBar
- item에 접근 : navigationItem( 종류 : titleView, leftBarButton, rightBarButton)
2. 탭바 커스텀 - storyboard 사용 + 프로그래밍적 접근
1) storyboard준비화면
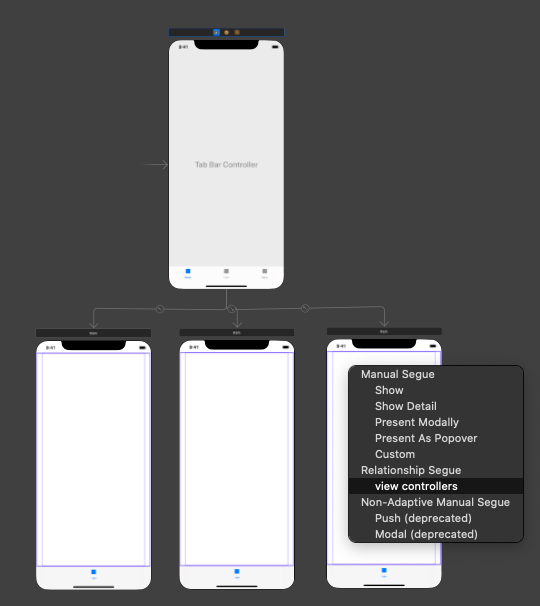
2) 탭 바 생성
* SceneDelegate.swift에 초기화 하기
- 탭바 객체 참조하는 방법 : self.window?.rootViewController as? UITabBarController
|
1
2
3
4
5
6
7
8
9
10
11
12
13
14
15
16
17
18
19
20
21
22
23
24
25
26
27
28
29
30
31
32
33
34
35
36
37
38
39
40
41
42
43
44
45
46
47
48
49
50
51
52
53
54
55
56
57
58
59
60
61
|
// SceneDelegate.swift
func scene(_ scene: UIScene, willConnectTo session: UISceneSession, options connectionOptions: UIScene.ConnectionOptions) {
// 윈도우 객체와 연결된 루트뷰컨트롤러 가져오기
if let tbc = self.window?.rootViewController as? UITabBarController {
// 현재 선택된 아이템 색깔 지정
tbc.tabBar.tintColor = .green
// 탭바의 색깔
tbc.tabBar.barTintColor = .blue
// 탭바에 이미지 삽입 방법 (backgoundImage는 색상이 잘 표현 안되는 경우가 생겨서 tint로 사용할 것)
tbc.tabBar.barTintColor = UIColor(patternImage: UIImage(named: "menubar-bg-mini")!)
// bacgroundImage의 장접은 신축성 옵션이 가능
tbc.tabBar.backgroundImage = UIImage(named: "menubar-bg-mini") // 이미지 크기가 작다면 바둑판형태
tbc.tabBar.backgroundImage = UIImage(named: "menubar-bg-mini")?.stretchableImage(withLeftCapWidth: 5, topCapHeight: 16) // 좌표를 기준으로 늘이기
tbc.tabBar.backgroundImage = UIImage(named: "menubar-bg-mini")?.stretchableImage(withLeftCapWidth: 0, topCapHeight: 0) // 균일하게 늘이기
// 큰 이미지 자르기: 이미지가 tabBar보다 큰 경우 밖으로 튀어나옴
tbc.tabBar.clipsToBounds = true
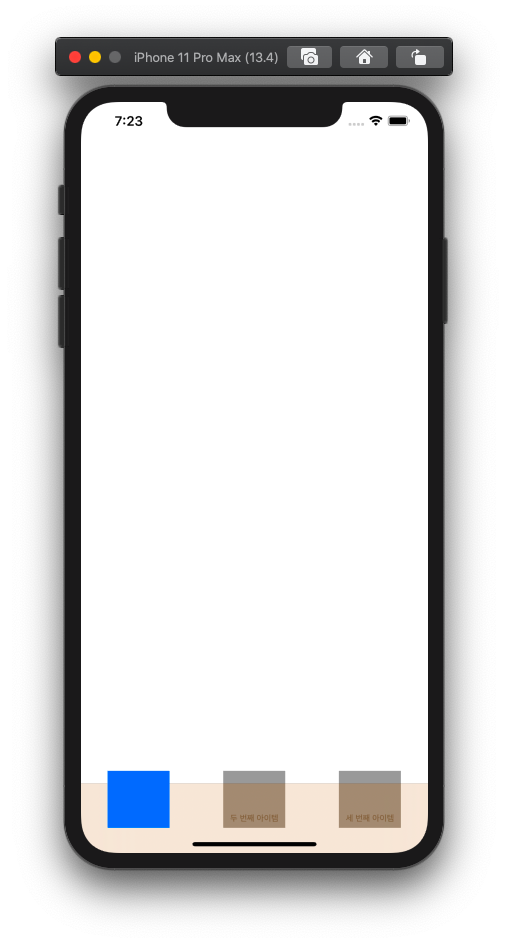
// 탭바 아이템
if let tbItems = tbc.tabBar.items {
tbItems[0].image = UIImage(named: "calendar")
tbItems[1].image = UIImage(named: "file-tree")
tbItems[2].image = UIImage(named: "photo")
tbItems[0].title = "calendar"
tbItems[1].title = "file"
tbItems[2].title = "photo"
// 원본 이미지 적용하기 (탭바의 이미지 디폴트는 색상은 무시되고 단순히 alpha값만 사용함)
let image = UIImage(named: "canlendar")?.withRenderingMode(.alwaysOriginal)
tbItems[0].image = image
// 탭바 아이템의 타이틀 설정
for tbItem in tbItems {
tbItem.setTitleTextAttributes([NSAttributedString.Key.foregroundColor: UIColor.gray], for: .disabled)
tbItem.setTitleTextAttributes([NSAttributedString.Key.foregroundColor : UIColor.red], for: .selected)
}
// proxy객체 사용 : for문으로 접근하지 않아도 가능
// 탭바 아이템에 일일이 할 필요 없이, 일괄적 적용
let tbItemProxy = UITabBarItem.appearance()
tbItemProxy.setTitleTextAttributes([NSAttributedString.Key.foregroundColor:UIColor.red], for: .selected)
tbItemProxy.setTitleTextAttributes([NSAttributedString.Key.foregroundColor:UIColor.gray], for: .disabled)
tbItemProxy.setTitleTextAttributes([NSAttributedString.Key.font: UIFont.systemFont(ofSize: 15)], for: .normal)
}
}
guard let _ = (scene as? UIWindowScene) else { return }
}
//
// 이미지 파일 출처 : 꼼꼼한 재은씨의 스위프트 실전편
|
※ 각 뷰 컨트롤러 viewDidLoad에 작성 하면 한 곳만 표시됨 : viewDidLoad 블럭에 입력했다면, 뷰가 생성될 때만 적용되므로

- 앱 실행시 모두 초기화가 가능하도록 SceneDelegate에 작성할 것
- 탭바의 이미지 아이콘 사이즈는 apple에서 정해져 있음 (너무 클시 튀어나오는 경우 발생)
Custom Icons - Icons and Images - iOS - Human Interface Guidelines - Apple Developer
Custom Icons (iOS 12 and Earlier) In iOS 13 or later, prefer using SF Symbols to represent tasks and modes in your app. If your app is running in iOS 12 or earlier, or if you need to create custom bitmap icons, follow the guidance below. Create recognizabl
developer.apple.com
3) 탭바 아이템 접근하기
- 인덱스로 접근 : self.tabBarController?.tabBar.items?[1]
|
1
2
3
|
secondItem?.image = UIImage(named: "photo")
secondItem?.title = "photo"
|
3. 탭바 커스텀 - storyboard 없이
1) 생성
- 핵심은 탭바 객체를 ]window의 루트뷰컨트롤러로 등록하는 과정, tabBarController.setViewControllers(컨트롤러 객체 배열, animated:)
|
1
2
3
4
5
6
7
8
9
10
11
12
13
14
15
16
17
18
19
20
21
22
|
// SceneDelegate.swift
func scene(_ scene: UIScene, willConnectTo session: UISceneSession, options connectionOptions: UIScene.ConnectionOptions) {
let tbc = UITabBarController()
let view01 = UIViewController()
view01.view.backgroundColor = .white
let view02 = UIViewController()
let view03 = UIViewController()
// 현재 윈도우의 루트 뷰를 tab bar controller로 지정
self.window?.rootViewController = tbc
// 탭바컨트롤러에 컨텐츠 컨트롤러 뷰 추가
tbc.setViewControllers([view01, view02, view03], animated: false)
tbc.tabBar.backgroundColor = .brown
guard let _ = (scene as? UIWindowScene) else { return }
}
|
2) TabBar숨기기
- isHidden사용
|
1
2
3
4
5
6
7
|
// 바로 사라지게 하기
//tbc.tabBar?.isHidden = (tbc.tabBar?.isHidden == true) ? false : true
// 애니메이션 효과 삽입
UIView.animate(withDuration: TimeInterval(0.15)){
tbc.tabBar?.alpha = (tbc.tabBar?.alpha == 0 ? 1 : 0)
}
|
'iOS 실전 (swift) > UI 커스텀(프로그래밍적 접근)' 카테고리의 다른 글
| [iOS - UI Custom] 7. 커스텀 클래스 - UIButton (0) | 2020.04.17 |
|---|---|
| [iOS - UI Custom] 6. 경고창(UIAlertController) (0) | 2020.04.17 |
| [iOS - UI Custom] 4. Navigation Controller (0) | 2020.04.17 |
| [iOS - UI Custom] 3. UIKit객체별 속성지정 (0) | 2020.04.16 |
| [iOS - UI Custom] 2. storyboard없이 UI배치하기 (0) | 2020.04.16 |


