| 일 | 월 | 화 | 수 | 목 | 금 | 토 |
|---|---|---|---|---|---|---|
| 1 | 2 | 3 | 4 | 5 | 6 | 7 |
| 8 | 9 | 10 | 11 | 12 | 13 | 14 |
| 15 | 16 | 17 | 18 | 19 | 20 | 21 |
| 22 | 23 | 24 | 25 | 26 | 27 | 28 |
- MVVM
- scrollview
- UITextView
- Observable
- combine
- UICollectionView
- ribs
- rxswift
- SWIFT
- swift documentation
- 애니메이션
- 스위프트
- Xcode
- ios
- Human interface guide
- uitableview
- tableView
- Refactoring
- uiscrollview
- Clean Code
- RxCocoa
- swiftUI
- 클린 코드
- map
- HIG
- Protocol
- 리팩토링
- collectionview
- clean architecture
- 리펙토링
- Today
- Total
김종권의 iOS 앱 개발 알아가기
[iOS - UI Custom] 4. Navigation Controller 본문
[iOS - UI Custom] 4. Navigation Controller
jake-kim 2020. 4. 17. 13:43*Navigation Controller를 프로그래밍 방식으로 구현하기
1. 기본적인 프로그래밍 방식
- ViewController에서, 프로그래밍 스타일로 만든 ResultViewController로 데이터 넘기는 예제
1) 첫 main.storyboard세팅 (오른쪽 화면은 ViewController클래스와 연결)

2) ResultViewController 프로그래밍방식으로 생성
- 주의할점 : 프로그래밍 방식으로 구현시, 루트뷰의 색상은 black이므로 white로 수정해야함
|
1
2
3
4
5
6
7
8
9
10
11
12
13
|
// ResultViewController.swift
class ResultViewController: UIViewController {
var pL: String!
var l : UILabel!
override func viewDidLoad() {
self.view.backgroundColor = .white // 주의사항
l = UILabel(
l.frame = CGRect(x: 0, y: self.view.center.y, width: 500, height: 100)
l.text = "전달받은 값 = \(pL)"
self.view.addSubview(l)
}
}
|
3) ViewController.swift
- Item추가하는 과정 볼것 : UIBarButtonItem사용
- 추가할 땐 self.navigtationItem.rightBarButtonItem 속성 이용
- 화면을 넘길 땐, self.navigationController?.pushViewController메소드 이용
|
1
2
3
4
5
6
7
8
9
10
11
12
13
14
15
16
17
|
class ViewController: UIViewController {
override func viewDidLoad() {
let submitBtn = UIBarButtonItem(barButtonSystemItem: .compose, target: self, action: #selector(submit(_:)))
// 비슷한 메서드 주의 : btn.addTarget(self, action: #selector(submit(_:)), for: .touchUpInside)
self.navigationItem.rightBarButtonItem = submitBtn
}
// 현재 뷰 컨트롤러 -> ResultViewController로 값과 화면 넘기기
@objc func submit(_ sender: Any) {
let rvc = ResultViewController()
rvc.pL = "from ViewController"
self.navigationController?.pushViewController(rvc, animated: true)
}
}
|
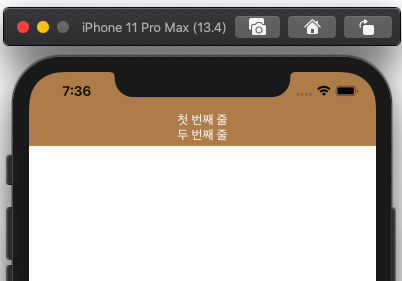
2. 타이틀 커스터마이징
1) 간단한 타이틀 작성
- bar에 접근 : navigationController -> navigationBar
- item에 접근 : navigationItem( 종류 : titleView, leftBarButton, rightBarButton)
- 뷰를 하나 만들고 그곳에 레이블 두 개를 넣어서 navigation item에 넣기

* 네비게이션의 구성 요소 : navigationgation bar와 navigatrion item (각각 접근하는 방법 주시)
|
1
2
3
4
5
6
7
8
9
10
11
12
13
14
15
16
17
18
19
20
21
22
23
24
25
26
27
28
29
|
override func viewDidLoad() {
super.viewDidLoad()
self.initTitle()
}
func initTitle() {
let containerView = UIView(frame: CGRect(x: 0, y: 0, width: 200, height: 36))
let topTitle = UILabel(frame: CGRect(x: 0, y: 0, width: 200, height: 18))
topTitle.numberOfLines = 1
topTitle.textAlignment = .center
topTitle.font = .systemFont(ofSize: 15)
topTitle.textColor = .white
topTitle.text = "첫 번째 줄"
let bottomTitle = UILabel(frame: CGRect(x: 0, y: topTitle.frame.height, width:200, height: 18))
bottomTitle.numberOfLines = 1
bottomTitle.textAlignment = .center
bottomTitle.font = .systemFont(ofSize: 15)
bottomTitle.textColor = .white
bottomTitle.text = "두 번째 줄"
containerView.addSubview(topTitle)
containerView.addSubview(bottomTitle)
self.navigationItem.titleView = containerView
self.navigationController?.navigationBar.barTintColor = .brown
}
|
2) 웹 창 UI구현하기
세 부분에 적절히 삽입
- navigationItem.leftBarButtonItem
- navigationItem.titleView
- navigationItem.rightBarButtonItem

|
1
2
3
4
5
6
7
8
9
10
11
12
13
14
15
16
17
18
19
20
21
22
23
24
25
26
27
28
29
30
31
32
33
34
35
36
37
38
39
40
41
42
43
44
45
46
47
48
49
50
51
52
53
|
override func viewDidLoad() {
super.viewDidLoad()
self.initWebBar()
}
func initWebBar() {
// URL UI
let tf = UITextField()
tf.frame = CGRect(x: 0, y: 0, width: 300, height: 35)
tf.backgroundColor = .white
tf.font = .systemFont(ofSize: 13)
tf.autocapitalizationType = .none
tf.autocorrectionType = .no // 자동 입력 기능 해제
tf.spellCheckingType = .no
tf.keyboardType = .URL
tf.keyboardAppearance = .dark
tf.layer.borderWidth = 0.3
tf.layer.borderColor = UIColor(red: 0.5, green: 0.5, blue: 0.5, alpha: 1).cgColor
self.navigationItem.titleView = tf
// left side button
let backBtn = UIImage(named: "arrow-back")
let leftItem = UIBarButtonItem(image: backBtn, style: .plain, target: self, action: nil)
self.navigationItem.leftBarButtonItem = leftItem
// web page count UI
let cntLbl = UILabel()
cntLbl.frame = CGRect(x: 10, y: 8, width: 20, height: 20)
cntLbl.font = .boldSystemFont(ofSize: 10)
cntLbl.textColor = UIColor(red: 0.5, green: 0.5, blue: 0.5, alpha: 1)
cntLbl.text = "12"
cntLbl.textAlignment = .center
cntLbl.layer.cornerRadius = 3
cntLbl.layer.borderWidth = 2
cntLbl.layer.borderColor = UIColor(red: 0.5, green: 0.5, blue: 0.5, alpha: 0.7).cgColor
// count UI의 위치를 지정하기 위해 새로운 뷰를 만들어 여기에 담아서 아이템에 등록
let rightSideView = UIView()
rightSideView.frame = CGRect(x: 0, y: 0, width: 70, height: 37)
rightSideView.addSubview(cntLbl)
let rightItem = UIBarButtonItem(customView: rightSideView)
self.navigationItem.rightBarButtonItem = rightItem
// right side button
let more = UIButton(type: .system)
more.frame = CGRect(x: 50, y: 10, width: 16, height: 16)
more.setImage(UIImage(named: "more"), for: .normal)
rightSideView.addSubview(more)
}
|
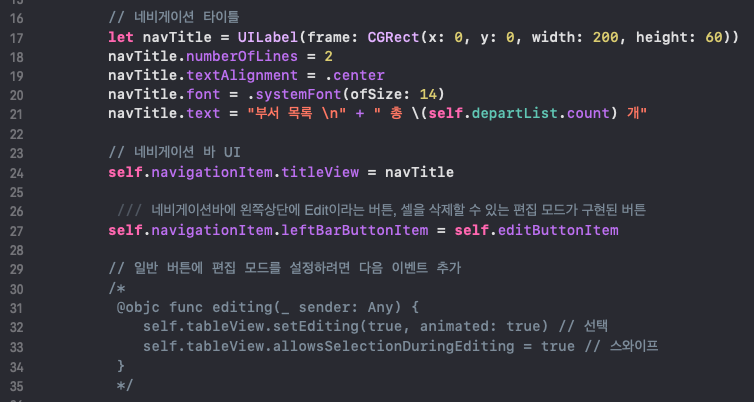
cf) 네비게이션 바 다루기 (왼쪽 버튼, 타이틀, edit button)

*코드 출처 : 꼼꼼한 재은씨의 스위프트 실전편
3. Promrammatically, NavigationController 생성

cf) navigation bar 숨기기(네비게이션 아이템 버튼 모두 제거)
self.navigationController?.isNavigationBarHidden = true
cf) navigation bar영역에서 아이템만 살리고 (배경과 line 모두 없애기)
        self.navigationController?.navigationBar.setBackgroundImage(UIImage(), for: .default)
        self.navigationController?.navigationBar.shadowImage = UIImage()
'iOS 실전 (swift) > UI 커스텀(프로그래밍적 접근)' 카테고리의 다른 글
| [iOS - UI Custom] 6. 경고창(UIAlertController) (0) | 2020.04.17 |
|---|---|
| [iOS - UI Custom] 5. TabBar Controller (0) | 2020.04.17 |
| [iOS - UI Custom] 3. UIKit객체별 속성지정 (0) | 2020.04.16 |
| [iOS - UI Custom] 2. storyboard없이 UI배치하기 (0) | 2020.04.16 |
| [iOS - UI Custom] 1. UI 커스터마이징의 원리 (0) | 2020.04.16 |


