
- 분류 전체보기 (1651)

- Git, CocoaPods, Xcode, Shel.. (71)
- iOS 튜토리얼 (SwiftUI) (23)
- iOS 기본 (SwiftUI) (55)
- iOS 응용 (SwiftUI) (65)
- iOS 접근성 (SwiftUI) (3)
- iOS Combine (SwiftUI) (19)
- swift 5 문법 (23)
- swift 공식 문서 (27)
- iOS 기본 (swift) (149)
- iOS 실전 (swift) (51)
- iOS 응용 (swift) (726)
- iOS framework (33)
- RxSwift (40)
- OAuth Login (4)
- Architecture (swift) (34)
- CoreML (2)
- REST API (2)
- iOS 앱 배포와 출시 (29)
- Unit Test와 UI Test (5)
- Design Pattern (디자인 패턴) (4)
- Clean Architecture (22)
- Clean Code (클린 코드) (15)
- Refactoring (리펙토링) (58)
- 알고리즘 (8)
- 커스텀 프레임워크 (2)
- Mac OS 편의 설정 (6)
- HIG(Human Interface Guideli.. (70)
- UI 컴포넌트 (swift) (66)
- 빌드 환경 설정 (4)
- Swift-Extension (0)
- WWDC 정리 (19)
- 오픈소스 까보기 (5)
- Swift Macro (6)
Notice
Recent Posts
Recent Comments
Link
| 일 | 월 | 화 | 수 | 목 | 금 | 토 |
|---|---|---|---|---|---|---|
| 1 | 2 | 3 | 4 | 5 | ||
| 6 | 7 | 8 | 9 | 10 | 11 | 12 |
| 13 | 14 | 15 | 16 | 17 | 18 | 19 |
| 20 | 21 | 22 | 23 | 24 | 25 | 26 |
| 27 | 28 | 29 | 30 |
Tags
- ribs
- 애니메이션
- clean architecture
- UICollectionView
- Human interface guide
- swiftUI
- Refactoring
- 스위프트
- tableView
- RxCocoa
- swift documentation
- HIG
- scrollview
- Observable
- SWIFT
- collectionview
- UITextView
- Clean Code
- MVVM
- combine
- uiscrollview
- Xcode
- uitableview
- 리펙토링
- 리팩토링
- Protocol
- ios
- 클린 코드
- map
- rxswift
Archives
- Today
- Total
김종권의 iOS 앱 개발 알아가기
[iOS - swift] 2. Section, Item 모델링 - 다중 Section, 다중 Item 모델링 방법 (UITableView, UICollectionView) 본문
iOS 실전 (swift)
[iOS - swift] 2. Section, Item 모델링 - 다중 Section, 다중 Item 모델링 방법 (UITableView, UICollectionView)
jake-kim 2022. 5. 27. 22:381. Section, Item 모델링 - 단일 Section, 다중 Item 모델링 방법 (UITableView, UICollectionView)
2. Section, Item 모델링 - 다중 Section, 다중 Item 모델링 방법 (UITableView, UICollectionView)

예제에 사용한 프레임워크
- Then - 초기화하는 동시에 프로퍼티에 접근하여 sugar programming을 위해 사용
- SnapKit - UI의 오토레이아웃 구현에 편의를 위해 사용
- RxSwift, RxCocoa - 비동기 처리에 편의를 위해 사용
- RxDataSources - dataSource는 UITableViewDataSource 델리게이트를 사용하면 되지만 편의를 위해서 RxDataSource 사용
cf) 만약 1-Section, n-item의 데이터 소스를 처리할 때 RxSwift를 사용할 경우, tableView.rx.items 를 사용하면 편리
(n-section, n-item에서는 RxDataSources를 사용하여 처리)
self.dataSource
.bind(to: self.tableView.rx.items) { tableView, row, index in
let indexPath = IndexPath(index: index)
let cell = tableView.dequeueReusableCell(withIdentifier: "cell", for: indexPath) as! MyCell
cell.prepare(text: item)
return cell
}
.disposed(by: self.disposeBag)1-Section, n-Item 처리
- 이전 포스팅 글에서 알아본대로 Section을 따로 모델링 할 필요 없이 enum으로 정의
- associative type으로 배열을 넣지 않고 하나만의 모델만을 넣는것이 핵심
// 모델 정의
enum MyItem {
  case normal
  case special(MyModel)
}

// 사용하는쪽
var items: [MyItem]

...

let item = items[indexPath.row]
n-Section, n-Item 처리 방법
- 1-section, n-item일때는 enum안에 case를 여러개 두어서 Item을 여러개 표시했지만, Section이 생기면 모델을 다르게 정의
- Section과 Item을 감싸고 있는 Wrapping 모델로 생성
struct DiarySectionItemModel {
  enum DiarySection: Equatable {
    case morning(TimeModel) // associative value에 들어가는 값은 section에서의 데이터 값
    case afternoon(TimeModel)
  }

  enum Item: Equatable {
    case oneLineSummary(String)  // associative value에 들어가는 값은 item에서 데이터 값
    case memory(DiaryModel)
  }

  let model: DiarySection
  let items: [Item]
}- 데이터 채워지는 쪽 (RxDataSources를 사용한 경우 아래처럼 입력이 가능)
- model과 items부분을 나누어, model부분에는 section을 넣고 items부분에는 아이템들을 대입
  var data: [DiarySectionItemModel.Model] = [
    .init( // morning 섹션
      model: .morning(섹션 데이터...),
      items: [ // morning 섹션 안에 item들
        .oneLineSummary(아이템 데이터...),
        .memory(...),
        .memory(...)
      ]
    ),
    .init( // afternoon 섹션
      model: .afternoon(섹션 데이터...),
      items: [ // afternoon 섹션 안에 item들
        .oneLineSummary(아이템 데이터...),
        .memory(...),
        .memory(...)
      ]
    ),
  ]
예제 내용
- 섹션이 여러개 있고, 섹션 안에 아이템도 여러개 존재
- 헤더의 스타일이 두 가지가 있으므로, 섹션도 두 가지가 필요
- 아이템도 여러가지가 있으므로 n-Section, n-Item으로 구현 필요
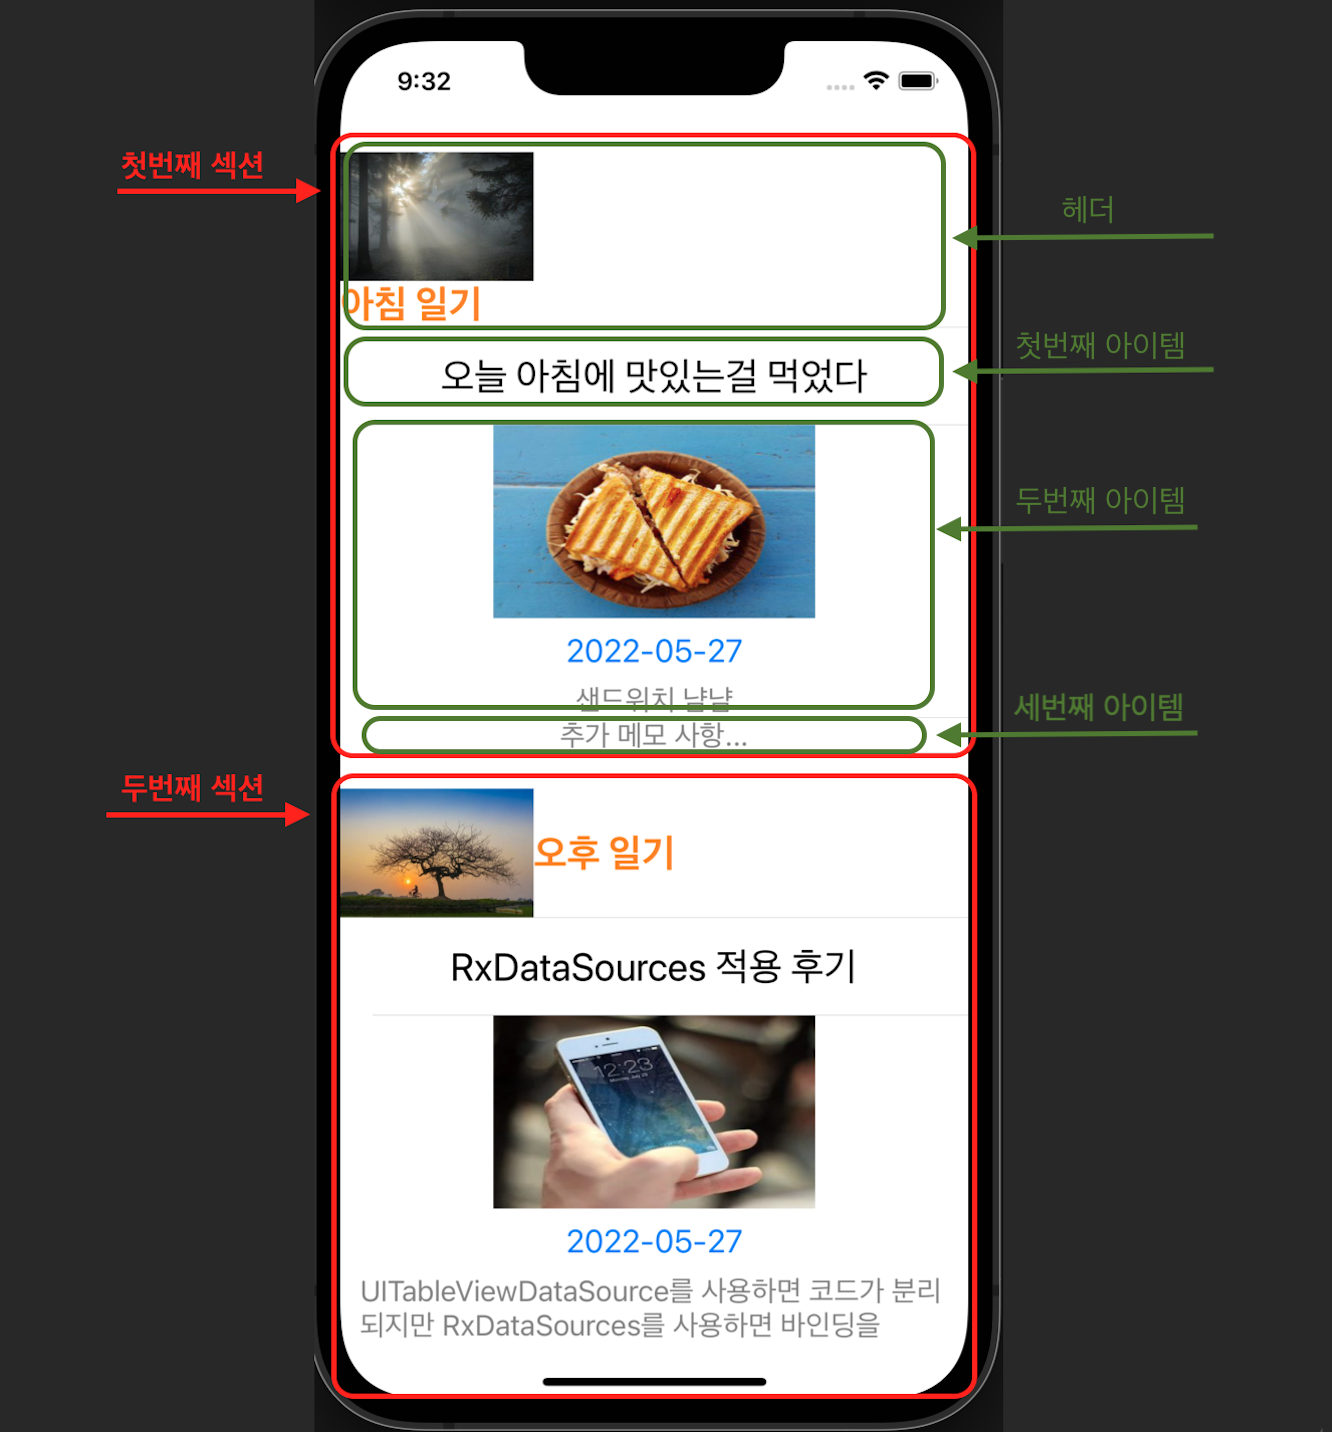
- 스크롤할때 Header가 상단에 걸쳐져야하므로, 이 기능은 시스템에서 제공해주고 Section의 헤더만 가능하므로 n-Section으로 필수 구현
모델링
- 셀의 UI에 표시될 모델 정의
import Foundation
import UIKit

struct DiaryModel {
  let date: Date?
  let memory: String?
  let picture: UIImage?
}- ExDataSources를 사용하려면 모델이 Equtable을 따라야 하므로 수정
struct DiaryModel: Equatable { // <-
  let date: Date?
  let memory: String?
  let picture: UIImage?
}- Section에서 사용하는 데이터 모델 정의 (RxDataSources 사용하려면 역시 Equatable 필요)
struct TimeModel: Equatable { // <-
  let image: UIImage?
  let name: String?
}- Section 타입 정의 (Section과 Item을 wrapping하고 있는 하나의 모델로 생성 - 핵심)
- RxDataSources 형식으로 사용하기위해서 Section과 Item을 하나의 struct안에 넣고 관리하도록 정의 (Wrapping 작업)
- 또한 typealias로 Model을 정의 (RxDataSources를 사용하기위해 선언)
import RxDataSources

struct DiarySectionItem {
  typealias Model = SectionModel<DiarySection, Item>

  enum DiarySection: Equatable {
    case morning(TimeModel) // associative value에 들어가는 값은 section에서의 데이터 값
    case afternoon(TimeModel)
  }

  enum Item: Equatable {
    case oneLineSummary(String)  // associative value에 들어가는 값은 item에서 데이터 값
    case memory(DiaryModel)
  }
}- 데이터 준비
- model과 items부분을 나누어, model부분에는 section을 넣고 items부분에는 아이템들을 대입
- RxDataSources에서는 model이라는 이름을 쓰는데, 이 model이 section과 동일하다고 기억할것
// ViewController.swift
// 3개의 섹션 생성

var data: [DiarySectionItemModel.Model] = [
  .init( // morning 섹션
    model: .morning(섹션 데이터...),
    items: [ // morning 섹션 안에 item들
      .oneLineSummary(아이템 데이터...),
      .memory(...),
      .memory(...)
    ]
  ),
  .init( // afternoon 섹션
    model: .afternoon(섹션 데이터...),
    items: [ // afternoon 섹션 안에 item들
      .oneLineSummary(아이템 데이터...),
      .memory(...),
      .memory(...)
    ]
  ),
]- 데이터소스 적용하는 쪽
- 데이터가 변경될때마다 tableView.rx.items(dataSource:)를 통해 셀 업데이트
- dataSources는 RxDataSources에서 지원하는 데이터 형태를 미리 정의하여 주입
  Observable.just(self.data)
    .bind(to: self.tableView.rx.items(dataSource: dataSource))
.disposed(by: self.disposeBag)- dataSource 정의
- item들을 분류하여 cell에 prepare()
let dataSource = RxTableViewSectionedReloadDataSource<DiarySectionItem.Model> { dataSource, tableView, indexPath, item in
  // item
  switch item {
  case let .memory(diaryModel):
  case let .oneLineSummary(text):
  }
}- Header, Footer는 원래 UITableViewDataSource에 없으므로, RxDataSources에서 지원 x
- rx를 사용하지 않고 delegate를 할당한 후 적용이 필요
* 주의) 예제 코드에서는 reusable을 사용안했지만 실제 사용할땐 아래처럼 사용할것 tableView.dequeueReusableHeaderFooterView(withIdentifier: "myKey")
- rx를 사용하지 않고 delegate를 할당한 후 적용이 필요
self.dataSource.delegate = self

extension ViewController: UITableViewDelegate {
  func tableView(_ tableView: UITableView, viewForHeaderInSection section: Int) -> UIView? {
    switch self.data[section].model {
    case let .morning(model):
    case let .afternoon(model):
    }
  }
}
DataSource 처리
- 테이블 뷰 정의
- Header와 Cell을 register
private let tableView = UITableView(frame: .zero).then {
  $0.allowsSelection = false
  $0.backgroundColor = UIColor.clear
  $0.separatorStyle = .none
  $0.bounces = true
  $0.showsVerticalScrollIndicator = true
  $0.contentInset = .zero
  $0.register(MorningHeaderView.self, forHeaderFooterViewReuseIdentifier: "MorningHeaderView")
  $0.register(AfternoonHeaderView.self, forHeaderFooterViewReuseIdentifier: "AfternoonHeaderView")

  $0.register(DiaryCell.self, forCellReuseIdentifier: "DiaryCell")
  $0.register(OneLineMemoryCell.self, forCellReuseIdentifier: "OneLineMemoryCell")
  $0.estimatedRowHeight = UITableView.automaticDimension
}- Header, Footer처리
- UITableViewDataSource가 아닌 UITableViewDelegate에 위치해있으므로, delegate 할당하여 직접 정의
self.tableView.delegate = self

extension ViewController: UITableViewDelegate {
  func tableView(_ tableView: UITableView, viewForHeaderInSection section: Int) -> UIView? {
    switch self.data[section].model {
    case let .morning(model):
      return (tableView.dequeueReusableHeaderFooterView(withIdentifier: "MorningHeaderView") as! MorningHeaderView).then {
        $0.prepare(image: model.image, text: model.name)
      }
    case let .afternoon(model):
      return (tableView.dequeueReusableHeaderFooterView(withIdentifier: "AfternoonHeaderView") as! AfternoonHeaderView).then {
        $0.prepare(image: model.image, text: model.name)
      }
    }
  }
}- Item은 RxDataSources로 편하게 처리가 가능
- RxTableViewSectionedReloadDataSource<정의한모델> { 여기서 셀 처리 }
let dataSource = RxTableViewSectionedReloadDataSource<DiarySectionItem.Model> { dataSource, tableView, indexPath, item in
  switch item {
  case let .memory(diaryModel):
    return (tableView.dequeueReusableCell(withIdentifier: "DiaryCell", for: indexPath) as! DiaryCell).then {
      $0.prepare(
        picture: diaryModel.picture,
        date: diaryModel.date,
        memory: diaryModel.memory
      )
    }
  case let .oneLineSummary(text):
    return (tableView.dequeueReusableCell(withIdentifier: "OneLineMemoryCell", for: indexPath) as! OneLineMemoryCell).then {
      $0.prepare(text: text)
    }
  }
}

Observable.just(self.data)
  .bind(to: self.tableView.rx.items(dataSource: dataSource))
.disposed(by: self.disposeBag)'iOS 실전 (swift)' 카테고리의 다른 글
| [iOS - swift] 작은 디바이스 대응 방법 (autolayout) (0) | 2022.06.11 |
|---|---|
| [iOS - swift] 1. Section, Item 모델링 - 단일 Section, 다중 Item 모델링 방법 (UITableView, UICollectionView) (0) | 2022.05.26 |
| [iOS - swfit] 18. Scroll view 구현 (storyboard 이용) (0) | 2021.03.14 |
| [iOS - swift] status bar, status bar view 속성 (배경, 글씨 색깔) 동적으로 변경하는 방법 (0) | 2021.01.21 |
| [iOS - swift] 선 그리기 (UIBezierPath, CAShapeLayer) (0) | 2020.12.17 |
'iOS 실전 (swift)' Related Articles
more


Comments
jake-kim님의
글이 좋았다면 응원을 보내주세요!