| 일 | 월 | 화 | 수 | 목 | 금 | 토 |
|---|---|---|---|---|---|---|
| 1 | 2 | 3 | 4 | 5 | 6 | 7 |
| 8 | 9 | 10 | 11 | 12 | 13 | 14 |
| 15 | 16 | 17 | 18 | 19 | 20 | 21 |
| 22 | 23 | 24 | 25 | 26 | 27 | 28 |
- rxswift
- scrollview
- tableView
- MVVM
- Xcode
- SWIFT
- RxCocoa
- Human interface guide
- 리펙토링
- clean architecture
- 리팩토링
- Refactoring
- Clean Code
- uiscrollview
- HIG
- swiftUI
- uitableview
- 스위프트
- UICollectionView
- swift documentation
- map
- 애니메이션
- 클린 코드
- UITextView
- Observable
- Protocol
- combine
- ribs
- ios
- collectionview
- Today
- Total
김종권의 iOS 앱 개발 알아가기
[iOS - swift] 5. Push Notification 응용 - 푸시 커스텀 UI 구현 방법 (Notification Content Extension, category) 본문
[iOS - swift] 5. Push Notification 응용 - 푸시 커스텀 UI 구현 방법 (Notification Content Extension, category)
jake-kim 2023. 2. 21. 22:301. Push Notification 응용 - 테스트 방법 (Pusher, APNs)
2. Push Notification 응용 - Silent Push Notification (사일런트 푸시, 푸시를 이용한 백그라운드에서 업데이트 방법)
3. Push Notification 응용 - Rich Push Notification (Notification Service Extension, 푸시 내용 변경하여 띄우기)
4. Push Notification 응용 - 시스템 푸시에 이미지 넣기 (Notification Service Extension, mutable-content)
5. Push Notification 응용 - 푸시 커스텀 UI 구현 방법 (Notification Content Extension, category) <
6. Push Notification 응용 - 푸시 앱 아이콘 부분 커스텀 방법 (메시지 앱에서의 썸네일 아이콘 푸시 구현, 카톡 푸시 썸네일, INSendMessageIntent)
푸시 구성 (4번글에서 알아본 내용 복습)
- Header와 기본 인터페이스로 구성
- Header는 Title, Subtitle, Body가 존재
- 기본 인터페이스에는 Attachment가 존재
- 사진을 넣는것은 Attachment 부분
- Attachment 부분의 사진을 넣는 것은 Notification Service Extension 사용
- Attachment 부분의 커스텀 UI 방법은 Notification Content Extension 사용
(푸시를 확장하지 않은 경우)

(푸시를 위에서 아래로 드래그하여 확장한 경우)

(iOS 13은 Attachment > Title 순이고 iOS 15부터는 위 그림과 같은 Title > Attachment 순임을 주의)
푸시 커스텀 UI 구현 방법
- 시스템 푸시에 이미지를 넣었을 때 default UI는 아래와 같이 사각형 형태

- Notification Content Service를 사용하면 부분적으로 시스템 Push Notification의 UI를 커스텀 가능

Notification Content Extension 세팅
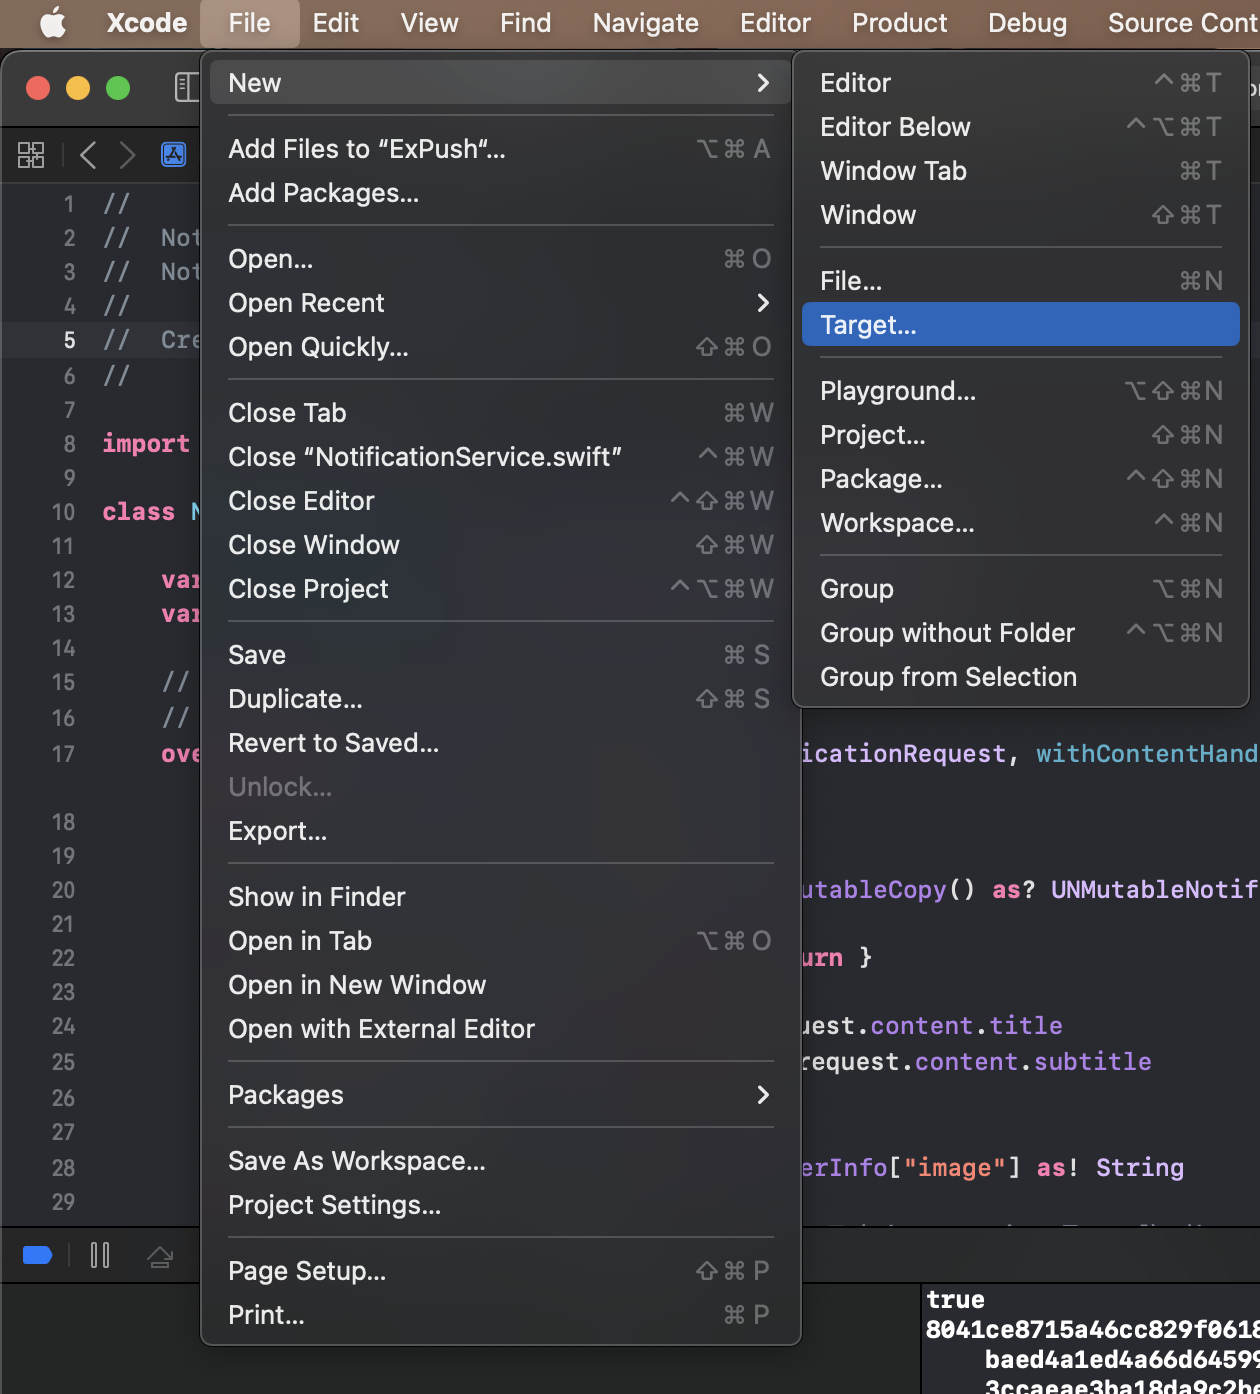
- XCode > File > New > target

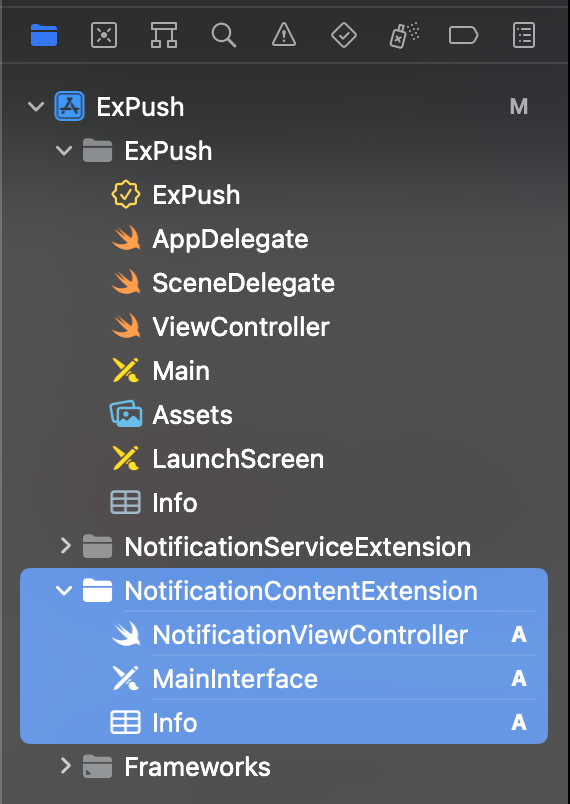
- Notification Content Extension 추가

- NotificationViewController 외 3가지 파일 생성

- MainInterface 파일

- NotificationViewController 파일
- UNNotificationContentExtension을 준수하고 있는 뷰컨
import UIKit
import UserNotifications
import UserNotificationsUI

class NotificationViewController: UIViewController, UNNotificationContentExtension {

    @IBOutlet var label: UILabel?

    override func viewDidLoad() {
        super.viewDidLoad()
        // Do any required interface initialization here.
    }

    func didReceive(_ notification: UNNotification) {
        self.label?.text = notification.request.content.body
    }

}- Custom UI 구현 방법
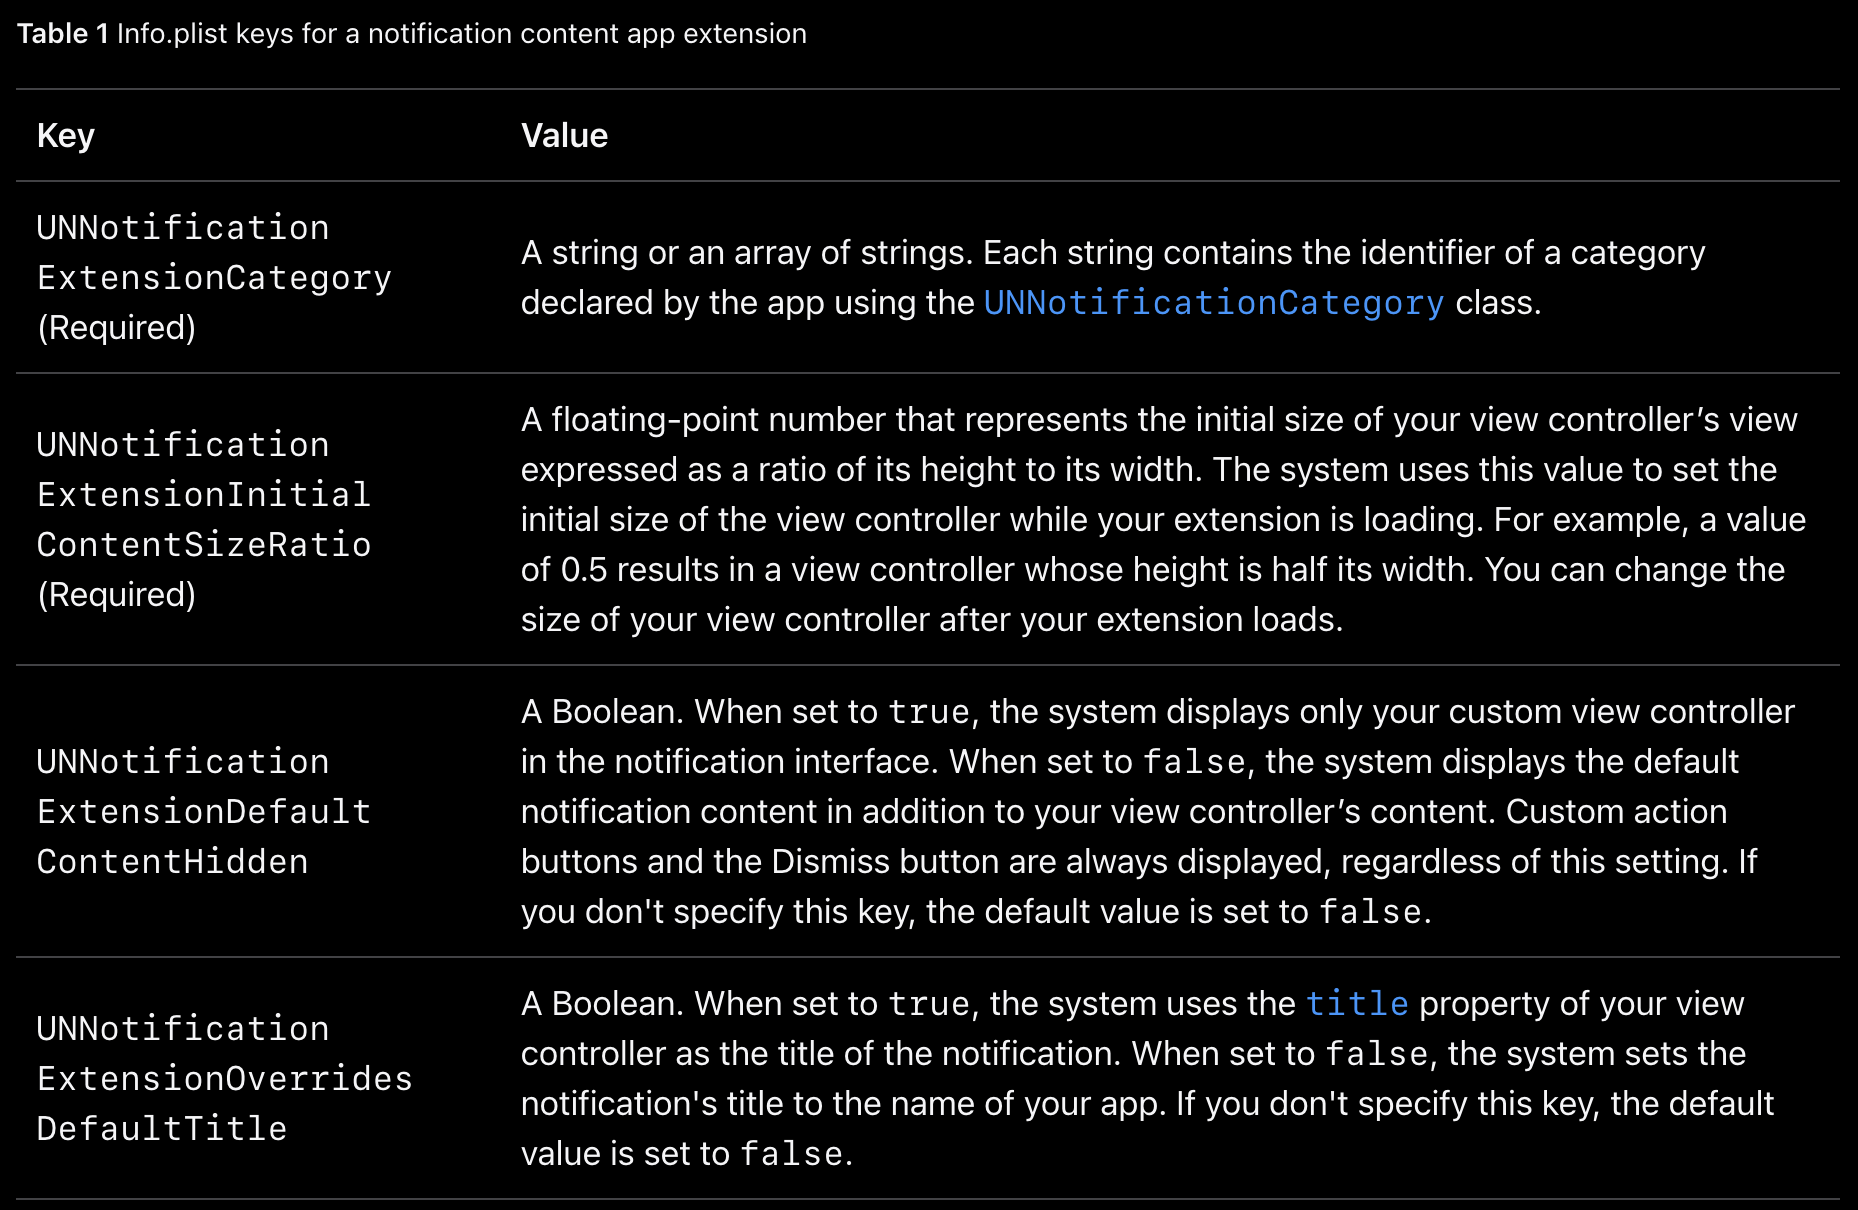
- info.plist에 적절한 key값과 value값을 넣어서 구현
- info.plist에 넣는 이유? 위에서 만들어진 NotificationViewController는 Not running 상태에서 정보를 알 수 없으므로 Not running 상태에서 바로 설정할 수 있도록 info.plist에 특정 값들을 사용

- info.plist 파일은 기존 앱 타겟의 info.plist가 아니고 Notification Content Extension을 만들면서 생성된 값이며, NSExtension 값이 자동으로 생성되어 있으므로 바로 추가해서 사용

- 위 info.pllist에서 category 값, "myNotificationCategory" 값이 핵심
- 푸시를 보내는 payload에 "category" 키와 값은 위에 있는 값을 포함하여 푸시를 보내야 Notification Content Extension 부분이 동작
- cf) "mutable-content": 1 값은 Notification Service Extension 실행임을 구분
{
   "aps" : {
      "mutable-content": 1,
      "category": "myNotificationCategory",
      "alert" : {
         "title" : "iOS 앱 개발 알아가기",
         "subtitle" : "jake 서브 타이틀",
         "body" : "바디"
      },
      "sound":"default"
   },
   "image": "https://images.unsplash.com/photo-1591154669695-5f2a8d20c089?ixlib=rb-4.0.3&ixid=MnwxMjA3fDB8MHxzZWFyY2h8M3x8dXJsfGVufDB8fDB8fA%3D%3D&auto=format&fit=crop&w=2000&q=60"
}- 실행하여 Notification Content Extension이 적용되는지 확인
- NotificationViewController.swift에 적용된 UI가 Attachment 부분에 적용된 것을 확인

NotificationViewController를 수정하여 커스텀 UI 구현
- vertical stackView에 label 2개가 있는 상태

(완성)

번외) 커스텀 액션 버튼 넣는 방법

- AppDelegate에서 UNUserNotificationCenter.current()로 권한 요청을 하기 전에 setNotificationCategories를 통해서 버튼을 등록
- 버튼의 id, title을 넣어서 인스턴스 생성
let center = UNUserNotificationCenter.current()

...

let doneAction = UNNotificationAction(identifier: "action.done", title: "Done")
let cancelAction = UNNotificationAction(identifier: "action.cancle", title: "Cancel")
let categories = UNNotificationCategory(
    identifier: "myNotificationCategory",
    actions: [doneAction, cancelAction],
    intentIdentifiers: [],
    options: .customDismissAction
)
center.setNotificationCategories([categories])

...- 버튼 탭 이벤트 처리는 didReceive 메소드에서 처리
- response.actionIdentifier로 분기하여 어떤 버튼이 눌렸는지 판단하여 사용
- cf) 이 밖의 푸시 관련 처리 메소드들 개념은 이전 포스팅 글, 푸시 메소드들 총 정리 참고
extension AppDelegate: UNUserNotificationCenterDelegate {
    // foreground에서 시스템 푸시를 수신했을 때 해당 메소드가 호출
    func userNotificationCenter(_ center: UNUserNotificationCenter, willPresent notification: UNNotification, withCompletionHandler completionHandler: @escaping (UNNotificationPresentationOptions) -> Void) {
        completionHandler([.sound, .badge, .banner])
    }

    // foreground, background에서 시스템 푸시를 탭하거나 dismiss했을때 해당 메소드가 호출
    func userNotificationCenter(_ center: UNUserNotificationCenter, didReceive response: UNNotificationResponse, withCompletionHandler completionHandler: @escaping () -> Void) {
        print(response.actionIdentifier)
    }
}- payload
- payload에 필수로 들어가는 key값은 category값임
- category의 value 부분에 Notification Content Extension의 Info.plist에서 사용되는 동일한 값으로 설정해야, Notification Content Extension도 동작하므로 주의
{
   "aps" : {
      "mutable-content": 1,
      "category": "myNotificationCategory",
      "alert" : {
         "title" : "iOS 앱 개발 알아가기",
         "subtitle" : "jake 서브 타이틀",
         "body" : "바디"
      },
      "sound":"default"
   },
   "image": "https://images.unsplash.com/photo-1591154669695-5f2a8d20c089?ixlib=rb-4.0.3&ixid=MnwxMjA3fDB8MHxzZWFyY2h8M3x8dXJsfGVufDB8fDB8fA%3D%3D&auto=format&fit=crop&w=2000&q=60"
}
(Notification Content Extension의 Info.plist에서 사용하는 category 값)

(완료)

* 전체 코드: https://github.com/JK0369/ExPushTest
* 참고


