| 일 | 월 | 화 | 수 | 목 | 금 | 토 |
|---|---|---|---|---|---|---|
| 1 | 2 | 3 | 4 | 5 | 6 | 7 |
| 8 | 9 | 10 | 11 | 12 | 13 | 14 |
| 15 | 16 | 17 | 18 | 19 | 20 | 21 |
| 22 | 23 | 24 | 25 | 26 | 27 | 28 |
- uitableview
- rxswift
- Xcode
- swift documentation
- MVVM
- 리팩토링
- Clean Code
- uiscrollview
- combine
- scrollview
- Refactoring
- ribs
- SWIFT
- 클린 코드
- map
- Protocol
- Human interface guide
- HIG
- UICollectionView
- ios
- clean architecture
- 스위프트
- tableView
- Observable
- swiftUI
- collectionview
- UITextView
- RxCocoa
- 애니메이션
- 리펙토링
- Today
- Total
김종권의 iOS 앱 개발 알아가기
[iOS - swift] 4. Push Notification 응용 - 시스템 푸시에 이미지 넣기 (Notification Service Extension) 본문
[iOS - swift] 4. Push Notification 응용 - 시스템 푸시에 이미지 넣기 (Notification Service Extension)
jake-kim 2023. 2. 20. 22:231. Push Notification 응용 - 테스트 방법 (Pusher, APNs)
2. Push Notification 응용 - Silent Push Notification (사일런트 푸시, 푸시를 이용한 백그라운드에서 업데이트 방법)
3. Push Notification 응용 - Rich Push Notification (Notification Service Extension, 푸시 내용 변경하여 띄우기)
4. Push Notification 응용 - 시스템 푸시에 이미지 넣기 (Notification Service Extension, mutable-content) <
5. Push Notification 응용 - 푸시 커스텀 UI 구현 방법 (Notification Content Extension, category)
6. Push Notification 응용 - 푸시 앱 아이콘 부분 커스텀 방법 (메시지 앱에서의 썸네일 아이콘 푸시 구현, 카톡 푸시 썸네일, INSendMessageIntent)

푸시 구성
- Header와 기본 인터페이스로 구성
- Header는 Title, Subtitle, Body가 존재
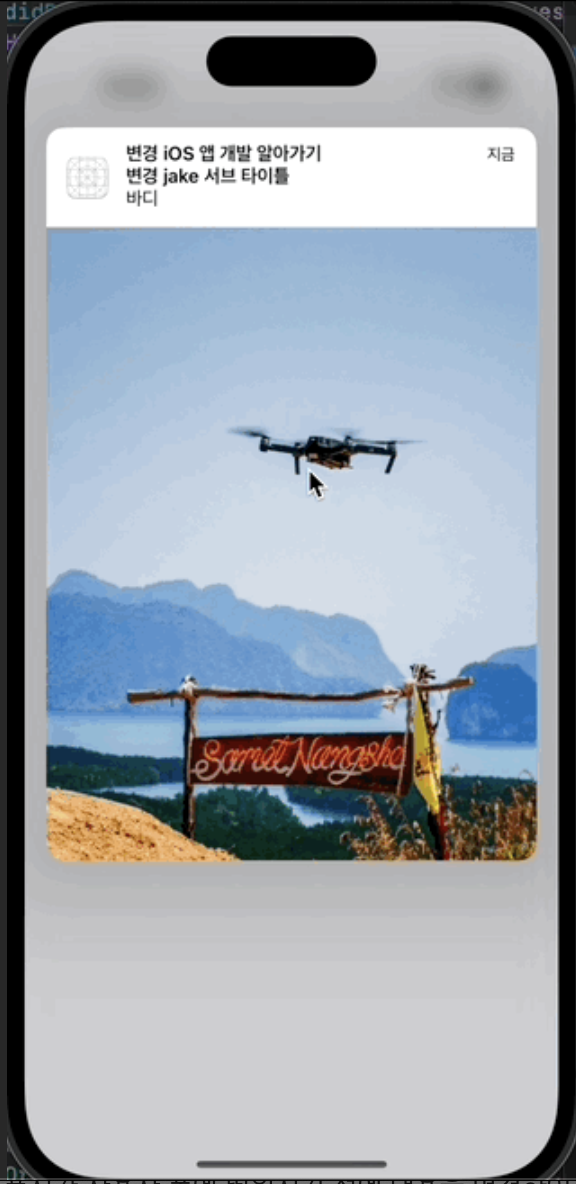
- 기본 인터페이스에는 Attachment가 존재
- 사진을 넣는것은 Attachment 부분
- Attachment 부분의 사진을 넣는 것은 Notification Service Extension 사용
- Attachment 부분의 커스텀 UI 방법은 Notification Content Extension 사용
(푸시를 확장하지 않은 경우)

(푸시를 위에서 아래로 드래그하여 확장한 경우)

(iOS 13은 Attachment > Title 순이고 iOS 15부터는 위 그림과 같은 Title > Attachment 순임을 주의)
Notification Service Extension 개념
- 푸시의 페이로드는 4KB로 제한되기 때문에 이미지를 바로 앱에 전달하지 않고 url을 전달하며, 앱에서 다운받아서 직접 표출하도록 구현
- APNs를 가로채어 시스템 푸시가 사용자 폰에 띄워지기 전에 내용을 변경하여 띄울 수 있는데, 이 방법을 사용하여 시스템 푸시 화면에 이미지 넣기가 가능
- Notification Service Extension 개념은 이전 포스팅 글 참고
푸시 테스트 환경 준비
- 이전 포스팅 글을 참고하여 푸시 테스트 환경 준비
- apple developer에서 keys 생성
- provisioning profile 생성
- Xcode push notification 활성화 (background modes, push notifications)
- Pusher로 테스트
시스템 푸시에 이미지 넣는 방법
- 시스템 푸시에 이미지를 넣기 위해서 Notification Service Extension를 추가
- didReceive에서 push notification에서 넘어온 이미지 url을 사용
- 이미지 url을 가지고 다운받은 후 그 값을 UNMutableNotificationContent 인스턴스에 세팅하고 handler 호출하면 완료
- 주의할점) url을 바로 handler로 호출하면 안되고, 다운로드 받아서 그 경로의 url을 세팅하는 것
(NotificationService 파일 - 이전 포스팅 글 참고)
// NotificationService.swift

override func didReceive(_ request: UNNotificationRequest, withContentHandler contentHandler: @escaping (UNNotificationContent) -> Void) {

    self.contentHandler = contentHandler
    bestAttemptContent = (request.content.mutableCopy() as? UNMutableNotificationContent)

    guard let bestAttemptContent else { return }

    contentHandler(bestAttemptContent)
}
UNMutableNotificationContent 이란?
- 푸시에 관한 정보를 가지고 있는 클래스
- 이 인스턴스를 만든 후 attachments에 로컬 이미지 파일 url을 넣으면 완료
open class UNMutableNotificationContent : UNNotificationContent {
    open var attachments: [UNNotificationAttachment]
    @NSCopying open var badge: NSNumber?
    open var body: String
    open var categoryIdentifier: String
    open var launchImageName: String
    @NSCopying open var sound: UNNotificationSound?

    open var subtitle: String
    open var threadIdentifier: String
    open var title: String
    open var userInfo: [AnyHashable : Any]

    open var summaryArgument: String
    open var summaryArgumentCount: Int
    open var targetContentIdentifier: String? // default nil
    open var interruptionLevel: UNNotificationInterruptionLevel
    open var relevanceScore: Double
    open var filterCriteria: String? // default nil
}- UNNotificationAttachment는 로컬 이미지 데이터가 들어갈 클래스
open class UNNotificationAttachment : NSObject, NSCopying, NSSecureCoding {
    // The identifier of this attachment
    open var identifier: String { get }

    // The URL to the attachment's data. If you have obtained this attachment from UNUserNotificationCenter then the URL will be security-scoped.
    open var url: URL { get }

    // The UTI of the attachment.
    open var type: String { get }

    // Creates an attachment for the data at URL with an optional options dictionary. URL must be a file URL. Returns nil if the data at URL is not supported.
    public convenience init(identifier: String, url URL: URL, options: [AnyHashable : Any]? = nil) throws
}
이미지 띄우기
- 푸시 페이로드 준비
- 주의) Notification Service Extension을 실행하기 위해 "mutable-content": 1 넣기
- 이미지 url은 저작권 없는 unsplash 에서 획득
{
   "aps" : {
      "mutable-content": 1,
      "alert" : {
         "title" : "iOS 앱 개발 알아가기",
         "subtitle" : "jake 서브 타이틀",
         "body" : "바디"
      },
      "sound":"default"
   },
   "image": "https://images.unsplash.com/photo-1591154669695-5f2a8d20c089?ixlib=rb-4.0.3&ixid=MnwxMjA3fDB8MHxzZWFyY2h8M3x8dXJsfGVufDB8fDB8fA%3D%3D&auto=format&fit=crop&w=2000&q=60"
}- NotificationService 파일의 didReceive에 기본적인 코드 준비
override func didReceive(_ request: UNNotificationRequest, withContentHandler contentHandler: @escaping (UNNotificationContent) -> Void) {

    self.contentHandler = contentHandler
    bestAttemptContent = (request.content.mutableCopy() as? UNMutableNotificationContent)

    guard let bestAttemptContent else { return }

    bestAttemptContent.title = "변경 " + request.content.title
    bestAttemptContent.subtitle = "변경 " + request.content.subtitle

    // TODO: 여기에 이미지 추가하는 코드 반영
}- 단계
- 1) 페이로드 중 "image"는 request.content.userInfo에서 이미지 url획득
- 2) 이미지를 다운받은 후 fileManager를 통해 디스크에 이미지 저장
- 3) 디스크에 이미지 저장된 url을 가지고 UNNotificationAttachment 인스턴스를 만든 후 attachments에 추가
1) 페이로드 중 "image"는 request.content.userInfo에서 이미지 url획득
let imageURLString = request.content.userInfo["image"] as! String2) 이미지를 다운받은 후 fileManager를 통해 디스크에 이미지 저장
try saveFile(id: "myImage.png", imageURLString: imageURLString) { fileURL in
    // TODO
}

private func saveFile(id: String, imageURLString: String, completion: (_ fileURL: URL) -> Void) throws {
    let fileManager = FileManager.default
    let documentDirectory = try fileManager.url(for: .documentDirectory, in: .userDomainMask, appropriateFor: nil, create: false)
    let fileURL = documentDirectory.appendingPathComponent(id)

    guard
        let imageURL = URL(string: imageURLString),
        let data = try? Data(contentsOf: imageURL)
    else { throw URLError(.cannotDecodeContentData) }
    try data.write(to: fileURL)
    completion(fileURL)
}
3) 디스크에 이미지 저장된 url을 가지고 UNNotificationAttachment 인스턴스를 만든 후 attachments에 추가
do {
    // 이미지 타입으로 저장하지 않으면 error나므로 주의 (.png, .jpg 등으로 할 것)
    try saveFile(id: "myImage.png", imageURLString: imageURLString) { fileURL in
        do {
            print(fileURL.absoluteURL)
            let attachment = try UNNotificationAttachment(identifier: "", url: fileURL, options: nil)
            bestAttemptContent.attachments = [attachment]
            contentHandler(bestAttemptContent)
        } catch {
            print(error)
        }
    }
} catch {
    print(error)
}
(관련 전체 코드)
// 푸시에 이미지 추가
let imageURLString = request.content.userInfo["image"] as! String
do {
    // 이미지 타입으로 저장하지 않으면 error나므로 주의 (.png, .jpg 등으로 할 것)
    try saveFile(id: "myImage.png", imageURLString: imageURLString) { fileURL in
        do {
            print(fileURL.absoluteURL)
            let attachment = try UNNotificationAttachment(identifier: "", url: fileURL, options: nil)
            bestAttemptContent.attachments = [attachment]
            contentHandler(bestAttemptContent)
        } catch {
            print(error)
        }
    }
} catch {
    print(error)
}
테스트
- 이전에도 알아보았듯이 NotificationServiceExtension는 별도의 타겟이므로 실행할 때 scheme을NotificationServiceExtension로 설정한 후 실행해야 NotificationService.swift 파일 디버깅이 가능
- 만약 scheme이 NotificationServiceExtension가 아니면 print(), fatalError()가 일어나도 아무런 로깅이 되지 않고 크래시도 나지 않음

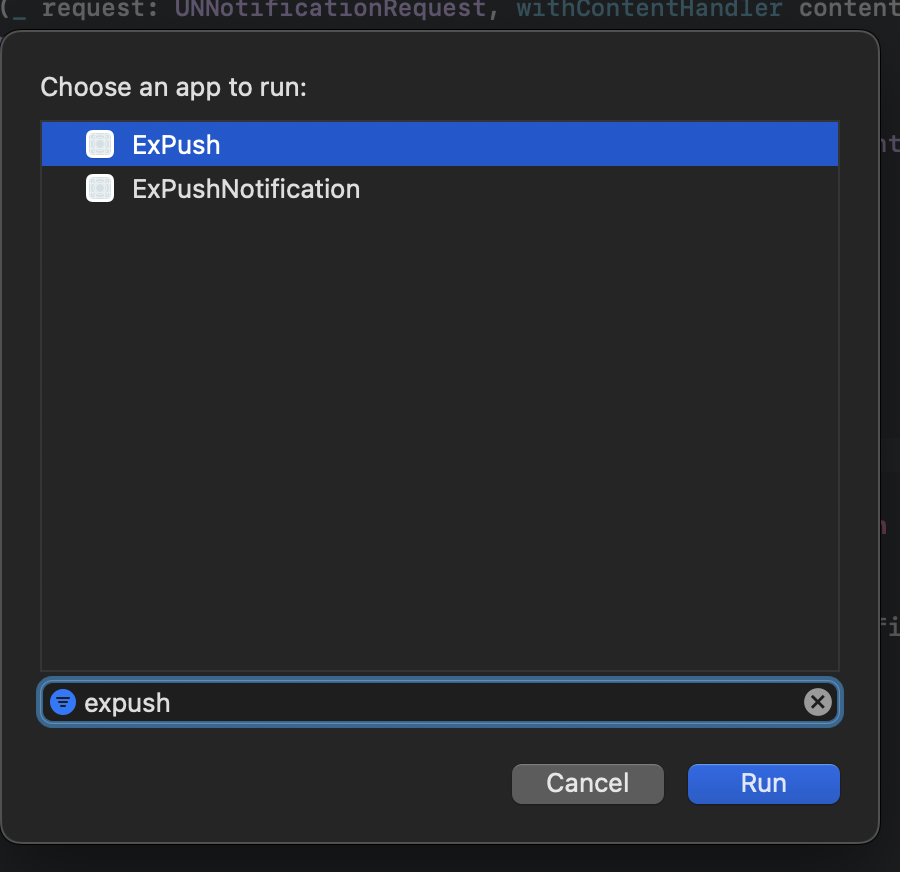
- cmd + R하면 run할 앱을 선택하라고 하는데, 이때 본 앱 'ExPush' 선택

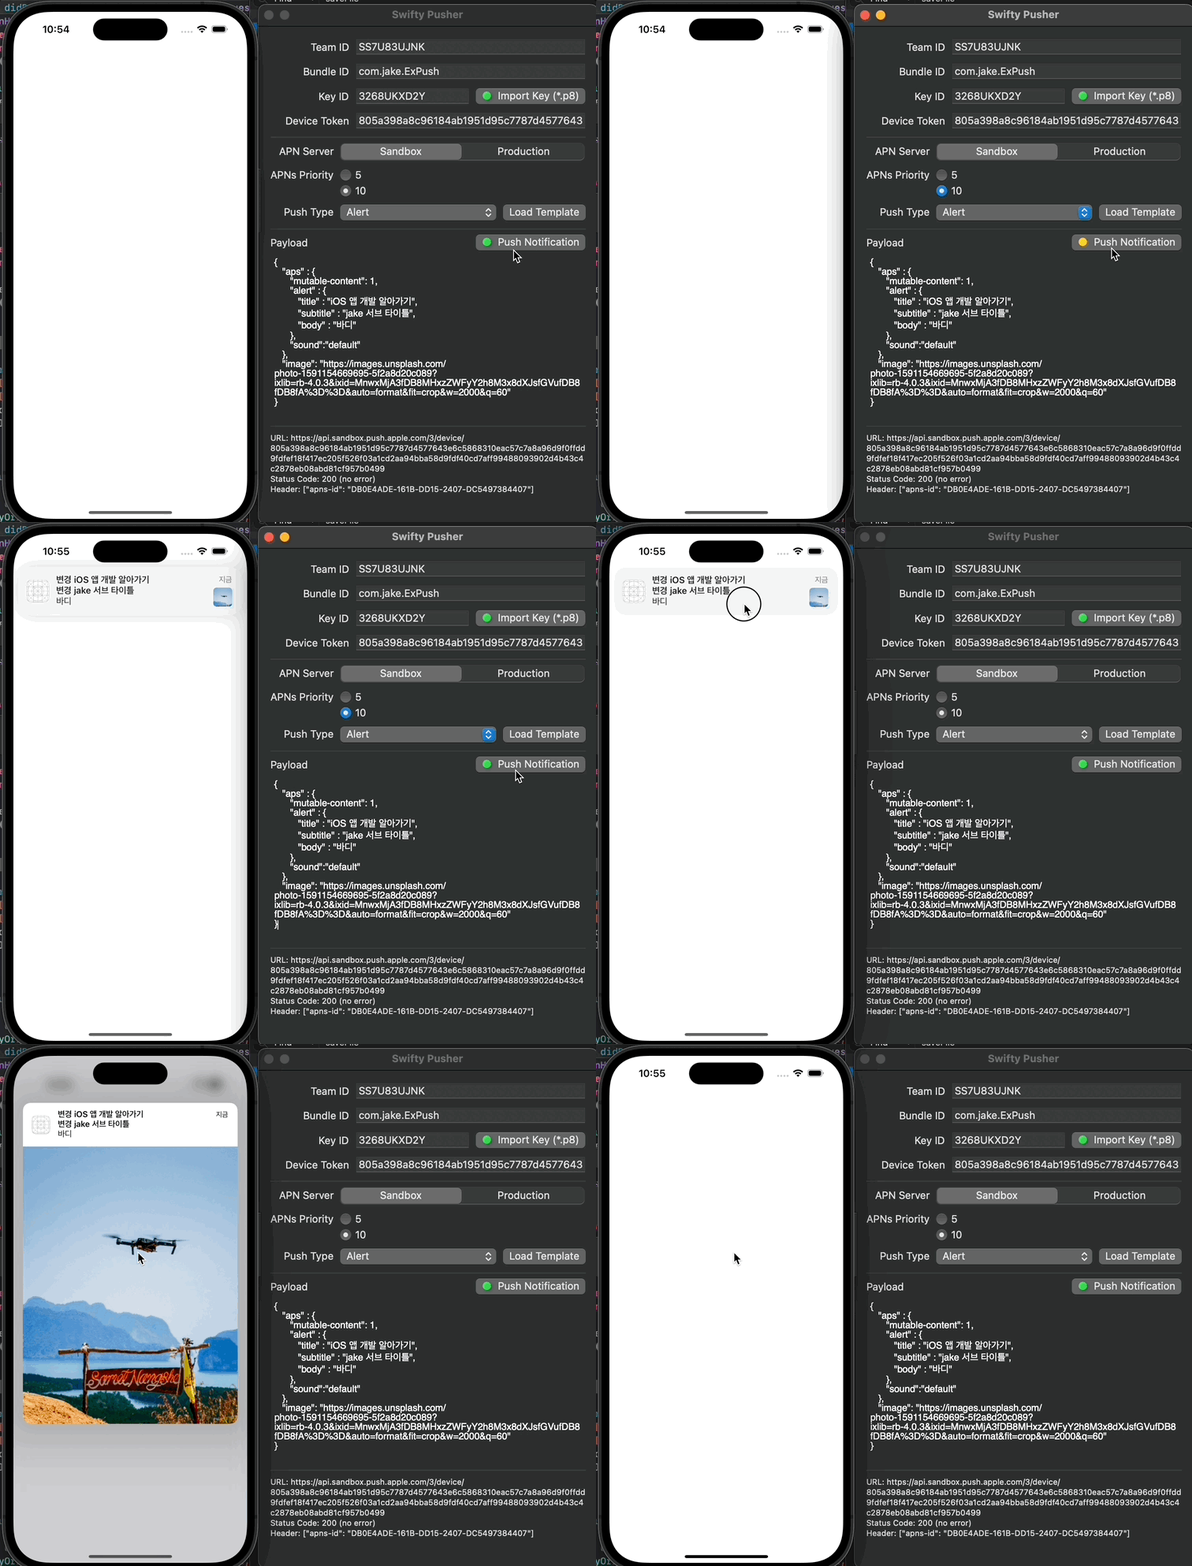
- Pusher를 통해 테스트
- pusher 관련 테스트 방법은 이전 포스팅 글을 참고

* 전체 코드: https://github.com/JK0369/ExPushTest
* 참고
https://developer.apple.com/documentation/usernotifications/unnotificationserviceextension


